Canon MultiPASS MP390 MultiPASS MP390 Software Guide - Page 60
Setting for slow-drying paper (Custom Settings)
 |
View all Canon MultiPASS MP390 manuals
Add to My Manuals
Save this manual to your list of manuals |
Page 60 highlights
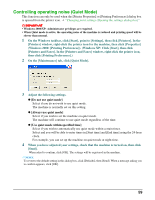
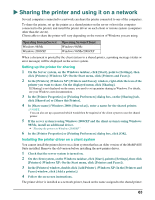
Setting for slow-drying paper (Custom Settings) This function can only be used when the [Printer Properties] or [Printing Preferences] dialog box is opened from the printer icon. J "Changing print settings (Opening the settings dialog box)" 1 On the Windows taskbar, click [Start], point to [Settings], then click [Printers]. In the [Printers] window, right-click the printer icon for the machine, then click [Properties] (Windows 2000: [Printing Preferences]). (Windows XP: Click [Start], then click [Printers and Faxes]. In the [Printers and Faxes] window, right-click the printer icon, then click [Printing Preferences].) 2 On the [Maintenance] tab, click [Custom Settings]. 3 Adjust the [Ink Drying Wait Time] settings. If you are printing on paper that takes a long time for the ink to dry, or if you are printing at a high density, use the slider to adjust the time to print. The further the slider is moved to the right, the more the machine will rest and rubbing of the print head against the paper will diminish. The further the slider is moved to the left, the less the machine will rest and printing speed will be faster. 4 When you have adjusted your settings, check that the machine is turned on, then click [Send]. When asked to confirm, click [OK]. Your settings will be registered in the machine. NOTE To revert to the default setting in this dialog box, click [Defaults], then [Send]. When a message asking you to confirm appears, click [OK]. 58
-
 1
1 -
2
-
3
-
4
-
5
-
6
-
7
-
8
-
9
-
10
-
11
-
12
-
13
-
14
-
15
-
16
-
17
-
18
-
19
-
20
-
21
-
22
-
23
-
24
-
25
-
26
-
27
-
28
-
29
-
30
-
31
-
32
-
33
-
34
-
35
-
36
-
37
-
38
-
39
-
40
-
41
-
42
-
43
-
44
-
45
-
46
-
47
-
48
-
49
-
50
-
51
-
52
-
53
-
54
-
 55
55 -
 56
56 -
 57
57 -
 58
58 -
 59
59 -
 60
60 -
 61
61 -
 62
62 -
 63
63 -
 64
64 -
 65
65 -
66
-
67
-
68
-
69
-
70
-
71
-
72
-
73
-
74
-
75
-
76
-
77
-
78
-
79
-
80
-
81
-
82
-
83
-
84
-
85
-
86
-
87
-
88
-
89
-
90
-
91
-
92
-
93
-
94
-
95
-
96
-
97
-
98
-
99
-
100
-
101
-
102
-
103
-
104
-
105
-
106
-
107
-
108
-
109
-
110
-
111
-
112
-
113
-
114
-
115
-
116
-
117
-
118
-
119
-
120
-
121
-
122
-
123
-
124
-
125
-
126
-
127
-
128
-
129
-
130
-
131
-
132
-
133
-
134
-
135
-
136
-
137
-
138
 |
 |
