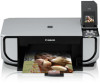
Canon PIXMA MP520 MP520 series Quick Start Guide - Page 22
Loading Envelopes, Loading Envelopes in the Rear Tray - printer drivers
 |
View all Canon PIXMA MP520 manuals
Add to My Manuals
Save this manual to your list of manuals |
Page 22 highlights
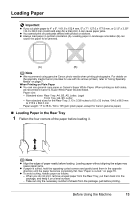
Loading Envelopes Use either European DL or US Comm. Env. #10-sized envelope. Important z You need to print from the computer to print on envelopes. z Do not use the following envelopes: - Envelopes with double flaps (or sticker flaps) - Envelopes with an embossed or treated surface - Envelopes with pressure stickers - Envelopes whose gummed flaps are already moistened and adhesive z Select DL Env. or Comm. Env. #10 in the printer driver according to the envelope size you are using. If you do not, the address will be printed in the wrong direction. z In Windows®, print guidance will be displayed when envelopes are printed. To prevent display of print guidance, refer to "Printing Envelopes" in the PC Printing Guide on-screen manual. „ Loading Envelopes in the Rear Tray 1 Prepare the envelopes. z Press down on all four corners and edges of the envelopes to flatten them. z If the envelopes are curled, hold the opposite corners and gently twist them in the opposite direction. z If the flap of an envelope is curled, flatten it. z If the leading edge of an envelope is puffed up or curled, use a pen to press the envelope flat and sharpen the crease. Press the envelope flat, working from the middle to the edge. * The above illustrations show a side view of the leading edge of the envelope. Important z The envelopes may jam in the machine if they are not flat or the edges are not aligned. z Make sure that no curl or puff exceeds 0.1 inches / 3 mm. 18 Before Using the Machine
-
 1
1 -
2
-
3
-
4
-
5
-
6
-
7
-
8
-
9
-
10
-
11
-
12
-
13
-
14
-
15
-
16
-
 17
17 -
 18
18 -
 19
19 -
 20
20 -
 21
21 -
 22
22 -
 23
23 -
 24
24 -
 25
25 -
 26
26 -
 27
27 -
28
-
29
-
30
-
31
-
32
-
33
-
34
-
35
-
36
-
37
-
38
-
39
-
40
-
41
-
42
-
43
-
44
-
45
-
46
-
47
-
48
-
49
-
50
-
51
-
52
-
53
-
54
-
55
-
56
-
57
-
58
-
59
-
60
-
61
-
62
-
63
-
64
-
65
-
66
-
67
-
68
-
69
-
70
-
71
-
72
-
73
-
74
-
75
-
76
-
77
-
78
-
79
-
80
-
81
-
82
-
83
-
84
-
85
-
86
-
87
-
88
-
89
-
90
-
91
-
92
-
93
-
94
-
95
-
96
-
97
-
98
-
99
-
100
-
101
-
102
-
103
-
104
-
105
-
106
-
107
-
108
 |
 |
