Canon PIXMA iP5000 iP5000 Quick Start Guide - Page 82
User's Guide, Easy Setup Instructions - mac driver
 |
View all Canon PIXMA iP5000 manuals
Add to My Manuals
Save this manual to your list of manuals |
Page 82 highlights
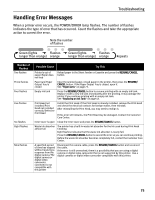
Troubleshooting Problem Writing Error/ Output Error/ Communication Error Cannot print with Automatic Duplex Printing Possible Cause Printer port error Try This Verify the printer port status. 1. Click Start, right-click My Computer and select Properties. When using versions of Windows other than Windows XP, right-click My Computer on the desktop and select Properties. 2. Click the Hardware tab and click Device Manager. Double-click Universal Serial Bus controllers, and USB Printing Support. When using Windows Me or Windows 98, click the Device Manager tab. Double-click Universal Serial Bus controllers, and double-click the name of your printer. 3. Check whether the General tab shows any unusual condition. Size of loaded Ensure that the size of loaded paper is suitable for Automatic Duplex Printing. paper is incorrect Incorrect paper size is selected Check the Paper Size setting from within your application to ensure that it matches the size of the paper loaded. Check Paper Size on the Page Setup tab in the printer properties dialog box (Windows) or the Page Setup dialog box (Macintosh) to ensure that it matches the size of the paper loaded. For the paper size compatible with Automatic Duplex Printing, refer to "Automatically Printing on Both Sides of the Page" on the User's Guide. To print on both sides of the page manually, follow the procedure below. On the Page Setup tab, clear the Automatic check box. Then try printing again. "Error No.: 300" * "Error No.: 1700"* "Error No.: 1851"* When using Mac OS 9, click Options in the Print dialog box, and then clear the Automatic check box. Then try printing again. Mac OS X does not support the manual duplex printing. Printer is not ready Ensure that the POWER lamp lights green. If the POWER lamp is off, turn the printer on. The POWER lamp will flash green when the printer is initializing. Wait until the POWER lamp stops flashing. When the POWER lamp is flashing orange, an error may occur in the printer. For details on how to resolve the error, refer to "Handling Error Messages" on page 75. Printer is not properly connected Ensure that the printer is securely connected to the computer. z If using a switching hub or other device, disconnect the printer and reconnect it directly to the computer and try printing again. If successful, the problem may have been with the device. z There could also be a problem with the cable(s). Replace the cable(s) and try printing again. Specified printer name is not on the print list under Printer Setup Utility (Print Center) 1. Select Application from the Go menu. 2. Double-click Printer Setup Utility in the Utility folder. When using Mac OS X v.10.2, double-click the Print Center icon. 3. Ensure that the name of your printer is indicated in the printer list. If the name of your printer does not appear in the printer list, carefully follow the procedures described in the Easy Setup Instructions and reinstall the driver. Waste ink absorber almost full The printer has a built-in waste ink absorber to hold the ink used during print head cleaning. Eight flashes indicates that this absorber is nearly full. Press the RESUME/CANCEL button to clear the error so you can continue printing. Before the waste ink absorber becomes completely full, contact the Customer Care Center. Inner Cover is open Close the Inner Cover, then press the RESUME/CANCEL button. when printing starts 78
-
 1
1 -
2
-
3
-
4
-
5
-
6
-
7
-
8
-
9
-
10
-
11
-
12
-
13
-
14
-
15
-
16
-
17
-
18
-
19
-
20
-
21
-
22
-
23
-
24
-
25
-
26
-
27
-
28
-
29
-
30
-
31
-
32
-
33
-
34
-
35
-
36
-
37
-
38
-
39
-
40
-
41
-
42
-
43
-
44
-
45
-
46
-
47
-
48
-
49
-
50
-
51
-
52
-
53
-
54
-
55
-
56
-
57
-
58
-
59
-
60
-
61
-
62
-
63
-
64
-
65
-
66
-
67
-
68
-
69
-
70
-
71
-
72
-
73
-
74
-
75
-
76
-
 77
77 -
 78
78 -
 79
79 -
 80
80 -
 81
81 -
 82
82 -
 83
83 -
 84
84 -
 85
85 -
 86
86 -
 87
87 -
88
-
89
-
90
-
91
-
92
-
93
-
94
-
95
-
96
-
97
-
98
-
99
-
100
 |
 |