Canon PowerShot ELPH 500 HS PowerShot ELPH 500 HS / IXUS 310 HS Camera User Gu - Page 72
Changing the Color and Shooting
 |
View all Canon PowerShot ELPH 500 HS manuals
Add to My Manuals
Save this manual to your list of manuals |
Page 72 highlights
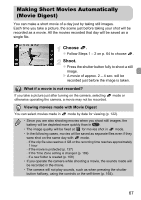
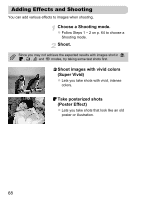
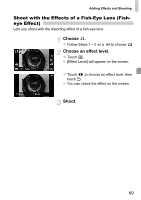
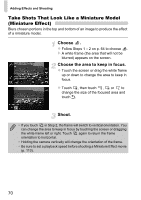
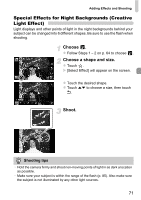
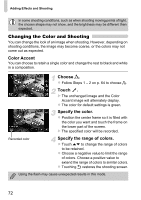
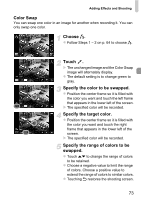
Adding Effects and Shooting In some shooting conditions, such as when shooting moving points of light, the chosen shape may not show, and the brightness may be different than expected. Changing the Color and Shooting You can change the look of an image when shooting. However, depending on shooting conditions, the image may become coarse, or the colors may not come out as expected. Color Accent You can choose to retain a single color and change the rest to black and white in a composition. Choose T. z Follow Steps 1 - 2 on p. 64 to choose T. Touch . X The unchanged image and the Color Accent image will alternately display. z The color for default settings is green. Specify the color. z Position the center frame so it is filled with the color you want and touch the frame on the lower part of the screen. X The specified color will be recorded. Recorded color Specify the range of colors. z Touch op to change the range of colors to be retained. z Choose a negative value to limit the range of colors. Choose a positive value to extend the range of colors to similar colors. z Touching Ú restores the shooting screen. Using the flash may cause unexpected results in this mode. 72
-
 1
1 -
2
-
3
-
4
-
5
-
6
-
7
-
8
-
9
-
10
-
11
-
12
-
13
-
14
-
15
-
16
-
17
-
18
-
19
-
20
-
21
-
22
-
23
-
24
-
25
-
26
-
27
-
28
-
29
-
30
-
31
-
32
-
33
-
34
-
35
-
36
-
37
-
38
-
39
-
40
-
41
-
42
-
43
-
44
-
45
-
46
-
47
-
48
-
49
-
50
-
51
-
52
-
53
-
54
-
55
-
56
-
57
-
58
-
59
-
60
-
61
-
62
-
63
-
64
-
65
-
66
-
 67
67 -
 68
68 -
 69
69 -
 70
70 -
 71
71 -
 72
72 -
 73
73 -
 74
74 -
 75
75 -
 76
76 -
 77
77 -
78
-
79
-
80
-
81
-
82
-
83
-
84
-
85
-
86
-
87
-
88
-
89
-
90
-
91
-
92
-
93
-
94
-
95
-
96
-
97
-
98
-
99
-
100
-
101
-
102
-
103
-
104
-
105
-
106
-
107
-
108
-
109
-
110
-
111
-
112
-
113
-
114
-
115
-
116
-
117
-
118
-
119
-
120
-
121
-
122
-
123
-
124
-
125
-
126
-
127
-
128
-
129
-
130
-
131
-
132
-
133
-
134
-
135
-
136
-
137
-
138
-
139
-
140
-
141
-
142
-
143
-
144
-
145
-
146
-
147
-
148
-
149
-
150
-
151
-
152
-
153
-
154
-
155
-
156
-
157
-
158
-
159
-
160
-
161
-
162
-
163
-
164
-
165
-
166
-
167
-
168
-
169
-
170
-
171
-
172
-
173
-
174
-
175
-
176
-
177
-
178
-
179
-
180
-
181
-
182
-
183
-
184
-
185
-
186
-
187
-
188
-
189
-
190
-
191
-
192
-
193
-
194
-
195
-
196
-
197
-
198
-
199
-
200
-
201
-
202
-
203
-
204
-
205
-
206
-
207
-
208
-
209
-
210
-
211
-
212
 |
 |
