Canon PowerShot G11 PowerShot G11 Camera User Guide - Page 128
Viewing Images on a TV
 |
View all Canon PowerShot G11 manuals
Add to My Manuals
Save this manual to your list of manuals |
Page 128 highlights
Viewing Images on a TV Using the supplied AV cable, you can connect the camera to a TV to view images you have shot. Items to Prepare • Camera and TV • AV cable supplied with the camera (p. 2) Turn off the camera and TV. White or Black Yellow Yellow Black Connect the camera to the TV. ● Open the camera's terminal cover and fully insert the plug of the cable into the camera's terminal. ● Insert the cable plug fully into the video input terminals as shown in the illustration. Turn on the TV and switch it to the input to which the cable is connected. Turn on the camera. ● Press the 1 button to turn on the camera. X The image will appear on the TV (nothing will appear on the monitor of the camera). ● After you finish viewing, turn off the camera and TV, and unplug the cable. What if the images don't properly display on the TV? Images will not display correctly if the camera's video output setting (NTSC/PAL) does not match the TV system. Press the n button, choose the 3 tab and [Video System] to switch to the correct video system. 128
-
 1
1 -
2
-
3
-
4
-
5
-
6
-
7
-
8
-
9
-
10
-
11
-
12
-
13
-
14
-
15
-
16
-
17
-
18
-
19
-
20
-
21
-
22
-
23
-
24
-
25
-
26
-
27
-
28
-
29
-
30
-
31
-
32
-
33
-
34
-
35
-
36
-
37
-
38
-
39
-
40
-
41
-
42
-
43
-
44
-
45
-
46
-
47
-
48
-
49
-
50
-
51
-
52
-
53
-
54
-
55
-
56
-
57
-
58
-
59
-
60
-
61
-
62
-
63
-
64
-
65
-
66
-
67
-
68
-
69
-
70
-
71
-
72
-
73
-
74
-
75
-
76
-
77
-
78
-
79
-
80
-
81
-
82
-
83
-
84
-
85
-
86
-
87
-
88
-
89
-
90
-
91
-
92
-
93
-
94
-
95
-
96
-
97
-
98
-
99
-
100
-
101
-
102
-
103
-
104
-
105
-
106
-
107
-
108
-
109
-
110
-
111
-
112
-
113
-
114
-
115
-
116
-
117
-
118
-
119
-
120
-
121
-
122
-
 123
123 -
 124
124 -
 125
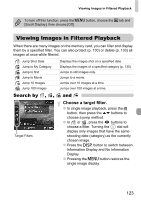
125 -
 126
126 -
 127
127 -
 128
128 -
 129
129 -
 130
130 -
 131
131 -
 132
132 -
 133
133 -
134
-
135
-
136
-
137
-
138
-
139
-
140
-
141
-
142
-
143
-
144
-
145
-
146
-
147
-
148
-
149
-
150
-
151
-
152
-
153
-
154
-
155
-
156
-
157
-
158
-
159
-
160
-
161
-
162
-
163
-
164
-
165
-
166
-
167
-
168
-
169
-
170
-
171
-
172
-
173
-
174
-
175
-
176
-
177
-
178
-
179
-
180
-
181
-
182
-
183
-
184
-
185
-
186
-
187
-
188
-
189
-
190
-
191
-
192
-
193
-
194
-
195
-
196
 |
 |
