Canon PowerShot SX30 IS PowerShot SX30 IS Camera User Guide - Page 70
Take Shots That Look Like a Miniature, Model Miniature Effect
 |
View all Canon PowerShot SX30 IS manuals
Add to My Manuals
Save this manual to your list of manuals |
Page 70 highlights
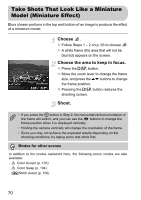
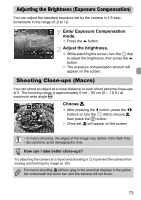
Take Shots That Look Like a Miniature Model (Miniature Effect) Blurs chosen portions in the top and bottom of an image to produce the effect of a miniature model. Choose . ● Follow Steps 1 - 2 on p. 63 to choose . X A white frame (the area that will not be blurred) appears on the screen. Choose the area to keep in focus. ● Press the l button. ● Move the zoom lever to change the frame size, and press the op buttons to change the frame position. ● Pressing the l button restores the shooting screen. Shoot. • If you press the m button in Step 2, the horizontal/vertical orientation of the frame will switch, and you can use the qr buttons to change the frame position when it is displayed vertically. • Holding the camera vertically will change the orientation of the frame. • Since you may not achieve the expected results depending on the shooting conditions, try taking some test shots first. Modes for other scenes In addition to the modes explained here, the following scene modes are also available: • T Color Accent (p. 103) • Y Color Swap (p. 104) • xvStitch Assist (p. 106) 70
-
 1
1 -
2
-
3
-
4
-
5
-
6
-
7
-
8
-
9
-
10
-
11
-
12
-
13
-
14
-
15
-
16
-
17
-
18
-
19
-
20
-
21
-
22
-
23
-
24
-
25
-
26
-
27
-
28
-
29
-
30
-
31
-
32
-
33
-
34
-
35
-
36
-
37
-
38
-
39
-
40
-
41
-
42
-
43
-
44
-
45
-
46
-
47
-
48
-
49
-
50
-
51
-
52
-
53
-
54
-
55
-
56
-
57
-
58
-
59
-
60
-
61
-
62
-
63
-
64
-
 65
65 -
 66
66 -
 67
67 -
 68
68 -
 69
69 -
 70
70 -
 71
71 -
 72
72 -
 73
73 -
 74
74 -
 75
75 -
76
-
77
-
78
-
79
-
80
-
81
-
82
-
83
-
84
-
85
-
86
-
87
-
88
-
89
-
90
-
91
-
92
-
93
-
94
-
95
-
96
-
97
-
98
-
99
-
100
-
101
-
102
-
103
-
104
-
105
-
106
-
107
-
108
-
109
-
110
-
111
-
112
-
113
-
114
-
115
-
116
-
117
-
118
-
119
-
120
-
121
-
122
-
123
-
124
-
125
-
126
-
127
-
128
-
129
-
130
-
131
-
132
-
133
-
134
-
135
-
136
-
137
-
138
-
139
-
140
-
141
-
142
-
143
-
144
-
145
-
146
-
147
-
148
-
149
-
150
-
151
-
152
-
153
-
154
-
155
-
156
-
157
-
158
-
159
-
160
-
161
-
162
-
163
-
164
-
165
-
166
-
167
-
168
-
169
-
170
-
171
-
172
-
173
-
174
-
175
-
176
-
177
-
178
-
179
-
180
-
181
-
182
-
183
-
184
-
185
-
186
-
187
-
188
-
189
-
190
-
191
-
192
-
193
-
194
-
195
-
196
 |
 |
