Canon PowerShot SX30 IS PowerShot SX30 IS Camera User Guide - Page 80
Using the Self-Timer to Prevent Camera Shake
 |
View all Canon PowerShot SX30 IS manuals
Add to My Manuals
Save this manual to your list of manuals |
Page 80 highlights
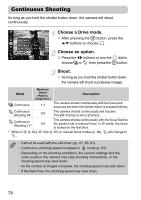
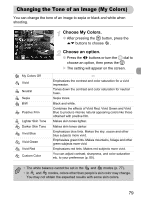
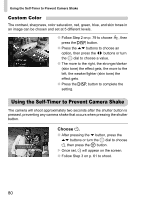
Using the Self-Timer to Prevent Camera Shake Custom Color The contrast, sharpness, color saturation, red, green, blue, and skin tones in an image can be chosen and set at 5 different levels. ● Follow Step 2 on p. 79 to choose , then press the l button. ● Press the op buttons to choose an option, then press the qr buttons or turn the  dial to choose a value. ● The more to the right, the stronger/darker (skin tone) the effect gets, the more to the left, the weaker/lighter (skin tone) the effect gets. ● Press the l button to complete the setting. Using the Self-Timer to Prevent Camera Shake The camera will shoot approximately two seconds after the shutter button is pressed, preventing any camera shake that occurs when pressing the shutter button. Choose Î. ● After pressing the p button, press the op buttons or turn the  dial to choose Î, then press the m button. X Once set, Î will appear on the screen. ● Follow Step 3 on p. 61 to shoot. 80
-
 1
1 -
2
-
3
-
4
-
5
-
6
-
7
-
8
-
9
-
10
-
11
-
12
-
13
-
14
-
15
-
16
-
17
-
18
-
19
-
20
-
21
-
22
-
23
-
24
-
25
-
26
-
27
-
28
-
29
-
30
-
31
-
32
-
33
-
34
-
35
-
36
-
37
-
38
-
39
-
40
-
41
-
42
-
43
-
44
-
45
-
46
-
47
-
48
-
49
-
50
-
51
-
52
-
53
-
54
-
55
-
56
-
57
-
58
-
59
-
60
-
61
-
62
-
63
-
64
-
65
-
66
-
67
-
68
-
69
-
70
-
71
-
72
-
73
-
74
-
 75
75 -
 76
76 -
 77
77 -
 78
78 -
 79
79 -
 80
80 -
 81
81 -
 82
82 -
 83
83 -
 84
84 -
 85
85 -
86
-
87
-
88
-
89
-
90
-
91
-
92
-
93
-
94
-
95
-
96
-
97
-
98
-
99
-
100
-
101
-
102
-
103
-
104
-
105
-
106
-
107
-
108
-
109
-
110
-
111
-
112
-
113
-
114
-
115
-
116
-
117
-
118
-
119
-
120
-
121
-
122
-
123
-
124
-
125
-
126
-
127
-
128
-
129
-
130
-
131
-
132
-
133
-
134
-
135
-
136
-
137
-
138
-
139
-
140
-
141
-
142
-
143
-
144
-
145
-
146
-
147
-
148
-
149
-
150
-
151
-
152
-
153
-
154
-
155
-
156
-
157
-
158
-
159
-
160
-
161
-
162
-
163
-
164
-
165
-
166
-
167
-
168
-
169
-
170
-
171
-
172
-
173
-
174
-
175
-
176
-
177
-
178
-
179
-
180
-
181
-
182
-
183
-
184
-
185
-
186
-
187
-
188
-
189
-
190
-
191
-
192
-
193
-
194
-
195
-
196
 |
 |
