Canon REALiS LCOS WUX6600Z WUX7000Z WUX6600Z WUX5800Z Users Manual - Page 170
Remote control channel, [INPUT A-C] button settings, Selecting the Projector Channel
 |
View all Canon REALiS LCOS WUX6600Z manuals
Add to My Manuals
Save this manual to your list of manuals |
Page 170 highlights
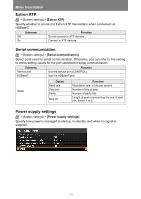
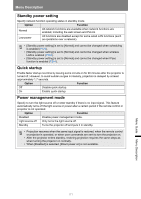
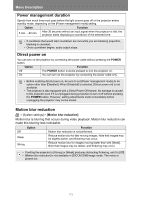
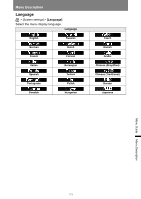
Menu Description Remote control channel Separate channels can be assigned to up to four projectors so that a single remote control can be used with each projector. Selecting the Projector Channel If a wired remote control is used, there is no need to set the remote control channel. Option Function Ch1 Ch2 Ch3 Select the remote control channel to use with this projector. Ch4 Independent Can be controlled from a remote control set to any channel. Selecting a Channel on the Remote Control After changing the projector channel from the menu, always change the remote control channel accordingly. Ch1 Hold down both the Ch button and [1] button for 3 seconds. Ch2 Hold down both the Ch button and [2] button for 3 seconds. Ch3 Hold down both the Ch button and [3] button for 3 seconds. Ch4 Hold down both the Ch button and [4] button for 3 seconds. Independent Hold down both the Ch button and [0] button for 3 seconds. [INPUT A-C] button settings Select input signals to assign to INPUT A-C buttons on the remote control. This enables direct selection of the input signals. Option INPUT A INPUT B INPUT C Function Choose from the following input signals to assign: [Disable], [HDMI], [DisplayPort], [Digital PC], [Analog PC-1], [Analog PC-2], [Component], [HDBaseT], [LAN], or [USB]. [Fn] button settings You can select a function to assign to the Fn button on the remote control. Option Function Disable Disables assigning a function to the Fn button on the remote control. Split screen Enables split-screen mode toggling using the Fn button on the remote control. Select a function to assign to the Fn button on the remote control. 168
-
 1
1 -
2
-
3
-
4
-
5
-
6
-
7
-
8
-
9
-
10
-
11
-
12
-
13
-
14
-
15
-
16
-
17
-
18
-
19
-
20
-
21
-
22
-
23
-
24
-
25
-
26
-
27
-
28
-
29
-
30
-
31
-
32
-
33
-
34
-
35
-
36
-
37
-
38
-
39
-
40
-
41
-
42
-
43
-
44
-
45
-
46
-
47
-
48
-
49
-
50
-
51
-
52
-
53
-
54
-
55
-
56
-
57
-
58
-
59
-
60
-
61
-
62
-
63
-
64
-
65
-
66
-
67
-
68
-
69
-
70
-
71
-
72
-
73
-
74
-
75
-
76
-
77
-
78
-
79
-
80
-
81
-
82
-
83
-
84
-
85
-
86
-
87
-
88
-
89
-
90
-
91
-
92
-
93
-
94
-
95
-
96
-
97
-
98
-
99
-
100
-
101
-
102
-
103
-
104
-
105
-
106
-
107
-
108
-
109
-
110
-
111
-
112
-
113
-
114
-
115
-
116
-
117
-
118
-
119
-
120
-
121
-
122
-
123
-
124
-
125
-
126
-
127
-
128
-
129
-
130
-
131
-
132
-
133
-
134
-
135
-
136
-
137
-
138
-
139
-
140
-
141
-
142
-
143
-
144
-
145
-
146
-
147
-
148
-
149
-
150
-
151
-
152
-
153
-
154
-
155
-
156
-
157
-
158
-
159
-
160
-
161
-
162
-
163
-
164
-
 165
165 -
 166
166 -
 167
167 -
 168
168 -
 169
169 -
 170
170 -
 171
171 -
 172
172 -
 173
173 -
 174
174 -
 175
175 -
176
-
177
-
178
-
179
-
180
-
181
-
182
-
183
-
184
-
185
-
186
-
187
-
188
-
189
-
190
-
191
-
192
-
193
-
194
-
195
-
196
-
197
-
198
-
199
-
200
-
201
-
202
-
203
-
204
-
205
-
206
-
207
-
208
-
209
-
210
-
211
-
212
-
213
-
214
-
215
-
216
-
217
-
218
-
219
-
220
-
221
-
222
-
223
-
224
-
225
-
226
-
227
-
228
-
229
-
230
-
231
-
232
-
233
-
234
-
235
-
236
-
237
-
238
-
239
-
240
-
241
-
242
 |
 |
