Canon VIXIA HF S21 Canon VIXIA HF S20/HF S21/HF S200 Instruction Manual - Page 135
Saving Movies onto High-Definition Discs AVCHD/Blu-ray Discs - user manual
 |
View all Canon VIXIA HF S21 manuals
Add to My Manuals
Save this manual to your list of manuals |
Page 135 highlights
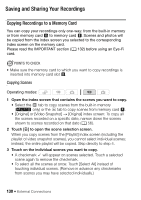
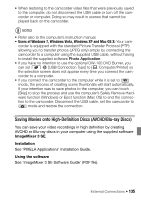
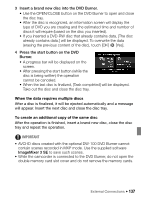
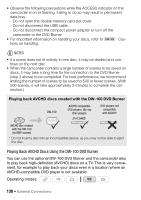
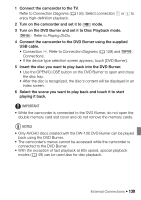
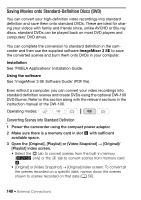
• When restoring to the camcorder video files that were previously saved to the computer, do not disconnect the USB cable or turn off the camcorder or computer. Doing so may result in scenes that cannot be played back on the camcorder. NOTES • Refer also to the computer's instruction manual. • Users of Windows 7, Windows Vista, Windows XP and Mac OS X: Your cam- corder is equipped with the standard Picture Transfer Protocol (PTP) allowing you to transfer photos (JPEG only) simply by connecting the camcorder to a computer using the supplied USB cable, without having to install the supplied software Photo Application. • If you have no intention to use the optional DW-100 DVD Burner, you can set 8 8 [USB Connection Type] to [N Computer/Printer] so the selection screen does not appear every time you connect the camcorder to a computer. • If you connect the camcorder to the computer while it is set to mode, the process of creating scene thumbnails will start automatically. If your intention was to save photos to the computer, you can touch [Skip] to stop the process and use the computer's Safely Remove Hardware function (Windows) or Eject function (Mac OS) to end the connection to the camcorder. Disconnect the USB cable, set the camcorder to mode and restore the connection. Saving Movies onto High-Definition Discs (AVCHD/Blu-ray Discs) You can save your video recordings in high definition by creating AVCHD or Blu-ray discs in your computer using the supplied software ImageMixer 3 SE. Installation See 'PIXELA Applications' Installation Guide. Using the software See 'ImageMixer 3 SE Software Guide' (PDF file). External Connections Š 135
-
 1
1 -
2
-
3
-
4
-
5
-
6
-
7
-
8
-
9
-
10
-
11
-
12
-
13
-
14
-
15
-
16
-
17
-
18
-
19
-
20
-
21
-
22
-
23
-
24
-
25
-
26
-
27
-
28
-
29
-
30
-
31
-
32
-
33
-
34
-
35
-
36
-
37
-
38
-
39
-
40
-
41
-
42
-
43
-
44
-
45
-
46
-
47
-
48
-
49
-
50
-
51
-
52
-
53
-
54
-
55
-
56
-
57
-
58
-
59
-
60
-
61
-
62
-
63
-
64
-
65
-
66
-
67
-
68
-
69
-
70
-
71
-
72
-
73
-
74
-
75
-
76
-
77
-
78
-
79
-
80
-
81
-
82
-
83
-
84
-
85
-
86
-
87
-
88
-
89
-
90
-
91
-
92
-
93
-
94
-
95
-
96
-
97
-
98
-
99
-
100
-
101
-
102
-
103
-
104
-
105
-
106
-
107
-
108
-
109
-
110
-
111
-
112
-
113
-
114
-
115
-
116
-
117
-
118
-
119
-
120
-
121
-
122
-
123
-
124
-
125
-
126
-
127
-
128
-
129
-
 130
130 -
 131
131 -
 132
132 -
 133
133 -
 134
134 -
 135
135 -
 136
136 -
 137
137 -
 138
138 -
 139
139 -
 140
140 -
141
-
142
-
143
-
144
-
145
-
146
-
147
-
148
-
149
-
150
-
151
-
152
-
153
-
154
-
155
-
156
-
157
-
158
-
159
-
160
-
161
-
162
-
163
-
164
-
165
-
166
-
167
-
168
-
169
-
170
-
171
-
172
-
173
-
174
-
175
-
176
-
177
-
178
-
179
-
180
-
181
-
182
-
183
-
184
-
185
-
186
-
187
-
188
-
189
-
190
-
191
-
192
-
193
-
194
-
195
-
196
-
197
-
198
-
199
-
200
-
201
-
202
-
203
-
204
-
205
-
206
-
207
-
208
-
209
-
210
-
211
-
212
-
213
-
214
-
215
-
216
-
217
-
218
-
219
 |
 |
