Canon imageFORMULA DR-2510M Workgroup Scanner Reference Guide - Page 31
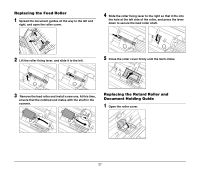
Replacing the Feed Roller, Document Holding Guide, the hole at the left side of the roller
 |
View all Canon imageFORMULA DR-2510M Workgroup Scanner manuals
Add to My Manuals
Save this manual to your list of manuals |
Page 31 highlights
Replacing the Feed Roller 1 Spread the document guides all the way to the left and right, and open the roller cover. 4 Slide the roller fixing lever to the right so that it fits into the hole at the left side of the roller, and press the lever down to secure the feed roller shaft. 2 Lift the roller fixing lever, and slide it to the left. 5 Close the roller cover firmly until the latch clicks. 3 Remove the feed roller and install a new one. At this time, ensure that the notched end mates with the shaft in the scanner. Replacing the Retard Roller and Document Holding Guide 1 Open the roller cover. 27
-
 1
1 -
2
-
3
-
4
-
5
-
6
-
7
-
8
-
9
-
10
-
11
-
12
-
13
-
14
-
15
-
16
-
17
-
18
-
19
-
20
-
21
-
22
-
23
-
24
-
25
-
 26
26 -
 27
27 -
 28
28 -
 29
29 -
 30
30 -
 31
31 -
 32
32 -
 33
33 -
 34
34 -
 35
35 -
 36
36
 |
 |

27
Replacing the Feed Roller
1
Spread the document guides all the way to the left and
right, and open the roller cover.
2
Lift the roller fixing lever, and slide it to the left.
3
Remove the feed roller and install a new one. At this time,
ensure that the notched end mates with the shaft in the
scanner.
4
Slide the roller fixing lever to the right so that it fits into
the hole at the left side of the roller, and press the lever
down to secure the feed roller shaft.
5
Close the roller cover firmly until the latch clicks.
Replacing the Retard Roller and
Document Holding Guide
1
Open the roller cover.