Casio XJ-360 Owners Manual - Page 17
Casio XJ-360 - XGA DLP Projector Manual
 |
View all Casio XJ-360 manuals
Add to My Manuals
Save this manual to your list of manuals |
Page 17 highlights
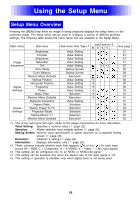
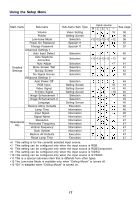
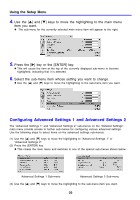
Using the Setup Menu Main menu Sub-menu Volume Pointer Low-noise Mode Power On Password Change Password Advanced Settings 1 Auto Input Detect Auto Keystone Correction Auto Adjust Detailed Show Screen Text Settings Startup Screen No Signal Screen Advanced Settings 2 Auto Power Off RGB Input Video Signal S-Video Signal Image Enhancement 1 Image Enhancement 2 Language Restore Menu Defaults Lamp Time Input Signal Signal Name Operational Info Resolution Horizontal Frequency Vertical Frequency Scan System Restore All Defaults Reset Lamp Time Sub-menu Item Type Value Setting Setting Screen Selection Special∗11 Special∗11 Input source RCSV - *6 ∗12 ∗12 ∗12 ∗12 ∗12 See page 35 36 36 37 37 Selection Selection Selection Selection Selection Selection 40 ∗13 ∗13 ∗13 ∗13 ∗13 40 ∗7 41 41 42 42 Selection Setting Screen Setting Screen Setting Screen Selection Selection Setting Screen Execution Information Information Information Information Information Information Information Execution Execution 43 ∗8 44 ∗9 45 ∗10 45 45 45 46 46 46 46 47 47 47 47 47 47 47 ∗6 This setting is for the currently selected input source. ∗7 This setting can be configured only when the input source is RGB. ∗8 This setting can be configured only when the input source is RGB/Component. ∗9 This setting can be configured only when the input source is VIDEO. ∗10 This setting can be configured only when the input source is S-VIDEO. ∗11 This is a special sub-menu item that is different from other types. ∗12 The Low-noise Mode is available only when "Ceiling Mount" is turned off. ∗13 "On" is disabled when "Ceiling Mount" is turned on. 17
-
 1
1 -
2
-
3
-
4
-
5
-
6
-
7
-
8
-
9
-
10
-
11
-
 12
12 -
 13
13 -
 14
14 -
 15
15 -
 16
16 -
 17
17 -
 18
18 -
 19
19 -
 20
20 -
 21
21 -
 22
22 -
23
-
24
-
25
-
26
-
27
-
28
-
29
-
30
-
31
-
32
-
33
-
34
-
35
-
36
-
37
-
38
-
39
-
40
-
41
-
42
-
43
-
44
-
45
-
46
-
47
-
48
-
49
-
50
-
51
-
52
-
53
-
54
-
55
-
56
-
57
-
58
-
59
-
60
 |
 |
