Cisco CSS11503-AC Hardware Installation Guide - Page 51
Cisco CSS11503-AC Manual
 |
View all Cisco CSS11503-AC manuals
Add to My Manuals
Save this manual to your list of manuals |
Page 51 highlights
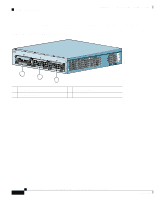
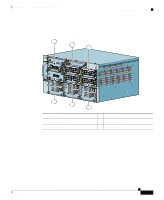
Chapter 1 Unpacking and Installing the CSS Installing a CSS Module To install a module: 1. Properly ground yourself prior to handling the module. For example, wear the anti-static wrist strap (included in the accessory kit) and stick the copper-tape end of the strap to an unpainted metal surface on the chassis. Make sure that the wrist strap makes good contact with your skin. If the CSS is powered up, power it down. Locate an open slot in the chassis for the module. See Table 1-3 to identify possible slots for the module. If necessary, use a #1 Phillips screwdriver to remove a blank panel from the chassis to expose a slot for the module. Insert the module into the board guides at the left and right of the slot. Make sure that the ejectors are fully extended outward. Slide the module into the chassis by pressing firmly at the left and right of the faceplate as shown in Figure 1-8. Installing a Module into a CSS Chassis 2. 3. 4. Figure 1-8 1 9 10 11 12 13 14 15 CONTE CISCO 11 NT SERVIC 500 SERIES ES SWITC H 1 2 3 4 5 6 7 8 16 Fast Ethernet DPLX DPLX 9 10 11 12 13 14 15 CSS5-10M-16FE LINK LINK DPLX DPLX 1 Spring-loaded screw (one on each side) 16 Fast Ethernet 2 2 Ejector (one on each side), extend outward during insertion 5. 6. 7. Close both ejectors simultaneously to seat the module connector into the backplane. Using a Phillips screwdriver, tighten the spring-loaded screws on the front of the module faceplate. Reboot the chassis to activate the module. Cisco 11500 Series Content Services Switch Hardware Installation Guide 78-13884-06 1-25 59542
-
 1
1 -
2
-
3
-
4
-
5
-
6
-
7
-
8
-
9
-
10
-
11
-
12
-
13
-
14
-
15
-
16
-
17
-
18
-
19
-
20
-
21
-
22
-
23
-
24
-
25
-
26
-
27
-
28
-
29
-
30
-
31
-
32
-
33
-
34
-
35
-
36
-
37
-
38
-
39
-
40
-
41
-
42
-
43
-
44
-
45
-
 46
46 -
 47
47 -
 48
48 -
 49
49 -
 50
50 -
 51
51 -
 52
52 -
 53
53 -
 54
54 -
 55
55 -
 56
56 -
57
-
58
-
59
-
60
-
61
-
62
-
63
-
64
-
65
-
66
-
67
-
68
-
69
-
70
-
71
-
72
-
73
-
74
-
75
-
76
-
77
-
78
-
79
-
80
-
81
-
82
-
83
-
84
-
85
-
86
-
87
-
88
-
89
-
90
-
91
-
92
-
93
-
94
-
95
-
96
-
97
-
98
-
99
-
100
-
101
-
102
-
103
-
104
-
105
-
106
-
107
-
108
-
109
-
110
-
111
-
112
-
113
-
114
-
115
-
116
-
117
-
118
-
119
-
120
-
121
-
122
-
123
-
124
-
125
-
126
-
127
-
128
-
129
-
130
-
131
-
132
-
133
-
134
-
135
-
136
-
137
-
138
-
139
-
140
-
141
-
142
-
143
-
144
-
145
-
146
-
147
-
148
-
149
-
150
-
151
-
152
-
153
-
154
-
155
-
156
-
157
-
158
-
159
-
160
-
161
-
162
-
163
-
164
-
165
-
166
-
167
-
168
-
169
-
170
-
171
-
172
-
173
-
174
-
175
-
176
-
177
-
178
-
179
-
180
-
181
-
182
-
183
-
184
 |
 |
