Craftsman 28913 Operation Manual - Page 30
Troubleshooting Chart
 |
View all Craftsman 28913 manuals
Add to My Manuals
Save this manual to your list of manuals |
Page 30 highlights
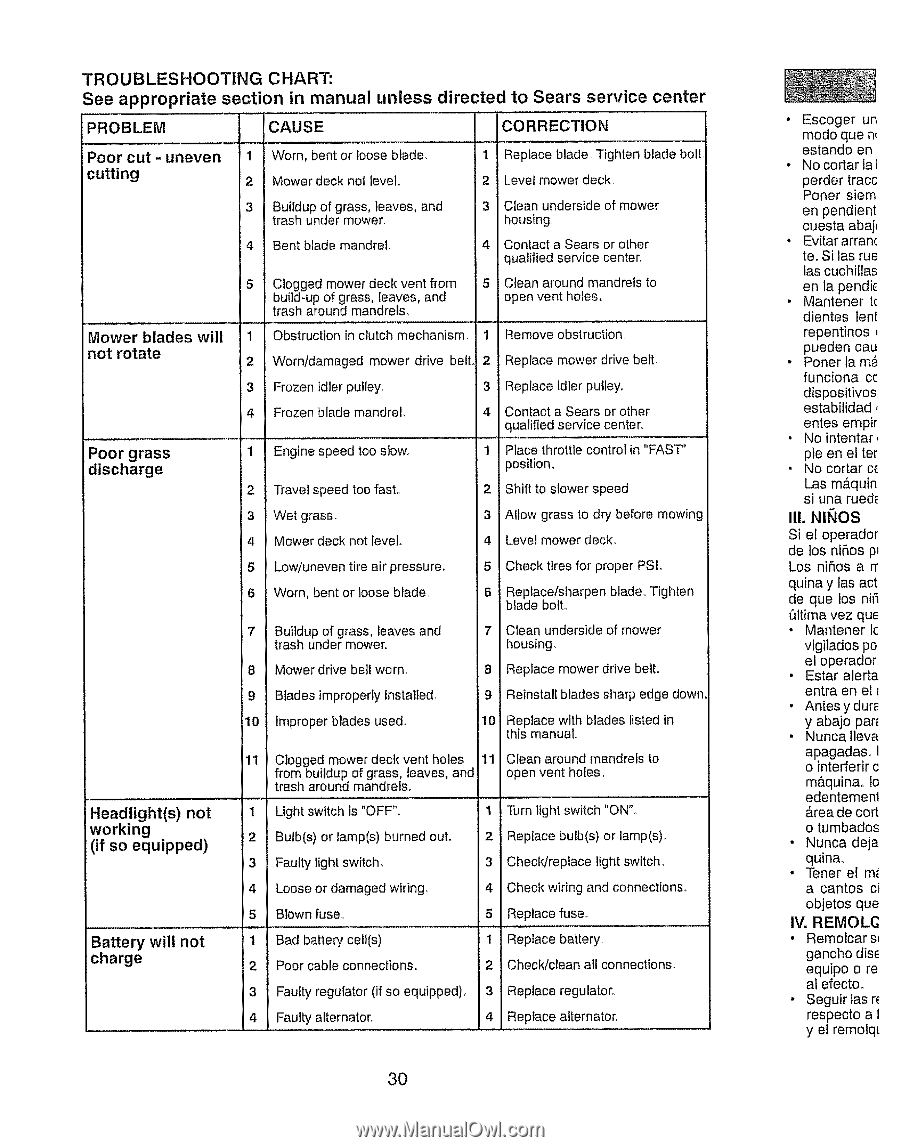
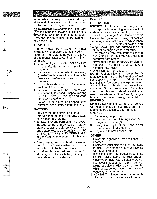
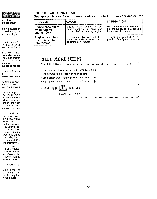
TROUBLESHOOTING CHART: See appropriate section in manual PROBLEM CAUSE unless directed to Sears service CORRECTION center Poor cut - uneven cutting 1 Worn, bent or lo_se blaJe. 2 Mower deck not eveL 1 Replace blade Tighten blade bolt, 2 Level mower deck 3 Buildup of grass, teave_;, and trash under mow _=r, 4 Bent blade man(rel. 3 Clean underside of mower housing 4 Contact a Sears or other qualified service center_ Mower blades will not rotate Poor grass discharge 5 Clogged mower,Jeck v,.mt from build-up of grass, leave s, and trash around ma _drels, 5 Clean around mandrels to open vent holes, 1 Obstruction in cll_tch m ._chanism. 1 Remove obstruction, 2 Worn/damaged nower drive belt..! 2 Replace mower drive belt 3 Frozen idler pull_ _y. 4 Frozen blade m_ ndrel, 1 Engine speed to ) slow. 3 Replace idler pulley_ 4 Contact a Sears or other qualified service center. 1 Place throttle control in "FAST" position, 2 Travel speed too fast. Shift to slower speed, 3 Wet grass. 4 Mower deck not level. 3 Allow grass to dr/before 4 Level mower deck. mowing 5 Low/uneven tire air pre _sure, 6 Worn, bent or louise blEde, 5 Check tires for proper PSIo 6 Replace!sharpen blade,, Tigllten blade bolto 7 Buildup of grass leave _and trash under mo_ er_ 7 Clean underside of mower housing. 8 Mower drive belt worn, 8 Replace mower drive belt. 9 Blades improper ly inst_ 4Iedo 9 Reinstall blades sharp edge down, 10 Improper blades used, 10 Replace with blades listed in this manual., 11 Clogged mower deck vent holes 11 Clean around mandrels to from buildup of [ ross, l_aves, and trash around mandrels open vent holes, Headlight(s) not working (if so equipped) Battery will not charge 1 Light switch is "()FF". Bulb(s) or lamp(3) burred out. Faulty light switc h, 4 Loose or damagad wiri'_g. 5 Blown fuse., 1 Bad battery celils) 2 Poor cable conn.=ction_;. 1 "SJrn light switch "ON", 2 Replace bulb(s) orlamp(s). 3 Check/replace light switch, 4 Check wiring and connections. 5 Replace fuse° 1 Replace battery,, 2 Check/clean all connections. 3 Faulty regulator (if so e quipped), 3 Replace regulator, 4 Faulty alternato[ 4 Replace alternate_ 3O • Escoger un modo que n_ estando en • No cortar la i perder tracc Poner siem en pendient cuesta abaj_ • Evitar arrant te. Silas rue las cuchillas en la pendi_ • Mantener t( dientes fent repentinos pueden cau • Poner la m_ funciona cc dispositivos estabilidad, entes ernpir • No intentar, pie en el ter • No corral c_ L.as m&quin si una ruedz Iil. NINOS Si e! operador de los niSos p_ Los niflos a rr quina y tas act de que los ni5 _ltima vez que • Mantener Ic vigilados po el operador •Estar alerta entra en el • Antesy dur_ y abajo par_ • Nunca lleva apagadas, I o interferir c m&quina,, to edentement &rea de cort o tumbados • Nunca deja quinao • Tener el mt a cantos ci objetos que IV. REMOLC • Remolcar s_ gancho dise equipo o re al efecto, , Seguirlasr_ respecto a I y el remolqt
-
 1
1 -
2
-
3
-
4
-
5
-
6
-
7
-
8
-
9
-
10
-
11
-
12
-
13
-
14
-
15
-
16
-
17
-
18
-
19
-
20
-
21
-
22
-
23
-
24
-
 25
25 -
 26
26 -
 27
27 -
 28
28 -
 29
29 -
 30
30 -
 31
31 -
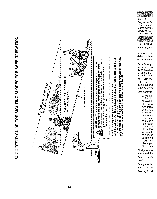 32
32 -
 33
33 -
 34
34 -
 35
35 -
36
-
37
-
38
-
39
-
40
-
41
-
42
-
43
-
44
-
45
-
46
-
47
-
48
-
49
-
50
-
51
-
52
-
53
-
54
-
55
-
56
-
57
-
58
-
59
-
60
-
61
-
62
-
63
-
64
 |
 |