D-Link DFL-1100 Product Manual - Page 28
Setting up a High Availability cluster
 |
UPC - 790069270239
View all D-Link DFL-1100 manuals
Add to My Manuals
Save this manual to your list of manuals |
Page 28 highlights
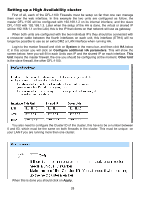
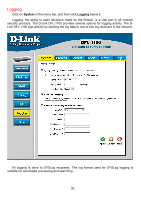
Setting up a High Availability cluster First of all, each of the DFL-1100 Firewalls must be setup so far that one can manage them over the web interface. In this example the two units are configured as follow, the master DFL-1100 will be configured with 192.168.1.2 on its internal interface, and the slave DFL-1100 with 192.168.1.3. Later when the setup of the HA is done, the virtual or shared IP will be 192.168.1.1 on the LAN, this is the IP that clients on that network will use as gateway. When both units are configured with the two individual IP's they should be connected with a crossover cable between the fourth interfaces on each unit, this interface (ETH4) will no longer be possible to use as an extra DMZ or LAN interface when running HA. Login to the master firewall and click on System in the menu bar, and then click HA below it; in this screen you will click on Configure additional HA parameters. This will show the screen below; here you will fill in each Units own IP and the shared IP on each interface. This Unit means the master firewall, the one you should be configuring at the moment. Other Unit is the slave firewall, the other DFL-1100. You also need to configure the Cluster ID of the cluster, this have to be a number between 0 and 63, which must be the same on both firewalls in the cluster. This must be unique on your LAN if you are running more then one cluster. When this is done you should click on Apply. 28
-
 1
1 -
2
-
3
-
4
-
5
-
6
-
7
-
8
-
9
-
10
-
11
-
12
-
13
-
14
-
15
-
16
-
17
-
18
-
19
-
20
-
21
-
22
-
 23
23 -
 24
24 -
 25
25 -
 26
26 -
 27
27 -
 28
28 -
 29
29 -
 30
30 -
 31
31 -
 32
32 -
 33
33 -
34
-
35
-
36
-
37
-
38
-
39
-
40
-
41
-
42
-
43
-
44
-
45
-
46
-
47
-
48
-
49
-
50
-
51
-
52
-
53
-
54
-
55
-
56
-
57
-
58
-
59
-
60
-
61
-
62
-
63
-
64
-
65
-
66
-
67
-
68
-
69
-
70
-
71
-
72
-
73
-
74
-
75
-
76
-
77
-
78
-
79
-
80
-
81
-
82
-
83
-
84
-
85
-
86
-
87
-
88
-
89
-
90
-
91
-
92
-
93
-
94
-
95
-
96
-
97
-
98
-
99
-
100
-
101
-
102
-
103
-
104
-
105
-
106
-
107
-
108
-
109
-
110
-
111
-
112
-
113
-
114
-
115
-
116
-
117
-
118
-
119
-
120
-
121
-
122
-
123
-
124
-
125
-
126
-
127
-
128
-
129
-
130
-
131
-
132
-
133
-
134
-
135
-
136
-
137
-
138
-
139
-
140
-
141
-
142
-
143
-
144
 |
 |
