D-Link DFL-1100 Product Manual - Page 37
Add a new policy - user manual
 |
UPC - 790069270239
View all D-Link DFL-1100 manuals
Add to My Manuals
Save this manual to your list of manuals |
Page 37 highlights
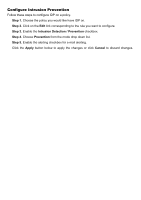
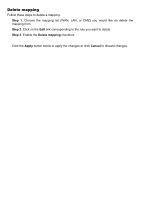
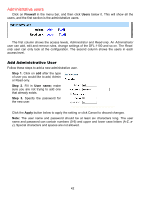
There are two ways to configure Policy Routing; both include specifying the Gateway to send the traffic over. The first one, Redirect via routing (make gateway next hop), will just reroute the traffic to the given gateway as if it was just another router. The second mode, Via address translation (change destination IP), will change the destination IP in the IP header and then pass the packet on to the gateway, used for example in transparent squid-proxy setups. Add a new policy Follow these steps to add a new outgoing policy. Step 1. Choose the LAN->WAN policy list from the available policy lists. Step 2. Click on the Add new link. Step 3. Fill in the following values: Name: Specifies a symbolic name for the rule. This name is used mainly as a rule reference in log data and for easy reference in the policy list. Position: Moves before given position. Action: Select Allow to allow the specified service traffic to traverse the firewall. Choose Deny to drop all traffic matching the criteria of the specified service. Source Nets: - Specifies the sender span of IP addresses to be compared to the received packet. Leave this blank to match everything. Source Users/Groups: Specifies if an authenticated username is needed for this policy to match. Either make a list of usernames, separated by a comma (,) or write Any for any authenticated user. If it is left blank there is no need for authentication for the policy. Destination Nets: Specifies the span of IP addresses to be compared to the destination IP of the received packet. Leave this blank to match everything. Destination Users/Groups: Specifies if an authenticated username is needed for this policy to match. Either make a list of usernames, separated by a comma (,) or write Any for any authenticated user. If it is left blank there is no need for authentication for the policy. Service: Either choose a predefined service from the dropdown menu or make a custom service. Schedule: Choose which schedule should be used for this policy to match. Choose Always for no scheduling. Step 4. If using Traffic shaping, fill in the required information. If not, skip this step. Click the Apply button below to apply the changes or click Cancel to discard changes. Note: Refer to Appendix C of the manual for details on mapping Public IP addresses to Internal Servers.
-
 1
1 -
2
-
3
-
4
-
5
-
6
-
7
-
8
-
9
-
10
-
11
-
12
-
13
-
14
-
15
-
16
-
17
-
18
-
19
-
20
-
21
-
22
-
23
-
24
-
25
-
26
-
27
-
28
-
29
-
30
-
31
-
 32
32 -
 33
33 -
 34
34 -
 35
35 -
 36
36 -
 37
37 -
 38
38 -
 39
39 -
 40
40 -
 41
41 -
 42
42 -
43
-
44
-
45
-
46
-
47
-
48
-
49
-
50
-
51
-
52
-
53
-
54
-
55
-
56
-
57
-
58
-
59
-
60
-
61
-
62
-
63
-
64
-
65
-
66
-
67
-
68
-
69
-
70
-
71
-
72
-
73
-
74
-
75
-
76
-
77
-
78
-
79
-
80
-
81
-
82
-
83
-
84
-
85
-
86
-
87
-
88
-
89
-
90
-
91
-
92
-
93
-
94
-
95
-
96
-
97
-
98
-
99
-
100
-
101
-
102
-
103
-
104
-
105
-
106
-
107
-
108
-
109
-
110
-
111
-
112
-
113
-
114
-
115
-
116
-
117
-
118
-
119
-
120
-
121
-
122
-
123
-
124
-
125
-
126
-
127
-
128
-
129
-
130
-
131
-
132
-
133
-
134
-
135
-
136
-
137
-
138
-
139
-
140
-
141
-
142
-
143
-
144
 |
 |
