D-Link DNS-320L DNS-320L Manual - Page 223
USB Backup Process
 |
View all D-Link DNS-320L manuals
Add to My Manuals
Save this manual to your list of manuals |
Page 223 highlights
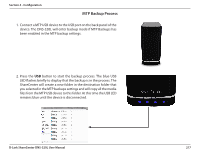
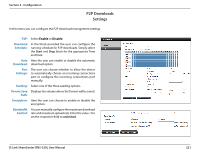
Section 4 - Configuration USB Backup Process 1. Connect a USB storage device to the USB port on the back panel of the device. The LED will blink then become solid once it is ready for backup, if USB Backups has been enabled in the USB backup settings. 2. Press the USB button to start the backup process. The LED starts to blink to display that the backup is in the process. The ShareCenter will copy or sync all the files from the source folder to the destination folder. Please Note: No warning message will appear to indicate that all data on the destination folder will be deleted automatically if you've selected Synchronize in the USB Backup settings. D-Link ShareCenter DNS-320L User Manual 219
-
 1
1 -
2
-
3
-
4
-
5
-
6
-
7
-
8
-
9
-
10
-
11
-
12
-
13
-
14
-
15
-
16
-
17
-
18
-
19
-
20
-
21
-
22
-
23
-
24
-
25
-
26
-
27
-
28
-
29
-
30
-
31
-
32
-
33
-
34
-
35
-
36
-
37
-
38
-
39
-
40
-
41
-
42
-
43
-
44
-
45
-
46
-
47
-
48
-
49
-
50
-
51
-
52
-
53
-
54
-
55
-
56
-
57
-
58
-
59
-
60
-
61
-
62
-
63
-
64
-
65
-
66
-
67
-
68
-
69
-
70
-
71
-
72
-
73
-
74
-
75
-
76
-
77
-
78
-
79
-
80
-
81
-
82
-
83
-
84
-
85
-
86
-
87
-
88
-
89
-
90
-
91
-
92
-
93
-
94
-
95
-
96
-
97
-
98
-
99
-
100
-
101
-
102
-
103
-
104
-
105
-
106
-
107
-
108
-
109
-
110
-
111
-
112
-
113
-
114
-
115
-
116
-
117
-
118
-
119
-
120
-
121
-
122
-
123
-
124
-
125
-
126
-
127
-
128
-
129
-
130
-
131
-
132
-
133
-
134
-
135
-
136
-
137
-
138
-
139
-
140
-
141
-
142
-
143
-
144
-
145
-
146
-
147
-
148
-
149
-
150
-
151
-
152
-
153
-
154
-
155
-
156
-
157
-
158
-
159
-
160
-
161
-
162
-
163
-
164
-
165
-
166
-
167
-
168
-
169
-
170
-
171
-
172
-
173
-
174
-
175
-
176
-
177
-
178
-
179
-
180
-
181
-
182
-
183
-
184
-
185
-
186
-
187
-
188
-
189
-
190
-
191
-
192
-
193
-
194
-
195
-
196
-
197
-
198
-
199
-
200
-
201
-
202
-
203
-
204
-
205
-
206
-
207
-
208
-
209
-
210
-
211
-
212
-
213
-
214
-
215
-
216
-
217
-
 218
218 -
 219
219 -
 220
220 -
 221
221 -
 222
222 -
 223
223 -
 224
224 -
 225
225 -
 226
226 -
 227
227 -
 228
228 -
229
-
230
-
231
-
232
-
233
-
234
-
235
-
236
-
237
-
238
-
239
-
240
-
241
-
242
-
243
-
244
-
245
-
246
-
247
-
248
-
249
-
250
-
251
-
252
-
253
-
254
-
255
-
256
-
257
-
258
-
259
-
260
-
261
-
262
-
263
-
264
-
265
 |
 |

219
D-Link ShareCenter DNS-320L User Manual
Section 4 - Configuration
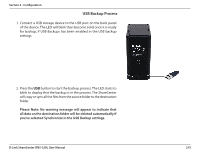
1. Connect a USB storage device to the USB port on the back panel
of the device. The LED will blink then become solid once it is ready
for backup, if USB Backups has been enabled in the USB backup
settings.
2. Press the
USB
button to start the backup process. The LED starts to
blink to display that the backup is in the process. The ShareCenter
will copy or sync all the files from the source folder to the destination
folder.
Please Note: No warning message will appear to indicate that
all data on the destination folder will be deleted automatically if
you’ve selected Synchronize in the USB Backup settings.
USB Backup Process