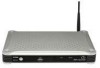
D-Link DSM 330 User Guide - Page 7
Installing the DivX Connected Application
 |
UPC - 790069313424
View all D-Link DSM 330 manuals
Add to My Manuals
Save this manual to your list of manuals |
Page 7 highlights
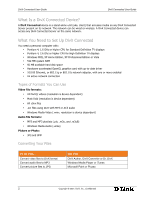
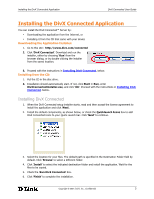
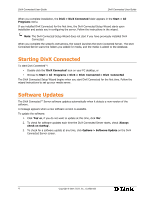
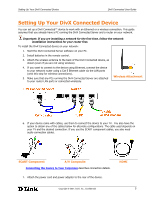
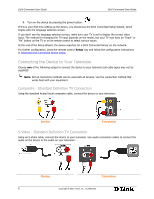
Installing the DivX Connected Application DivX Connected User Guide D Installing the DivX Connected Application You can install the DivX Connected™ Server by: • Downloading the application from the Internet, or • Installing it from the CD that came with your device Downloading the Application Installer: 1. Go to this site: http://www.divx.com/connected 2. Click 'DivX Connected'. Download and run the installer, either by choosing 'Run' from the browser dialog, or by double-clicking the installer from the saved location. 3. Proceed with the instructions in Installing DivX Connected, below. Installing from the CD: 1. Put the CD in the disc drive. 2. Installation should automatically start. If not, click Start > Run, enter DivXConnectedInstaller.exe, and click 'OK'. Proceed with the instructions in Installing DivX Connected, below. Installing DivX Connected 1. When the DivX Connected setup installer starts, read and then accept the license agreement to install the application and click 'Next'. 2. Install the default components, as shown below, or check the Quicklaunch Icons box to add DivX Connected icons to your Quick Launch bar. Click 'Next' to continue. 3. Select the location for your files. The default path is specified in the Destination Folder field by default. Click 'Browse' to select a different folder. 4. Click 'Install' to select the indicated destination folder and install the application. Wait for the files to be copied. 5. Check the 'Run DivX Connected' box. 6. Click 'Finish' to complete the installation. Copyright © 2007, DivX, Inc., Confidential 3
-
 1
1 -
 2
2 -
 3
3 -
 4
4 -
 5
5 -
 6
6 -
 7
7 -
 8
8 -
 9
9 -
 10
10 -
 11
11 -
 12
12 -
13
-
14
-
15
-
16
-
17
-
18
-
19
-
20
-
21
-
22
-
23
-
24
-
25
-
26
-
27
-
28
-
29
-
30
-
31
-
32
-
33
-
34
-
35
-
36
-
37
-
38
 |
 |
