D-Link DSM 330 User Guide - Page 9
Setting Up Your DivX Connected Device - hdmi no audio
 |
UPC - 790069313424
View all D-Link DSM 330 manuals
Add to My Manuals
Save this manual to your list of manuals |
Page 9 highlights
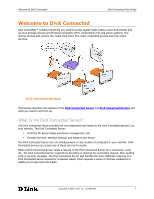
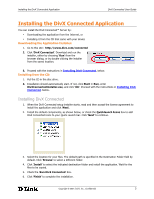
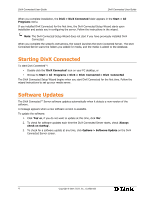
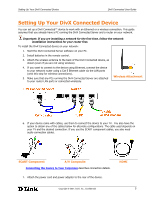
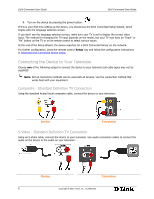
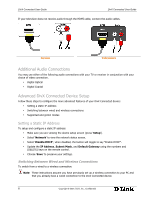
Setting Up Your DivX Connected Device DivX Connected User Guide D Setting Up Your DivX Connected Device You can set up a DivX Connected™ device to work with an Ethernet or a wireless connection. This guide assumes that you already have a PC running the DivX Connected Server and a router on your network. Important: If you are installing a network for the first time, follow the network installation instructions for your router first. To install the DivX Connected device on your network: 1. Start the DivX Connected Server software on your PC. 2. Install batteries in the remote control. 3. Attach the wireless antenna to the back of the DivX Connected device, as shown (even if you are not using wireless). 4. If you want to connect to the device using Ethernet, connect the device to your network router using a Cat-5 Ethernet cable via the LAN ports (omit this step for wireless connections). 5. Make sure that any PCs running the DivX Connected Server are attached to your router LAN ports or connected wirelessly. Wireless Attachment 6. If your device came with cables, use them to connect the device to your TV. You also have the option to obtain any of the cables below for alternate configurations. The cable used depends on your TV and the desired connection. If you use the SCART component cables, you also need audio connection cables. SCART Component A/V Composite Connecting the Device to Your Television describes connection details. 7. Attach the power cord and power adapter to the rear of the device. HDMI Copyright © 2007, DivX, Inc., Confidential 5
-
 1
1 -
2
-
3
-
 4
4 -
 5
5 -
 6
6 -
 7
7 -
 8
8 -
 9
9 -
 10
10 -
 11
11 -
 12
12 -
 13
13 -
 14
14 -
15
-
16
-
17
-
18
-
19
-
20
-
21
-
22
-
23
-
24
-
25
-
26
-
27
-
28
-
29
-
30
-
31
-
32
-
33
-
34
-
35
-
36
-
37
-
38
 |
 |
