D-Link DXS-5000-54S Quick Install Guide - Page 13
Installation, Installation Guidelines, Installing the Switch into a Rack
 |
View all D-Link DXS-5000-54S manuals
Add to My Manuals
Save this manual to your list of manuals |
Page 13 highlights
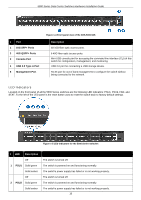
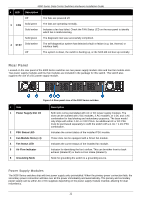
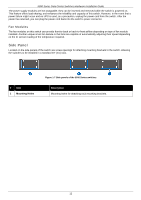
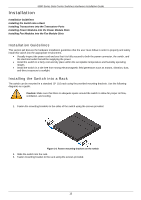
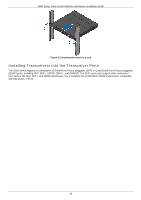
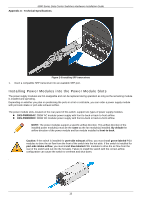
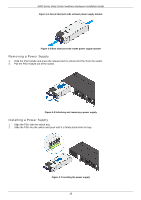
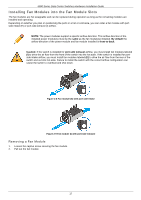
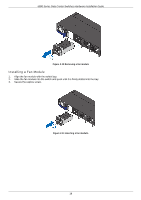
5000 Series Data Center Switches Hardware Installation Guide Installation Installation Guidelines Installing the Switch into a Rack Installing Transceivers into the Transceiver Ports Installing Power Modules into the Power Module Slots Installing Fan Modules into the Fan Module Slots Installation Guidelines This section will discuss the hardware installation guidelines that the user must follow in order to properly and safely install this switch into the appropriate environment. • Visually inspect the power cord and see that it is fully secured to both the power connector, the switch, and the electrical outlet that will be supplying the power. • Install the switch in a fairly cool and dry place within the acceptable temperature and humidity operating ranges. • Install the switch in a site free from strong electromagnetic field generators such as motors, vibration, dust, and direct exposure to sunlight. Installing the Switch into a Rack The switch can be mounted in a standard 19" (1U) rack using the provided mounting brackets. Use the following diagrams as a guide. Caution: Make sure that there is adequate space around the switch to allow for proper air flow, ventilation, and cooling. 1. Fasten the mounting brackets to the sides of the switch using the screws provided. Figure 2-1 Fasten mounting brackets on the switch 2. Slide the switch into the rack. 3. Fasten mounting bracket to the rack using the screws provided. 13
-
 1
1 -
2
-
3
-
4
-
5
-
6
-
7
-
 8
8 -
 9
9 -
 10
10 -
 11
11 -
 12
12 -
 13
13 -
 14
14 -
 15
15 -
 16
16 -
 17
17 -
 18
18 -
19
-
20
-
21
-
22
-
23
-
24
-
25
-
26
-
27
-
28
-
29
-
30
-
31
-
32
-
33
-
34
-
35
-
36
-
37
-
38
-
39
-
40
-
41
-
42
-
43
-
44
-
45
-
46
-
47
-
48
-
49
-
50
-
51
-
52
-
53
-
54
-
55
 |
 |
