Dell 2350DN User Guide - Page 38
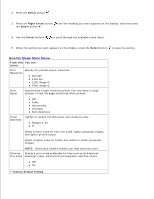
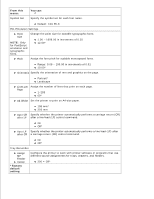
Quality Mode Main Menu, Select, Right Arrow, Arrow, From this, You can, Factory default setting - printer toner
 |
View all Dell 2350DN manuals
Add to My Manuals
Save this manual to your list of manuals |
Page 38 highlights
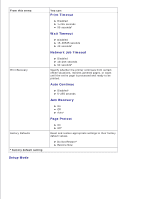
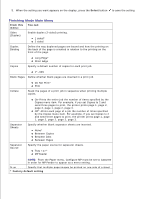
1. 2. Press the Select button . 3. Press the Right Arrow button until the heading you want appears on the display, and then press the Select button . 4. Use the Arrow buttons to scroll through the available menu items. 5. When the setting you want appears on the display, press the Select button to save the setting. Quality Mode Main Menu From this You can: menu: Print Resolution Specify the printed output resolution. 600 dpi* 1200 dpi 1200 Image Q 2400 Image Q Pixel Boost Approximate a high-resolution printer font and allow a rough preview of how the page would look when printed. Off* Fonts Horizontally Vertically Both directions Toner Darkness Lighten or darken printed output and conserve toner. Ranges 1-10 8* Select a lower value for finer line width, lighter grayscale images, and lighter printed output. Select a higher value for bolder line widths or darker grayscale images. NOTE: Selecting a smaller number can help conserve toner. Enhance Enable a print mode preferable for files such as architectural Fine Lines drawings, maps, electrical circuit diagrams, and flow charts. Off* On * Factory default setting
-
 1
1 -
2
-
3
-
4
-
5
-
6
-
7
-
8
-
9
-
10
-
11
-
12
-
13
-
14
-
15
-
16
-
17
-
18
-
19
-
20
-
21
-
22
-
23
-
24
-
25
-
26
-
27
-
28
-
29
-
30
-
31
-
32
-
 33
33 -
 34
34 -
 35
35 -
 36
36 -
 37
37 -
 38
38 -
 39
39 -
 40
40 -
 41
41 -
 42
42 -
 43
43 -
44
-
45
-
46
-
47
-
48
-
49
-
50
-
51
-
52
-
53
-
54
-
55
-
56
-
57
-
58
-
59
-
60
-
61
-
62
-
63
-
64
-
65
-
66
-
67
-
68
-
69
-
70
-
71
-
72
-
73
-
74
-
75
-
76
-
77
-
78
-
79
-
80
-
81
-
82
-
83
-
84
-
85
-
86
-
87
-
88
-
89
-
90
-
91
-
92
-
93
-
94
-
95
-
96
-
97
-
98
-
99
-
100
-
101
-
102
-
103
-
104
-
105
-
106
-
107
-
108
-
109
-
110
-
111
-
112
-
113
-
114
-
115
-
116
-
117
-
118
-
119
-
120
-
121
-
122
-
123
-
124
-
125
-
126
-
127
-
128
-
129
-
130
-
131
-
132
-
133
-
134
-
135
-
136
-
137
-
138
-
139
-
140
-
141
-
142
-
143
-
144
-
145
-
146
-
147
-
148
-
149
-
150
-
151
-
152
-
153
-
154
-
155
-
156
-
157
-
158
-
159
-
160
-
161
-
162
-
163
-
164
-
165
-
166
-
167
-
168
-
169
-
170
-
171
-
172
-
173
-
174
-
175
-
176
-
177
-
178
-
179
-
180
-
181
 |
 |
