Dell 2350DN User Guide - Page 63
Installing Additional Printer Drivers, Printers and Faxes - windows 7 driver
 |
View all Dell 2350DN manuals
Add to My Manuals
Save this manual to your list of manuals |
Page 63 highlights
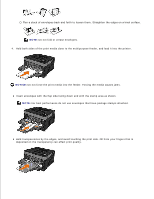
2. 3. Select your printer from the drop-down menu. 4. Select Typical Installation (recommended), and then click Install. 5. Click Finish, connect the printer to the computer using a USB or parallel cable, and turn on the printer. The installation prompts you when the setup is completed. Installing Additional Printer Drivers 1. Turn on your computer, and insert the Software and Documentation CD. When the Software and Documentation CD launches, click Cancel. 2. In Windows Vista® or later (default Start menu): a. Click Control Panel. b. Click Hardware and Sound. c. Click Printers. In Windows® XP (default Start menu): a. Click Start Control Panel. b. Double-click Printers and Other Hardware. c. Double-click Printers and Faxes. In Windows® XP (Classic Start menu): Click Start Settings Printers and Faxes. In Windows Vista® (Classic Start menu) and all other Windows versions: Click Start Settings Printers. 3. Double-click Add Printer.
-
 1
1 -
2
-
3
-
4
-
5
-
6
-
7
-
8
-
9
-
10
-
11
-
12
-
13
-
14
-
15
-
16
-
17
-
18
-
19
-
20
-
21
-
22
-
23
-
24
-
25
-
26
-
27
-
28
-
29
-
30
-
31
-
32
-
33
-
34
-
35
-
36
-
37
-
38
-
39
-
40
-
41
-
42
-
43
-
44
-
45
-
46
-
47
-
48
-
49
-
50
-
51
-
52
-
53
-
54
-
55
-
56
-
57
-
 58
58 -
 59
59 -
 60
60 -
 61
61 -
 62
62 -
 63
63 -
 64
64 -
 65
65 -
 66
66 -
 67
67 -
 68
68 -
69
-
70
-
71
-
72
-
73
-
74
-
75
-
76
-
77
-
78
-
79
-
80
-
81
-
82
-
83
-
84
-
85
-
86
-
87
-
88
-
89
-
90
-
91
-
92
-
93
-
94
-
95
-
96
-
97
-
98
-
99
-
100
-
101
-
102
-
103
-
104
-
105
-
106
-
107
-
108
-
109
-
110
-
111
-
112
-
113
-
114
-
115
-
116
-
117
-
118
-
119
-
120
-
121
-
122
-
123
-
124
-
125
-
126
-
127
-
128
-
129
-
130
-
131
-
132
-
133
-
134
-
135
-
136
-
137
-
138
-
139
-
140
-
141
-
142
-
143
-
144
-
145
-
146
-
147
-
148
-
149
-
150
-
151
-
152
-
153
-
154
-
155
-
156
-
157
-
158
-
159
-
160
-
161
-
162
-
163
-
164
-
165
-
166
-
167
-
168
-
169
-
170
-
171
-
172
-
173
-
174
-
175
-
176
-
177
-
178
-
179
-
180
-
181
 |
 |