Dell 2350DN User Guide - Page 44
Installing Optional Hardware, Installing the 550-Sheet Optional Drawer - parts
 |
View all Dell 2350DN manuals
Add to My Manuals
Save this manual to your list of manuals |
Page 44 highlights
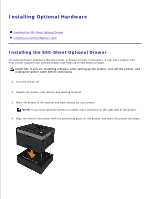
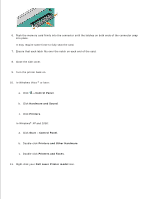
Installing Optional Hardware Installing the 550-Sheet Optional Drawer Installing an Optional Memory Card Installing the 550-Sheet Optional Drawer An optional drawer attaches under the printer. A drawer consists of two parts: a tray and a support unit. Your printer supports one optional drawer that holds up to 550 sheets of paper. CAUTION: If you are installing a drawer after setting up the printer, turn off the printer, and unplug the power cable before continuing. 1. Turn the printer off. 2. Unpack the drawer, and remove any packing material. 3. Place the drawer in the location you have chosen for your printer. NOTE: If you have optional memory to install, leave clearance on the right side of the printer. 4. Align the holes in the printer with the positioning posts on the drawer, and lower the printer into place. 5.
-
 1
1 -
2
-
3
-
4
-
5
-
6
-
7
-
8
-
9
-
10
-
11
-
12
-
13
-
14
-
15
-
16
-
17
-
18
-
19
-
20
-
21
-
22
-
23
-
24
-
25
-
26
-
27
-
28
-
29
-
30
-
31
-
32
-
33
-
34
-
35
-
36
-
37
-
38
-
 39
39 -
 40
40 -
 41
41 -
 42
42 -
 43
43 -
 44
44 -
 45
45 -
 46
46 -
 47
47 -
 48
48 -
 49
49 -
50
-
51
-
52
-
53
-
54
-
55
-
56
-
57
-
58
-
59
-
60
-
61
-
62
-
63
-
64
-
65
-
66
-
67
-
68
-
69
-
70
-
71
-
72
-
73
-
74
-
75
-
76
-
77
-
78
-
79
-
80
-
81
-
82
-
83
-
84
-
85
-
86
-
87
-
88
-
89
-
90
-
91
-
92
-
93
-
94
-
95
-
96
-
97
-
98
-
99
-
100
-
101
-
102
-
103
-
104
-
105
-
106
-
107
-
108
-
109
-
110
-
111
-
112
-
113
-
114
-
115
-
116
-
117
-
118
-
119
-
120
-
121
-
122
-
123
-
124
-
125
-
126
-
127
-
128
-
129
-
130
-
131
-
132
-
133
-
134
-
135
-
136
-
137
-
138
-
139
-
140
-
141
-
142
-
143
-
144
-
145
-
146
-
147
-
148
-
149
-
150
-
151
-
152
-
153
-
154
-
155
-
156
-
157
-
158
-
159
-
160
-
161
-
162
-
163
-
164
-
165
-
166
-
167
-
168
-
169
-
170
-
171
-
172
-
173
-
174
-
175
-
176
-
177
-
178
-
179
-
180
-
181
 |
 |
