Dell 962 All In One Photo Printer 21H0420.book - Page 26
On the operator panel, press the, button repeatedly until, is selected., Press, repeatedly until
 |
View all Dell 962 All In One Photo Printer manuals
Add to My Manuals
Save this manual to your list of manuals |
Page 26 highlights
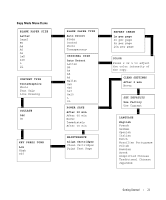
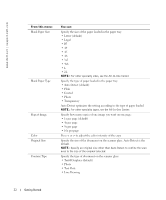
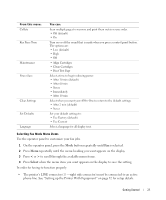
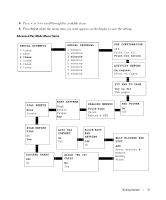
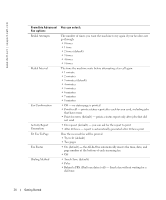
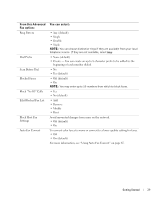
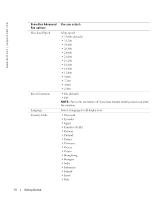
www.dell.com | support.dell.com From this menu: Edit Speed Dial Edit Date/Time Personalize Fax Blank Paper Size Blank Paper Type Fax Forward Advanced Fax You can: Make the following changes to your speed dial list: • Add to it • Remove a number from it • Modify it • Print it NOTE: For more information, see "Speed Dial" on page 62. Edit the date and time. NOTE: Make sure you enter a number into each of the available spaces. For example, 01:00 for 1:00. Once you have entered the time, press 1 for AM, 2 for PM or 3 for 24-hour mode. Enter your name or the name of your business and your number. This information appears as a heading to identify you and your fax machine to the fax recipient. NOTE: Not available for double-byte languages. Specify the size of the paper loaded in the paper tray. • Letter • A4 • Legal NOTE: If no asterisk (*) is present, a paper size that is not supported by fax has been selected through the copy menu. Specify the type of paper loaded in the paper tray: • Auto Detect (default): optimizes the setting according to the type of paper loaded. • Plain • Coated • Photo • Transparency • Turn this feature Off (default). • Enter a number to Forward the fax to. • Print&Forward the fax. Press Select to see a menu of advanced fax options. For more information, see "Advanced Fax Mode Menu Items" on page 27. Selecting Advanced Fax Menu Items 1 On the operator panel, press the Mode button repeatedly until Fax is selected. 2 Press Menu repeatedly until Advanced Fax appears on the display. 3 Press Select. 26 Getting Started
-
 1
1 -
2
-
3
-
4
-
5
-
6
-
7
-
8
-
9
-
10
-
11
-
12
-
13
-
14
-
15
-
16
-
17
-
18
-
19
-
20
-
 21
21 -
 22
22 -
 23
23 -
 24
24 -
 25
25 -
 26
26 -
 27
27 -
 28
28 -
 29
29 -
 30
30 -
 31
31 -
32
-
33
-
34
-
35
-
36
-
37
-
38
-
39
-
40
-
41
-
42
-
43
-
44
-
45
-
46
-
47
-
48
-
49
-
50
-
51
-
52
-
53
-
54
-
55
-
56
-
57
-
58
-
59
-
60
-
61
-
62
-
63
-
64
-
65
-
66
-
67
-
68
-
69
-
70
-
71
-
72
-
73
-
74
-
75
-
76
-
77
-
78
-
79
-
80
-
81
-
82
-
83
-
84
-
85
-
86
-
87
-
88
-
89
-
90
-
91
-
92
-
93
-
94
-
95
-
96
-
97
-
98
-
99
-
100
-
101
-
102
-
103
-
104
-
105
-
106
-
107
-
108
-
109
-
110
-
111
-
112
-
113
-
114
-
115
-
116
-
117
-
118
-
119
-
120
-
121
-
122
 |
 |