Dell 962 All In One Photo Printer 21H0420.book - Page 45
Collating Copies Using the Operator Panel, Changing Copy Settings, Dell Photo AIO Printer - photo all in one printer 962
 |
View all Dell 962 All In One Photo Printer manuals
Add to My Manuals
Save this manual to your list of manuals |
Page 45 highlights
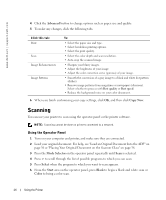
4 Click Start→ Programs or All Programs→ Dell Printers→ Dell Photo AIO Printer 962→ Dell All-In-One Center. The Dell All-In-One Center appears. 5 Click Preview Now. 6 Adjust the dotted lines to fit around the portion of the image you want to print. 7 In the Copy section, select Photo. 8 Select a copy quantity and color. 9 To customize your photo, click See More Copy Settings. 10 When you finish customizing your settings, click Copy Now. Collating Copies Using the Operator Panel When you are using your printer without a computer, you can print collated copies: 1 Load paper in the paper support. For help, see "Load Plain Paper Into the Paper Support" on page 34. 2 Load your original document. For help, see "Load an Original Document Into the ADF" on page 36 or "Placing Your Original Document on the Scanner Glass" on page 38. 3 Press the Mode Selector button repeatedly until Copy is selected. 4 Press Menu repeatedly until Collate appears. 5 Press > to scroll to the amount of pages you want to collate. 6 Press Select. Changing Copy Settings 1 Click Start→ Programs or All Programs→ Dell Printers→ Dell Photo AIO Printer 962→ Dell All-In-One Center. The Dell All-In-One Center appears. 2 Select a copy quantity and color. 3 Click See More Copy Settings to: - Choose a copy quality. - Select the blank paper size. - Select the original document size. - Lighten or darken your document. - Reduce or enlarge your document. Using the Printer 45
-
 1
1 -
2
-
3
-
4
-
5
-
6
-
7
-
8
-
9
-
10
-
11
-
12
-
13
-
14
-
15
-
16
-
17
-
18
-
19
-
20
-
21
-
22
-
23
-
24
-
25
-
26
-
27
-
28
-
29
-
30
-
31
-
32
-
33
-
34
-
35
-
36
-
37
-
38
-
39
-
 40
40 -
 41
41 -
 42
42 -
 43
43 -
 44
44 -
 45
45 -
 46
46 -
 47
47 -
 48
48 -
 49
49 -
 50
50 -
51
-
52
-
53
-
54
-
55
-
56
-
57
-
58
-
59
-
60
-
61
-
62
-
63
-
64
-
65
-
66
-
67
-
68
-
69
-
70
-
71
-
72
-
73
-
74
-
75
-
76
-
77
-
78
-
79
-
80
-
81
-
82
-
83
-
84
-
85
-
86
-
87
-
88
-
89
-
90
-
91
-
92
-
93
-
94
-
95
-
96
-
97
-
98
-
99
-
100
-
101
-
102
-
103
-
104
-
105
-
106
-
107
-
108
-
109
-
110
-
111
-
112
-
113
-
114
-
115
-
116
-
117
-
118
-
119
-
120
-
121
-
122
 |
 |