Dell A940 All In One Personal Printer Owner's Manual - Page 17
Options, Select, Operator panel menus
 |
View all Dell A940 All In One Personal Printer manuals
Add to My Manuals
Save this manual to your list of manuals |
Page 17 highlights
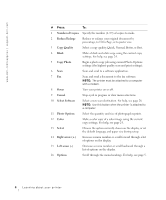
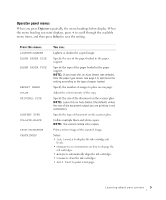
Operator panel menus When you press Options repeatedly, the menu headings below display. When the menu heading you want displays, press + to scroll through the available menu items, and then press Select to save the setting. From this menu: LIGHTER/DARKER BLANK PAPER SIZE BLANK PAPER TYPE REPEAT IMAGE COLOR ORIGINAL SIZE CONTENT TYPE COLLATE-BLACK IRON-ON/MIRROR CARTRIDGES You can: Lighten or darken the copied image. Specify the size of the paper loaded in the paper support. Specify the type of the paper loaded in the paper support. NOTE: If you leave this on Auto Detect (the default), then the paper type sensor (see page 11) optimizes the setting according to the type of paper loaded. Specify the number of images to place on one page. Adjust the color intensity of the copy. Specify the size of the document on the scanner glass. NOTE: Leave this on Auto Detect (the default) unless the size of the document output you are printing is not satisfactory. Specify the type of document on the scanner glass. Collate multiple black and white copies. NOTE: You cannot collate color copies. Print a mirror image of the scanned image. Select: • Ink Levels to display the ink cartridge ink levels. • Change to see instructions on how to change the ink cartridges. • Align to automatically align the ink cartridges. • Clean to clean the ink cartridges. • Self Test to print a test page. Learning about your printer 5
-
 1
1 -
2
-
3
-
4
-
5
-
6
-
7
-
8
-
9
-
10
-
11
-
 12
12 -
 13
13 -
 14
14 -
 15
15 -
 16
16 -
 17
17 -
 18
18 -
 19
19 -
 20
20 -
 21
21 -
 22
22 -
23
-
24
-
25
-
26
-
27
-
28
-
29
-
30
-
31
-
32
-
33
-
34
-
35
-
36
-
37
-
38
-
39
-
40
-
41
-
42
-
43
-
44
-
45
-
46
-
47
-
48
-
49
-
50
-
51
-
52
-
53
-
54
-
55
-
56
-
57
-
58
-
59
-
60
-
61
-
62
-
63
-
64
-
65
-
66
-
67
-
68
-
69
-
70
-
71
-
72
-
73
-
74
-
75
-
76
-
77
-
78
-
79
-
80
-
81
-
82
-
83
-
84
-
85
-
86
-
87
-
88
-
89
-
90
-
91
-
92
-
93
-
94
-
95
-
96
-
97
-
98
-
99
-
100
-
101
-
102
 |
 |