Dell B1165nfw Dell Users Guide - Page 18
Type A, Front view - toner cartridges
 |
View all Dell B1165nfw manuals
Add to My Manuals
Save this manual to your list of manuals |
Page 18 highlights
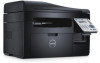
Machine overview 10 Front view • This illustration may differ from your machine depending on your model. There are various types of machine. • Some features and optional goods may not be available depending on model or country (see "Features by models" on page 7). 2 Control panel 8 Scanner glass 3 Handle 9 Scan unita b 4 Tray 10 Inner cover 5 Tray handle 11 Toner cartridge 6 Output support a. Close the scanner lid before opening the scan unit. b. Be careful not to pinch your fingers. Type A 1 8 9 7 6 5 4 1 Scanner lid 2 11 10 3 7 Output tray 1. Introduction 18
-
 1
1 -
2
-
3
-
4
-
5
-
6
-
7
-
8
-
9
-
10
-
11
-
12
-
 13
13 -
 14
14 -
 15
15 -
 16
16 -
 17
17 -
 18
18 -
 19
19 -
 20
20 -
 21
21 -
 22
22 -
 23
23 -
24
-
25
-
26
-
27
-
28
-
29
-
30
-
31
-
32
-
33
-
34
-
35
-
36
-
37
-
38
-
39
-
40
-
41
-
42
-
43
-
44
-
45
-
46
-
47
-
48
-
49
-
50
-
51
-
52
-
53
-
54
-
55
-
56
-
57
-
58
-
59
-
60
-
61
-
62
-
63
-
64
-
65
-
66
-
67
-
68
-
69
-
70
-
71
-
72
-
73
-
74
-
75
-
76
-
77
-
78
-
79
-
80
-
81
-
82
-
83
-
84
-
85
-
86
-
87
-
88
-
89
-
90
-
91
-
92
-
93
-
94
-
95
-
96
-
97
-
98
-
99
-
100
-
101
-
102
-
103
-
104
-
105
-
106
-
107
-
108
-
109
-
110
-
111
-
112
-
113
-
114
-
115
-
116
-
117
-
118
-
119
-
120
-
121
-
122
-
123
-
124
-
125
-
126
-
127
-
128
-
129
-
130
-
131
-
132
-
133
-
134
-
135
-
136
-
137
-
138
-
139
-
140
-
141
-
142
-
143
-
144
-
145
-
146
-
147
-
148
-
149
-
150
-
151
-
152
-
153
-
154
-
155
-
156
-
157
-
158
-
159
-
160
-
161
-
162
-
163
-
164
-
165
-
166
-
167
-
168
-
169
-
170
-
171
-
172
-
173
-
174
-
175
-
176
-
177
-
178
-
179
-
180
-
181
-
182
-
183
-
184
-
185
-
186
-
187
-
188
-
189
-
190
-
191
-
192
-
193
-
194
-
195
-
196
-
197
-
198
-
199
-
200
-
201
-
202
-
203
-
204
-
205
-
206
-
207
-
208
-
209
-
210
-
211
-
212
-
213
-
214
-
215
-
216
-
217
-
218
-
219
-
220
-
221
-
222
-
223
-
224
-
225
-
226
-
227
-
228
-
229
-
230
-
231
-
232
-
233
-
234
-
235
-
236
-
237
-
238
-
239
-
240
-
241
-
242
-
243
-
244
-
245
-
246
-
247
-
248
-
249
-
250
-
251
-
252
-
253
-
254
-
255
-
256
-
257
-
258
-
259
-
260
-
261
-
262
-
263
-
264
-
265
-
266
-
267
-
268
-
269
-
270
-
271
-
272
-
273
-
274
-
275
-
276
-
277
-
278
-
279
-
280
-
281
-
282
-
283
-
284
-
285
-
286
-
287
-
288
-
289
-
290
-
291
-
292
-
293
-
294
-
295
-
296
-
297
-
298
-
299
-
300
 |
 |

Machine overview±±
10
2
Control panel
8
Scanner glass
Front view
3
9
Handle
Scan unit
a b
4
Tray
10
Inner cover
•
This illustration may differ from your machine depending on your model. ±
There are various types of machine.
5±±
Tray handle
11
Toner cartridge
•
Some features and optional goods may not be available depending on
6
Output support
model or country (see "Features by models" on page 7).
a. Close the scanner lid before opening the scan unit.
b. Be careful not to pinch your fingers.
Type A
1
8
9
7±±
6±
5±±
2±±
11±±
10
4
3
1
Scanner lid
7
Output tray
1. Introduction
18±±