Dell Inspiron 1720 Service Manual - Page 40
Keyboard - owner s manual
 |
View all Dell Inspiron 1720 manuals
Add to My Manuals
Save this manual to your list of manuals |
Page 40 highlights
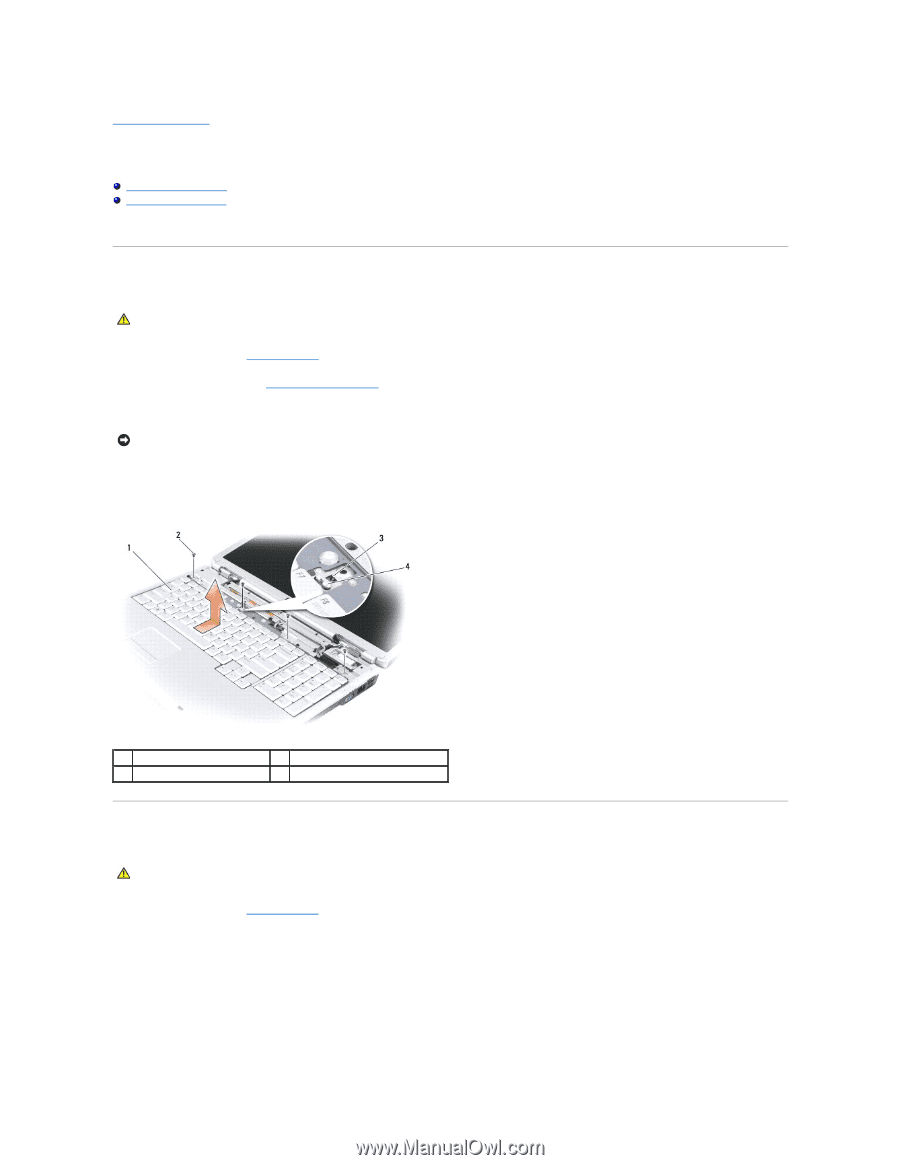
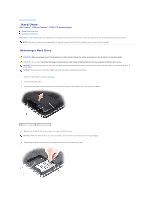
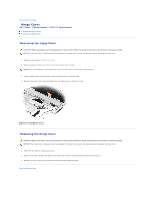
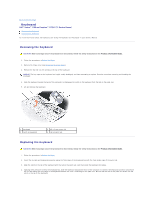
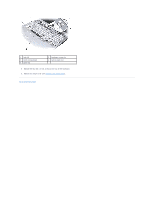
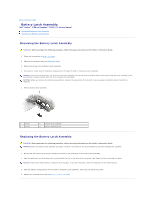
Back to Contents Page Keyboard Dell™ Vostro™ 1700 and Inspiron™ 1720/1721 Service Manual Removing the Keyboard Replacing the Keyboard For more information about the keyboard, see "Using the Keyboard and Touchpad" in your Owner's Manual. Removing the Keyboard CAUTION: Before you begin any of the procedures in this section, follow the safety instructions in the Product Information Guide. 1. Follow the procedures in Before You Begin. 2. Remove the hinge cover (see Removing the Hinge Cover). 3. Remove the four M2 x 3-mm screws at the top of the keyboard. NOTICE: The key caps on the keyboard are fragile, easily dislodged, and time-consuming to replace. Exercise care when removing and handling the keyboard. 4. Slide the keyboard toward the back of the computer to disengage the notch on the keyboard from the tab on the palm rest. 5. Lift and remove the keyboard. 1 keyboard 3 notch on keyboard 2 M2 x 3-mm screws (4) 4 tab on palm rest Replacing the Keyboard CAUTION: Before you begin any of the procedures in this section, follow the safety instructions in the Product Information Guide. 1. Follow the procedures in Before You Begin. 2. Insert the six tabs and keyboard connector along the front edge of the keyboard beneath the front-inside edge of the palm rest. 3. Align the notch at the top of the keyboard with the tab on the palm rest, and then lower the keyboard into place. 4. Applying even pressure to keep the keyboard flat, slide the keyboard towards the front of the computer to connect the keyboard connector and secure the six tabs along the front edge of the keyboard beneath the front- inside edge of the palm rest. Ensure that the tab on the palm rest slides into the notch at the top of the keyboard.
-
 1
1 -
2
-
3
-
4
-
5
-
6
-
7
-
8
-
9
-
10
-
11
-
12
-
13
-
14
-
15
-
16
-
17
-
18
-
19
-
20
-
21
-
22
-
23
-
24
-
25
-
26
-
27
-
28
-
29
-
30
-
31
-
32
-
33
-
34
-
 35
35 -
 36
36 -
 37
37 -
 38
38 -
 39
39 -
 40
40 -
 41
41 -
 42
42 -
 43
43 -
 44
44 -
 45
45 -
46
-
47
-
48
-
49
-
50
-
51
-
52
-
53
-
54
-
55
-
56
-
57
-
58
-
59
-
60
-
61
-
62
-
63
-
64
-
65
-
66
-
67
-
68
 |
 |