Dell Inspiron 1720 Service Manual - Page 9
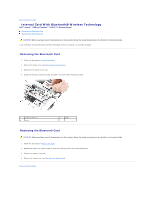
Removing the Computer Base, Replacing the Computer Base
 |
View all Dell Inspiron 1720 manuals
Add to My Manuals
Save this manual to your list of manuals |
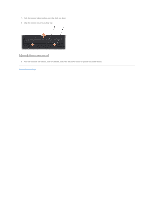
Page 9 highlights
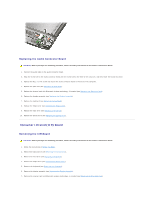
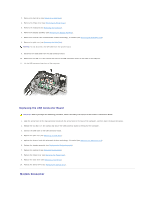
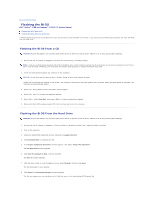
Removing the Computer Base CAUTION: Before you begin the following procedure, follow the safety instructions in the Product Information Guide. 1. Follow the instructions in Before You Begin. 2. Remove the system board (see Removing the System Board Assembly). NOTE: When removing the system board to replace the computer base, it is not necessary to remove the processor, memory, or Mini-Card. 3. Remove the wireless sniffer board (see Removing the Wireless Sniffer Board). 4. Remove the audio connector board (see Removing the Audio Connector Board). 5. Remove the CIR board (see Removing the CIR Board). 6. Remove the USB connector board (see Removing the USB Connector Board). 7. Remove the speaker assembly (see Removing the Speaker Assembly). Replacing the Computer Base CAUTION: Before you begin the following procedure, follow the safety instructions in the Product Information Guide. 1. Replace the speaker assembly (see Replacing the Speaker Assembly). 2. Replace the USB connector board (see Replacing the USB Connector Board. 3. Replace the CIR board (see Replacing the CIR Board). 4. Replace the audio connector board (see Replacing the Audio Connector Board). 5. Replace the wireless sniffer board (see Replacing the Wireless Sniffer Board). NOTICE: Ensure that the rubber gasket is installed in the appopriate location for your processor. The gasket can be moved as needed. 1 location for Intel processor 2 rubber gasket 3 location for AMD processor 6. Complete the replacement of the computer base by following the procedures in Replacing the System Board Assembly. Back to Contents Page
-
 1
1 -
2
-
3
-
 4
4 -
 5
5 -
 6
6 -
 7
7 -
 8
8 -
 9
9 -
 10
10 -
 11
11 -
 12
12 -
 13
13 -
 14
14 -
15
-
16
-
17
-
18
-
19
-
20
-
21
-
22
-
23
-
24
-
25
-
26
-
27
-
28
-
29
-
30
-
31
-
32
-
33
-
34
-
35
-
36
-
37
-
38
-
39
-
40
-
41
-
42
-
43
-
44
-
45
-
46
-
47
-
48
-
49
-
50
-
51
-
52
-
53
-
54
-
55
-
56
-
57
-
58
-
59
-
60
-
61
-
62
-
63
-
64
-
65
-
66
-
67
-
68
 |
 |