Dell Inspiron 1720 Service Manual - Page 44
Memory
 |
View all Dell Inspiron 1720 manuals
Add to My Manuals
Save this manual to your list of manuals |
Page 44 highlights
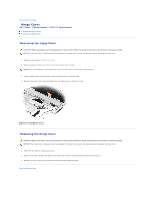
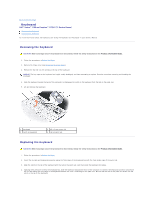
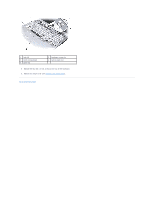
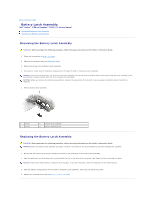
Back to Contents Page Memory Dell™ Vostro™ 1700 and Inspiron™ 1720/1721 Service Manual Removing a Memory Module Replacing a Memory Module Your computer has two user-accessible SODIMM sockets, one accessed from beneath the keyboard (DIMM A), and the other accessed from the bottom of the computer (DIMM B). You can increase your computer memory by installing memory modules on the system board. See "Specifications" in your Owner's Manual for information on the memory supported by your computer. Install only memory modules that are intended for your computer. NOTICE: If your computer has only one memory module, install the memory module in the connector labeled "DIMMA." NOTICE: If you need to install memory modules in two connectors, install a memory module in the connector labeled "DIMMA" before you install a module in the connector labeled "DIMMB." NOTE: Memory modules purchased from Dell are covered under your computer warranty. Removing a Memory Module CAUTION: Before you begin any of the procedures in this section, follow the safety instructions in the Product Information Guide. DIMM A Memory Module The DIMM A memory module is located under the keyboard. 1. Follow the procedures in Before You Begin. 2. Remove the hinge cover (see Removing the Hinge Cover). 3. Remove the keyboard (see Removing the Keyboard). NOTICE: To prevent damage to the memory module connector, do not use tools to spread the memory module securing clips. 4. Use your fingertips to carefully spread apart the securing clips on each end of the memory module connector until the module pops up. 5. Remove the module from the connector. 1 memory module (DIMM A) 2 securing clips (2) DIMM B Memory Module The DIMM B memory module is located under the memory module cover on the bottom of the computer.
-
 1
1 -
2
-
3
-
4
-
5
-
6
-
7
-
8
-
9
-
10
-
11
-
12
-
13
-
14
-
15
-
16
-
17
-
18
-
19
-
20
-
21
-
22
-
23
-
24
-
25
-
26
-
27
-
28
-
29
-
30
-
31
-
32
-
33
-
34
-
35
-
36
-
37
-
38
-
 39
39 -
 40
40 -
 41
41 -
 42
42 -
 43
43 -
 44
44 -
 45
45 -
 46
46 -
 47
47 -
 48
48 -
 49
49 -
50
-
51
-
52
-
53
-
54
-
55
-
56
-
57
-
58
-
59
-
60
-
61
-
62
-
63
-
64
-
65
-
66
-
67
-
68
 |
 |
