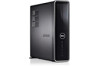
Dell Inspiron 560s Service Manual
Dell Inspiron 560s Manual
 |
View all Dell Inspiron 560s manuals
Add to My Manuals
Save this manual to your list of manuals |
Dell Inspiron 560s manual content summary:
- Dell Inspiron 560s | Service Manual - Page 1
Dell™ Inspiron™ 560s Service Manual Before You Begin Technical Overview Computer Cover Support Bracket Front Bezel Memory Module(s) PCI and PCI Express Cards Drives Fans Front I/O Panel Processor System Board Power Supply Battery System Setup Notes, Cautions, and Warnings NOTE: A NOTE indicates - Dell Inspiron 560s | Service Manual - Page 2
Back to Contents Page Before You Begin Dell™ Inspiron™ 560s Service Manual Technical Specifications Recommended Tools Turning Off Your Computer Safety Instructions This manual provides procedures for removing and installing the components in your computer. Unless otherwise noted, each procedure - Dell Inspiron 560s | Service Manual - Page 3
network cables from the computer. 6. Disconnect your computer and all attached devices from their electrical outlets. 7. Disconnect all attached devices from your computer. 8. Press and eject any installed cards from the optional Media Card Reader. 9. Press and hold the power button while the system - Dell Inspiron 560s | Service Manual - Page 4
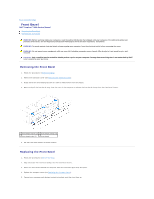
Back to Contents Page Front Bezel Dell™ Inspiron™ 560s Service Manual Removing the Front Bezel Replacing the Front Bezel WARNING: Before working inside your computer, read the safety information that shipped with your computer. For additional safety best practices information, see the Regulatory - Dell Inspiron 560s | Service Manual - Page 5
Back to Contents Page - Dell Inspiron 560s | Service Manual - Page 6
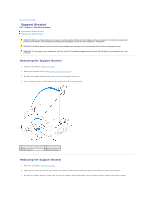
Back to Contents Page Support Bracket Dell™ Inspiron™ 560s Service Manual Removing the Support Bracket Replacing the Support Bracket WARNING: Before working inside your computer, read the safety information that shipped with your computer. For additional safety best practices information, see the - Dell Inspiron 560s | Service Manual - Page 7
4. Replace the computer cover (see Replacing the Computer Cover). 5. Connect your computer and devices to electrical outlets, and then turn them on. Back to Contents Page - Dell Inspiron 560s | Service Manual - Page 8
Back to Contents Page PCI and PCI Express Cards Dell™ Inspiron™ 560s Service Manual Removing PCI and PCI Express Cards Replacing PCI and PCI Express Cards Configuring Your Computer After Removing or Installing a PCI or PCI Express Card WARNING: Before working inside your computer, read the safety - Dell Inspiron 560s | Service Manual - Page 9
press down firmly. Ensure that the card is fully seated in the slot. 1 fully-seated card 2 not fully-seated card 3 alignment bar 4 alignment guide 5 bracket within slot 6 bracket caught outside of slot 8. Replace the support bracket (see Replacing the Support Bracket). 9. Connect any cables that - Dell Inspiron 560s | Service Manual - Page 10
Guide. For information on installing drivers and software for your card, see the documentation that shipped with the card. Sound Card Installed Removed 1. Enter system setup (see Entering System 's back panel connectors. Network Card 1. Enter system setup (see Entering System Setup). 2. Go to - Dell Inspiron 560s | Service Manual - Page 11
Battery Dell™ Inspiron™ 560s Service Manual Removing the Battery Replacing the Battery WARNING: Before working inside servicing that is not authorized by Dell™ is not covered by your warranty. Removing the Battery 1. Record all the screens in System Setup (see System Setup) so that you can restore - Dell Inspiron 560s | Service Manual - Page 12
3. Replace the computer cover (see Replacing the Computer Cover). 4. Connect your computer and devices to electrical outlets, and then turn them on. 5. Enter System Setup (see Entering System Setup) and restore the settings you recorded in step 1. Back to Contents Page - Dell Inspiron 560s | Service Manual - Page 13
Back to Contents Page Computer Cover Dell™ Inspiron™ 560s Service Manual Removing the Computer Cover Replacing the Computer Cover WARNING: Before working inside your computer, read the safety information that shipped with your computer. For additional safety best practices information, see the - Dell Inspiron 560s | Service Manual - Page 14
securely installed. 6. Ensure that the cover is seated correctly. 7. Replace the two screws that secure the computer cover, using a screwdriver. 1 screws (2) 2 . CAUTION: Ensure that none of the system air-vents are blocked. Blocking them would cause serious thermal problems. Back to Contents Page - Dell Inspiron 560s | Service Manual - Page 15
Back to Contents Page Processor Dell™ Inspiron™ 560s Service Manual Removing the Processor Replacing the Processor WARNING: Before working inside your computer, read the safety information that shipped with your computer. For additional safety best practices information, see the Regulatory - Dell Inspiron 560s | Service Manual - Page 16
socket, and do not use excessive force when you install the processor. 6. Set the processor lightly in the socket and ensure that the processor is positioned correctly. 7. When the processor is the top of the processor. 11. Replace the processor fan and heat sink assembly (see Replacing the Processor - Dell Inspiron 560s | Service Manual - Page 17
CAUTION: Ensure that the processor fan and heat sink assembly is correctly seated and secure. 12. Replace the computer cover (see Replacing the Computer Cover). 13. Connect your computer and devices to electrical outlets, and turn them on. Back to Contents Page - Dell Inspiron 560s | Service Manual - Page 18
Back to Contents Page Drives Dell™ Inspiron™ 560s Service Manual Hard Drive Media Card Reader Optical Drive WARNING: Before working inside your computer, read the safety information that shipped with your computer. For additional safety best practices information, see the Regulatory Compliance - Dell Inspiron 560s | Service Manual - Page 19
that came with the hard drive for instructions on installing any software required for hard drive operation. 12. Check the System Setup for hard drive configuration changes (see Entering System Setup). Media Card Reader Removing the Media Card Reader 1. Follow the procedures in Before You Begin - Dell Inspiron 560s | Service Manual - Page 20
on the break- away metal plate and rotate the screwdriver outwards to break and remove the metal plate. 3. If not present, attach the two shoulder screws to the Media Card Reader. NOTE: If you are replacing an existing drive, remove the shoulder screws from the existing drive and attach them to the - Dell Inspiron 560s | Service Manual - Page 21
, until the Media Card Reader snaps into place. 5. Connect the FlexBay USB cable to the system board connector (see System Board Components). 6. 3. Remove the front bezel (see Removing the Front Bezel). 4. Disconnect the power cable and the data cable from the back of the optical drive. NOTE: If - Dell Inspiron 560s | Service Manual - Page 22
the power cable and the data cable to the optical drive. 5. If disconnected, connect the data cable to the system board connector (see System Board Components the optical drive for instructions on installing any software required for optical drive operation. 9. Check the System Setup for drive - Dell Inspiron 560s | Service Manual - Page 23
Back to Contents Page Fans Dell™ Inspiron™ 560s Service Manual Removing the Processor Fan and Heat Sink Assembly Replacing the Processor Fan and Heat Sink Assembly Removing the Chassis Fan Replacing the Chassis Fan WARNING: Before working inside your computer, read the safety information that - Dell Inspiron 560s | Service Manual - Page 24
computer cover (see Removing the Computer Cover). 3. Disconnect the chassis fan cable from the system board connector (see System Board Components). 4. Remove the screw that secures the chassis fan to the chassis. 5. Slide the chassis fan towards the front of the computer and lift it out. 1 screw - Dell Inspiron 560s | Service Manual - Page 25
towards the back of the computer. 1 Chassis-fan bottom tab 2 Chassis-fan top tabs (2) 3 screw 3. Replace the screw that secures the chassis fan to the chassis. 4. Connect the chassis fan cable to the system board connector (see System Board Components). 5. Replace the computer cover (see Replacing - Dell Inspiron 560s | Service Manual - Page 26
I/O Panel Dell™ Inspiron™ 560s Service Manual Removing the Front I/O Panel Replacing the Front I/O Panel WARNING: Before working inside your Disconnect all the cables that are connected to the front I/O panel from the system board connectors. Note the routing of all cables as you remove them so that - Dell Inspiron 560s | Service Manual - Page 27
You Begin. 2. Route and connect the cables that you disconnected from the system board connectors. 3. Align and slide the front I/O panel into the front (see Replacing the Hard Drive). 6. Replace the support bracket (see Replacing the Support Bracket). 7. Replace the front bezel (see Replacing the - Dell Inspiron 560s | Service Manual - Page 28
Back to Contents Page Memory Module(s) Dell™ Inspiron™ 560s Service Manual Removing the Memory Module(s) Replacing the Memory Module(s) Recommended Memory Configuration Setting Up Dual-Channel Memory Configuration WARNING: Before working inside your computer, read the safety information that shipped - Dell Inspiron 560s | Service Manual - Page 29
My Computer icon on your Microsoft® Windows® desktop and click Properties. 10. Click the General tab. 11. To verify that the memory is installed correctly, check the amount of memory (RAM) listed. Recommended Memory Configuration While installing or replacing memory, refer to the table below. For - Dell Inspiron 560s | Service Manual - Page 30
1 Pair A: matched pair of memory modules in 2 Pair B: matched pair of memory modules in connectors DIMM1 and DIMM3 connectors DIMM2 and DIMM4 Back to Contents Page - Dell Inspiron 560s | Service Manual - Page 31
Back to Contents Page Power Supply Dell™ Inspiron™ 560s Service Manual Removing the Power Supply Replacing the Power Supply WARNING: Before working inside your computer, read the safety information that shipped with your computer. For additional safety best practices information, see the Regulatory - Dell Inspiron 560s | Service Manual - Page 32
. 4. Connect the DC power cables to the system board and drives. 5. Secure all the cables to the securing clip on the side of the power supply. NOTE: Double-check all cable connections to make sure they are secure. 6. Replace the support bracket (see Replacing the Support Bracket). 7. Replace the - Dell Inspiron 560s | Service Manual - Page 33
Back to Contents Page System Setup Dell™ Inspiron™ 560s Service Manual Overview Entering System Setup Clearing Forgotten Passwords Clearing CMOS Settings Flashing the BIOS Overview Use System Setup to: l Change the system configuration information after you add, change, or remove any hardware in - Dell Inspiron 560s | Service Manual - Page 34
.; Hard Drive; CD/DVD; Network; USB; Disabled (Network by default) Power Management Setup ACPI Suspend Type S1; S3 (S3 by default) Remote Wake Up Enabled; Disabled (Enabled by default) AC Recovery Power Off; Power On; Last Power State (Power Off by default) Auto Power On Enabled; Disabled - Dell Inspiron 560s | Service Manual - Page 35
boot from the CD drive so that you can run the Dell Diagnostics on the Drivers and Utilities media, but you want the computer to boot from If you wait too long and the operating system logo appears, continue to wait until you see the Microsoft Windows desktop. Then shut down your computer and try - Dell Inspiron 560s | Service Manual - Page 36
five seconds, and then turn off the computer. If required, press and hold the power button to turn off the computer. 6. Remove the 2-pin jumper plug from pins 1 settings: a. Locate the 3-pin CMOS reset jumper on the system board (see System Board Components). b. Remove the jumper plug from the CMOS - Dell Inspiron 560s | Service Manual - Page 37
Flashing the BIOS The BIOS may require flashing when an update is available or when replacing the system board. To flash the BIOS: 1. Turn on the computer. 2. Visit support.dell.com. 3. Click Drivers & Downloads. 4. Locate the BIOS update file for your computer: NOTE: The Service Tag for your - Dell Inspiron 560s | Service Manual - Page 38
Back to Contents Page System Board Dell™ Inspiron™ 560s Service Manual Removing the System Board Replacing the System Board WARNING: Before working inside your computer, read the safety information that shipped with your computer. For additional safety best practices information, see the Regulatory - Dell Inspiron 560s | Service Manual - Page 39
Processor Fan and Heat Sink Assembly). 7. Replace the optical drive (see Replacing the Optical Drive). 8. Replace the memory modules (see Replacing the Memory Module(s)). 9. Replace any PCI and PCI Express cards on the system board (see Replacing PCI and PCI Express Cards). 10. Replace the support - Dell Inspiron 560s | Service Manual - Page 40
. Inside View of Your Computer 1 power supply 3 system board 5 Media Card Reader (optional) 2 support bracket 4 optical drive 6 primary hard-drive System Board Components 1 12 V power connector (ATX12V1) 2 processor socket 3 processor fan connector (FAN_CPU) 4 memory-module connector (DIMM1 - Dell Inspiron 560s | Service Manual - Page 41
7 memory-module connector (DIMM4) 8 password reset jumper (CLR_PSW) 9 main power connector (ATX1_POWER1) 10 SATA connector (SATA_0) 11 SATA connector (SATA_1) 12 SATA connector (SATA_2) 13 SATA connector (SATA_3) 14 front-panel connector (FRONTPANEL) 15 front-panel USB connector (F_USB1) 16 - Dell Inspiron 560s | Service Manual - Page 42
Back to Contents Page Dell™ Inspiron™ 560s Service Manual NOTE: A NOTE indicates important information that helps you make better use of your computer. CAUTION: A CAUTION indicates potential damage to hardware or loss of data if instructions are not followed. WARNING: A WARNING indicates a potential
-
 1
1 -
 2
2 -
 3
3 -
 4
4 -
 5
5 -
 6
6 -
 7
7 -
8
-
9
-
10
-
11
-
12
-
13
-
14
-
15
-
16
-
17
-
18
-
19
-
20
-
21
-
22
-
23
-
24
-
25
-
26
-
27
-
28
-
29
-
30
-
31
-
32
-
33
-
34
-
35
-
36
-
37
-
38
-
39
-
40
-
41
-
42
 |
 |
Dell™ Inspiron™ 560s Service Manual
Notes, Cautions, and Warnings
Information in this document is subject to change without notice.
© 2009 Dell Inc. All rights reserved.
Reproduction of these materials in any manner whatsoever without the written permission of Dell Inc. is strictly forbidden.
Trademarks used in this text:
Dell
, the
DELL
logo, and
Inspiron
are trademarks of Dell Inc.;
Intel SpeedStep
is a registered trademark of Intel Corporation in the U.S. and other
countries;
Microsoft
and
Windows
are either trademarks or registered trademarks of Microsoft Corporation in the United States and/or other countries.
Other trademarks and trade names may be used in this document to refer to either the entities claiming the marks and names or their products. Dell Inc. disclaims any
proprietary interest in trademarks and trade names other than its own.
Regulatory Model: DCSLE
November 2009
Rev. A00
Before You Begin
Technical Overview
Computer Cover
Support Bracket
Front Bezel
Memory Module(s)
PCI and PCI Express Cards
Drives
Fans
Front I/O Panel
Processor
System Board
Power Supply
Battery
System Setup
NOTE:
A NOTE indicates important information that helps you make better use of your computer.
CAUTION:
A CAUTION indicates potential damage to hardware or loss of data if instructions are not followed.
WARNING:
A WARNING indicates a potential for property damage, personal injury, or death.