Dell Inspiron 560s Service Manual - Page 39
Replacing the Processor Fan and Heat Sink Assembly - bios
 |
View all Dell Inspiron 560s manuals
Add to My Manuals
Save this manual to your list of manuals |
Page 39 highlights
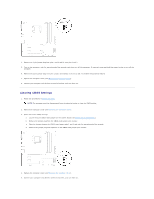
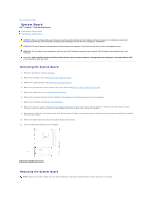
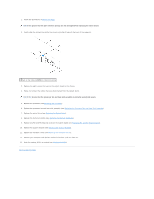
1. Follow the procedures in Before You Begin. CAUTION: Ensure that the port retention springs are not damaged while replacing the sytem board. 2. Gently align the system board into the chassis and slide it towards the back of the computer. 1 back of the computer 2 port retention spring 3. Replace the eight screws that secure the system board to the chassis. 4. Route and connect the cables that you disconnected from the system board. CAUTION: Ensure that the processor fan and heat sink assembly is correctly seated and secure. 5. Replace the processor (see Replacing the Processor). 6. Replace the processor fan and heat sink assembly (see Replacing the Processor Fan and Heat Sink Assembly). 7. Replace the optical drive (see Replacing the Optical Drive). 8. Replace the memory modules (see Replacing the Memory Module(s)). 9. Replace any PCI and PCI Express cards on the system board (see Replacing PCI and PCI Express Cards). 10. Replace the support bracket (see Replacing the Support Bracket). 11. Replace the computer cover (see Replacing the Computer Cover). 12. Connect your computer and devices to electrical outlets, and turn them on. 13. Flash the system BIOS, as needed (see Flashing the BIOS). Back to Contents Page
-
 1
1 -
2
-
3
-
4
-
5
-
6
-
7
-
8
-
9
-
10
-
11
-
12
-
13
-
14
-
15
-
16
-
17
-
18
-
19
-
20
-
21
-
22
-
23
-
24
-
25
-
26
-
27
-
28
-
29
-
30
-
31
-
32
-
33
-
 34
34 -
 35
35 -
 36
36 -
 37
37 -
 38
38 -
 39
39 -
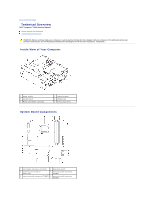 40
40 -
 41
41 -
 42
42
 |
 |
