Dell OptiPlex 9030 All In One Dell OptiPlex 9030 All-In-One Owners Manual - Page 10
Removing the VESA Stand, Before Working Inside Your Computer - hard drive removal
 |
View all Dell OptiPlex 9030 All In One manuals
Add to My Manuals
Save this manual to your list of manuals |
Page 10 highlights
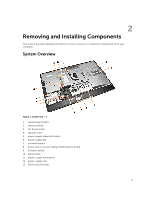
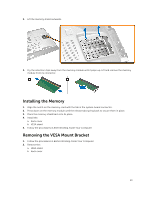
Figure 2. Inside View - 2 1. processor 3. memory module 5. left side lock latch 7. speaker 9. processor fan 11. right side lock latch 13. display bracket 2. coin-cell battery 4. WLAN card 6. hard drive 8. system board 10. speaker 12. optical-drive cable 14. heatsink assembly Removing the VESA Stand 1. Follow the procedures in Before Working Inside Your Computer. 2. Place the computer on a flat surface, display side facing downwards. 10
-
 1
1 -
2
-
3
-
4
-
 5
5 -
 6
6 -
 7
7 -
 8
8 -
 9
9 -
 10
10 -
 11
11 -
 12
12 -
 13
13 -
 14
14 -
 15
15 -
16
-
17
-
18
-
19
-
20
-
21
-
22
-
23
-
24
-
25
-
26
-
27
-
28
-
29
-
30
-
31
-
32
-
33
-
34
-
35
-
36
-
37
-
38
-
39
-
40
-
41
-
42
-
43
-
44
-
45
-
46
-
47
-
48
-
49
-
50
-
51
-
52
-
53
-
54
-
55
-
56
-
57
-
58
-
59
-
60
-
61
 |
 |

Figure 2. Inside View – 2
1.
processor
2.
coin-cell battery
3.
memory module
4.
WLAN card
5.
left side lock latch
6.
hard drive
7.
speaker
8.
system board
9.
processor fan
10.
speaker
11.
right side lock latch
12.
optical-drive cable
13.
display bracket
14.
heatsink assembly
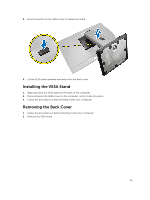
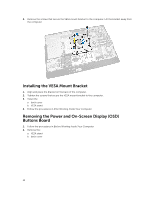
Removing the VESA Stand
1.
Follow the procedures in
Before Working Inside Your Computer
.
2.
Place the computer on a flat surface, display side facing downwards.
10