Dell PowerApp 110 Rack Installation Guide - Page 19
Installing Tab Covers, Four-Post Rack Kit Installation, Rack Kit Contents
 |
View all Dell PowerApp 110 manuals
Add to My Manuals
Save this manual to your list of manuals |
Page 19 highlights
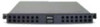
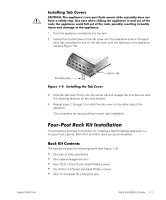
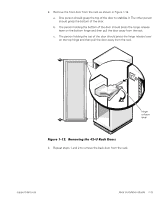
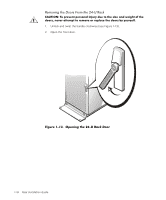
Installing Tab Covers CAUTION: The appliance's two-post flush-mount slide assembly does not have a safety stop. Use care when sliding the appliance in and out of the rack; the appliance could fall out of the rack, possibly resulting in bodily injury and damage to the appliance. 1. Push the appliance completely into the rack. 2. Center the thumbscrew on the tab cover with the clearance hole on the appliance tab, and align the slot on the tab cover with the opening on the appliance tab (see Figure 1-9). thumbscrew server tab Figure 1-9. Installing the Tab Cover 3. Hold the tab cover firmly onto the server tab and engage the thumbscrew with the receiving fastener on the slide bracket. 4. Repeat steps 1 through 3 to install the tab cover on the other side of the appliance. This completes the two-post flush-mount rack installation. Four-Post Rack Kit Installation This procedure provides instructions for installing a Dell PowerApp appliance in a four-post rack cabinet. Both 24-U and 42-U racks are accommodated. Rack Kit Contents The rack kit includes the following items (see Figure 1-10): • One pair of slide assemblies • One cable-management arm • Four 10-32 x 0.5-inch pan-head Phillips screws • Six 10-24 x 0.375-inch pan-head Phillips screws • One 1-U template for a four-post rack support.dell.com Rack Installation Guide 1-11
-
 1
1 -
2
-
3
-
4
-
5
-
6
-
7
-
8
-
9
-
10
-
11
-
12
-
13
-
 14
14 -
 15
15 -
 16
16 -
 17
17 -
 18
18 -
 19
19 -
 20
20 -
 21
21 -
 22
22 -
 23
23 -
 24
24 -
25
-
26
-
27
-
28
-
29
-
30
-
31
-
32
-
33
-
34
 |
 |