Dell PowerEdge 1655MC System Configuration Guide
Dell PowerEdge 1655MC Manual
 |
View all Dell PowerEdge 1655MC manuals
Add to My Manuals
Save this manual to your list of manuals |
Dell PowerEdge 1655MC manual content summary:
- Dell PowerEdge 1655MC | System
Configuration Guide - Page 1
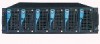
Dell™ PowerEdge™ 1655MC Systems System Configuration Guide www.dell.com | support.dell.com - Dell PowerEdge 1655MC | System
Configuration Guide - Page 2
to hardware or loss of data and tells you how to avoid the problem. CAUTION: A CAUTION indicates a potential for property damage, personal injury, Dell Computer Corporation is strictly forbidden. Trademarks used in this text: Dell, the DELL logo, PowerEdge, and Dell OpenManage are trademarks of Dell - Dell PowerEdge 1655MC | System
Configuration Guide - Page 3
Servers Soft Switching OSCAR Navigation Basics Configuring OSCAR Assigning Server Names Changing the Display Behavior Setting OSCAR Screen Saver Security 1-14 1-16 1-17 1-17 1-18 1-19 1-19 1-20 1-21 Configuring Drive Mirroring With PERC 4/im Integrated RAID 1-22 Using Remote Install - Dell PowerEdge 1655MC | System
Configuration Guide - Page 4
Figure 1-8. Figure 1-9. System With Drive Shelf Back-Panel Features System Management Module Features . . . . . Network Switch Module Integrated Switch Modules Connected to a Single External Switch Integrated Switch Modules Connected to Two External Switches Managing the System With the - Dell PowerEdge 1655MC | System
Configuration Guide - Page 5
, up to two hard drives, and up to two memory modules. To function as a system, a server module is inserted into a system that includes power supplies, fans, a system management module, and at least one network switch module. The power supplies, fans, system management module, and network - Dell PowerEdge 1655MC | System
Configuration Guide - Page 6
specifications. • The Dell OpenManage Remote Install User's Guide describes imaging a server module configuration to another server module. • The Dell PowerEdge Expandable RAID Controller 4/im Integrated Mirroring Guide describes using the integrated mirroring features. 1-2 System Configuration - Dell PowerEdge 1655MC | System
Configuration Guide - Page 7
for the remote access features. • The online Dell PowerEdge Integrated Switch User's Guide describes the features and how to use the network switch modules. • The Dell OpenManage Server Assistant User's Guide provides detailed information on the systems management software applications, as well as - Dell PowerEdge 1655MC | System
Configuration Guide - Page 8
module. See "Using the Network Switch Module." 8 Use the Dell OpenManage Server Assistant CD to load an operating system (if an operating system has not been installed) and to configure drivers. See "Using the Dell OpenManage Server Assistant CD" in the User's Guide. 9 To create an image of - Dell PowerEdge 1655MC | System
Configuration Guide - Page 9
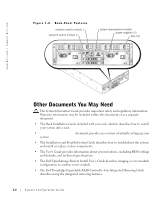
indicator Table 1-1. Icons on the System Management Module Icon System Management Module Feature Management serial port Ethernet management port System management status indicator System status indicator/system status connector Video connector Network switch module status indicator Analog rack - Dell PowerEdge 1655MC | System
Configuration Guide - Page 10
www.dell.com | support.dell.com 2 Click the Start button, the same as the setting you selected for the Console Redirection option on the server module. 11 Click Terminal Setup. A setting for the number of rows and access features on the system management module. 1-6 System Configuration Guide - Dell PowerEdge 1655MC | System
Configuration Guide - Page 11
utility. For detailed information on using these utilities, see the Dell Embedded Remote Access/MC User's Guide and online help. Using the Network Switch Module The network switch module is DHCP client-enabled. After it is installed into the system and connected to an external network, the network - Dell PowerEdge 1655MC | System
Configuration Guide - Page 12
www.dell.com | support.dell.com Figure 1-4. Network Switch Module link indicators (4) activity indicators (4) reset button RJ11 serial port for network switch module setup 10/100/1000 BASE-T uplink ports (4) system fault indicator You can configure the network switch module either through - Dell PowerEdge 1655MC | System
Configuration Guide - Page 13
module using the serial command-line utility. See the online Dell PowerEdge Integrated Switch User's Guide for detailed information on configuration. Integrating the System Into the Network The Dell™ PowerEdge™ 1655MC is essentially a self-contained network. Table 1-2 and Table 1-3 show the mapping - Dell PowerEdge 1655MC | System
Configuration Guide - Page 14
.dell.com | support.dell.com Table 1-2. Internal Network Port Mapping (continued) Module Port LOM 2 Server module 3 LOM 1 LOM 2 Server module 4 LOM 1 LOM 2 Server module 5 LOM 1 LOM 2 Server module 6 LOM 1 LOM 2 System management module Network Switch 1 Port 1/3 1/4 1/5 1/6 1/11 Network Switch - Dell PowerEdge 1655MC | System
Configuration Guide - Page 15
, Dell recommends basic configurations such as link aggregation or channeling to maximize performance and availability of the network. In the following examples, the PowerEdge 1655MC has two integrated network switch modules. If only one network switch module is in the system, all of the server - Dell PowerEdge 1655MC | System
Configuration Guide - Page 16
www.dell.com | support.dell.com In Figure 1-5, a four-port channel is set up on the external ports of the network switch modules. A steps 1 through 3 for the second network switch module. 5 To save your configuration, type #copy running-config startup-config. 1-12 System Configuration Guide - Dell PowerEdge 1655MC | System
Configuration Guide - Page 17
and to provide load balancing and failover. SLB is configured through the Broadcom Advanced Server Program, which is on the Dell OpenManage Server Assistant CD. SLB is the only LOM teaming method supported on the PowerEdge 1655MC. NOTE: When you use the Broadcom drivers to configure an SLB team, the - Dell PowerEdge 1655MC | System
Configuration Guide - Page 18
.dell.com | support.dell.com Figure 1-6. Integrated Switch Modules Connected to Two External Switches channel client ip address 1 external network switch external network switch switch module 1 uplink ports (4) internal ports (6) switch module 2 uplink ports (4) internal ports (6) server - Dell PowerEdge 1655MC | System
Configuration Guide - Page 19
Managing the System With an Analog KVM Switch analog KVM switch PowerEdge 1655MC PowerEdge systems Figure 1-9 shows an example of how the system can be managed using a KVM-over-IP switch. NOTE: Direct connection is only supported on Dell KVM-over-IP switches. System Configuration Guide 1-15 - Dell PowerEdge 1655MC | System
Configuration Guide - Page 20
| support.dell.com Figure 1-9. Managing the System With a KVM-Over-IP Switch KVM cable CAT 5 cable KVM GUI CAT 5 to PS/2 HD/15 converter analog KVM switch KVM cables PowerEdge 1655MC digital KVM-over-IP switch CAT 5 direct connects to the system for analog or digital KVM control remote user - Dell PowerEdge 1655MC | System
Configuration Guide - Page 21
Time, type the number of seconds of delay desired before the Main dialog box is displayed after is pressed. 4 Click OK. To soft switch to a server module, press . Type the server module number and press . System Configuration Guide 1-17 - Dell PowerEdge 1655MC | System
Configuration Guide - Page 22
www.dell.com | support.dell.com OSCAR Navigation Basics Selects the OK button and returns to the previous dialog box. Completes the switch operation in the Main screen and closes OSCAR. Single-click Enables left- and Use to change case. 1-18 System Configuration Guide - Dell PowerEdge 1655MC | System
Configuration Guide - Page 23
system from the Setup menu within OSCAR. Click Names when initially setting up your KVM switch to identify servers by unique names. Select the other setup features to manage routine tasks for your servers use to manage server modules. For appears. NOTE: If the server list changes, the mouse cursor - Dell PowerEdge 1655MC | System
Configuration Guide - Page 24
www.dell.com | support.dell.com To assign names to servers: 1 In the Names dialog box, select the name or slot number you want to change and click Modify. The Name Modify dialog box appears. 2 Type a name in the New Name box. Names of servers may be up to 15 characters long. Legal characters - Dell PowerEdge 1655MC | System
Configuration Guide - Page 25
Setting a time to delay the display of OSCAR allows you to complete a soft switch without displaying OSCAR. Setting OSCAR Screen Saver Security To set password protection for the OSCAR Main dialog box appears. 2 Click Setup-Security. The Password dialog box appears. System Configuration Guide 1-21 - Dell PowerEdge 1655MC | System
Configuration Guide - Page 26
www.dell.com | support.dell.com 3 Type your Drive Mirroring With PERC 4/im Integrated RAID Use the following procedures to configure drive mirroring (RAID 1) before installing an operating system on the server module. If an operating system is preinstalled, you may use the following instructions - Dell PowerEdge 1655MC | System
Configuration Guide - Page 27
status after POST. For additional information on integrated mirroring, see the Dell PowerEdge RAID Controller 4/im Integrated Mirroring Guide. Using Remote Install Software Remote Install software uses Preboot Execution Environment (PXE) to deploy images to server modules over the network. Remote - Dell PowerEdge 1655MC | System
Configuration Guide - Page 28
www.dell.com | support.dell.com • Predeploy - Allows you to create a virtual system that is a deployment image to be installed on a server module at a later time. After the server module is installed, the deployment server recognizes the server module's service tag and deploys the image to the - Dell PowerEdge 1655MC | System
Configuration Guide - Page 29
names, 1-19 configuring, 1-19 navigating, 1-18 selecting servers, 1-17 viewing server modules, 1-16 P PERC 4/im configuring, 1-22 port mapping network switch module, 1-9 R remote access features, 1-4 using, 1-4 Remote Install using, 1-23 remote management configuring client system, 1-5 Index 1 - Dell PowerEdge 1655MC | System
Configuration Guide - Page 30
S system management module features, 1-5 icons, 1-5 KVM switch, 1-14 U uplink ports network switch module, 1-10 using KVM switch, 1-14 network switch module, 1-7 remote access, 1-4 Remote Install, 1-23 2 Index - Dell PowerEdge 1655MC | System
Configuration Guide - Page 31
Dell™ PowerEdge™ 1655MC 系统 www.dell.com | support.dell.com - Dell PowerEdge 1655MC | System
Configuration Guide - Page 32
2002 Dell Computer Corporation Dell Computer Corporation Dell DELL 徽标 PowerEdge 和 Dell OpenManage 是 Dell Computer Corporation 的商 标 Microsoft 和 Windows 是 Microsoft Corporation Environmental Protection Agency Dell Computer Corporation Dell Computer Corporation 2002 年 10 月 P/N 0W440 - Dell PowerEdge 1655MC | System
Configuration Guide - Page 33
目录 使用 KVM OSCAR OSCAR OSCAR 使用 PERC 4/im 集成 RAID 使用 Remote Install 2-2 2-3 2-4 2-5 2-7 2-9 2-12 2-12 2-14 2-16 2-17 2-17 2-18 2-19 2-19 2-20 2-21 2-22 2-23 索引 目录 3 - Dell PowerEdge 1655MC | System
Configuration Guide - Page 34
图 图 2-1 图 2-2 图 2-3 图 2-4 图 2-5 图 2-6 图 2-7 图 2-8 图 2-9 表 表 2-1 表 2-2 表 2-3 表 2-4 表 2-5 KVM KVM KVM-Over-IP 2-1 2-2 2-4 2-7 2-11 2-13 2-14 2-15 2-16 2-5 2-9 2-10 OSCAR 2-18 2-19 4 目录 - Dell PowerEdge 1655MC | System
Configuration Guide - Page 35
USB USB CD 2-1 图 2-1 驱动器架 USB CD KVM 2-2 2-1 - Dell PowerEdge 1655MC | System
Configuration Guide - Page 36
www.dell.com | support.dell.com 图 2-2 1 2 2 个 风扇 4 个 BIOS • Dell OpenManage Remote Install • Dell PowerEdge 可扩充 RAID 控制器 4/im • Dell Embedded Remote Access/MC 2-2 - Dell PowerEdge 1655MC | System
Configuration Guide - Page 37
• 联机 Dell PowerEdge • Dell OpenManage Server Assistant CD 如何开始 1 2 3 KVM 转换器 4 使用 KVM KVM KVM 5 RAID 1 RAID 1 DHCP DHCP IP IP 6 和 7 6 IP 7 IP 2-3 - Dell PowerEdge 1655MC | System
Configuration Guide - Page 38
www.dell.com | support.dell.com 8 使用 Dell OpenManage Server Assistant CD Dell OpenManage Server Assistant CD 9 Dell OpenManage™ Remote Install Dell OpenManage Systems Management CD Remote Install 软件 IP GUI IP IP KVM 2-3 图 2-3 2-4 - Dell PowerEdge 1655MC | System
Configuration Guide - Page 39
表 2-1 图标 键盘端口 鼠标端口 Microsoft® Windows Hilgraeve 的 HyperTerminal HyperTerminal Private 6.1 Hilgraeve 的 HyperTerminal Private 6.1 1 2 单击 Start Programs 程序 → Accessories 附件 → Communications HyperTerminal 3 OK 确定 4 从 Connect to COM OK 确定 COM COM 5 - Dell PowerEdge 1655MC | System
Configuration Guide - Page 40
www.dell.com | support.dell.com • 将 Stop bits 1 • 将 Flow control Hardware 硬件 6 单击 OK 确定 7 在 HyperTerminal 单击 File Settings 文件 单击 Properties 属性 然后单击 8 确保将 Function, arrow, and Ctrl keys act as Ctrl Terminal Keys 终端键 9 确保将 Backspace key sends Ctrl+H - Dell PowerEdge 1655MC | System
Configuration Guide - Page 41
RAC 20 racadm setractime - [-o ] 此处的 utctime UTC GMT offset Dell Embedded Remote Access/MC IP racadm Dell Embedded Remote Access/MC DHCP 1 LAN (LOM1) 转换器 2 LOM2 VLAN CD 2-4 图 2-4 4 个 4 个 重设按钮 RJ11 10/100/1000 BASE-T 4 个 - Dell PowerEdge 1655MC | System
Configuration Guide - Page 42
www.dell.com | support.dell.com RJ11 RJ11 10/100/1000 BASE-T 1 1 至 14 2 • 键入 connect switch-1 connect switch-2 3 Username-admin Password-admin DHCP 4 IP sh ip interface 5 -config startup-config config config-if 6 键入 quit 或 exit 7 Enter 8 Dell PowerEdge 2-8 - Dell PowerEdge 1655MC | System
Configuration Guide - Page 43
GUI Telnet Dell PowerEdge Dell™ PowerEdge™ 1655MC 2-2 和 表 2-3 表 2-2 模块端口 1 LOM 1 LOM 2 2 LOM 1 LOM 2 3 LOM 1 LOM 2 4 LOM 1 LOM 2 5 LOM 1 LOM 2 6 LOM 1 LOM 2 1 2 端口 1/1 1/1 1/2 1/2 1/3 1/3 1/4 1/4 1/5 1/5 1/6 1/6 1/11 2-9 - Dell PowerEdge 1655MC | System
Configuration Guide - Page 44
www.dell.com | support.dell.com 表 2-3 1 1/7 1/8 1/9 1/10 2 1/7 1/8 1/9 1/10 注 1/x 表示 CLI x NIC 例如 100Mbps 1000Mbps MDI NIC MID-X 图 2-5 和图 2-6 PowerEdge 1655MC Dell PowerEdge 1655MC LOM1 2-10 - Dell PowerEdge 1655MC | System
Configuration Guide - Page 45
图 2-5 客户机 IP 地址 通道 1 6 个 4 个 2 4 个 6 个 SLB 组队 1 LOM1 IP 地址 LOM2 2 LOM1 IP 地址 LOM2 在图 2-5 2 个或 4 Cisco EtherChannel IEEE 802.3ad LACP) GUI 使用 Link Aggregation EtherChannel 或 LACP 2-11 - Dell PowerEdge 1655MC | System
Configuration Guide - Page 46
www.dell.com | support.dell.com 1 键入 connect switch-x 此处的 x 2 Config (config)#interface port-channel 1 (config-if)#exit (config)#interface ethernet 1/7 (config-if)#channel-group 1 (config)#exit config config-if 3 对端口 8 9 和 10 2 4 1 至 3 5 copy running-config startup- - Dell PowerEdge 1655MC | System
Configuration Guide - Page 47
5 键入 quit 或 exit 6 Enter 2-5 SLB) 功能将 LOM SLB 通 过 Broadcom Advanced Server Dell OpenManage Server Assistant CD 上 SLB 是 PowerEdge 1655MC LOM 注 使用 Broadcom SLB LOM SLB 注 使用 Broadcom SLB SLB 图 2-6 客户机 IP 地址 1 通道 1 6 个 4 个 2 6 个 4 个 1 LOM 1 IP 地址 1 LOM 2 IP - Dell PowerEdge 1655MC | System
Configuration Guide - Page 48
www.dell.com | support.dell.com 使用 KVM 转换器 机载 KVM KVM KVM-over-IP 2-3 KVM-over-IP 2-7 KVM 2-7 KVM PowerEdge 1655MC KVM 电缆 KVM GUI KVM 2-8 KVM 2-14 - Dell PowerEdge 1655MC | System
Configuration Guide - Page 49
图 2-8 KVM 模拟 KVM 转换器 PowerEdge 1655MC PowerEdge 系统 图 2-9 KVM-over-IP Dell KVM-over-IP 2-15 - Dell PowerEdge 1655MC | System
Configuration Guide - Page 50
www.dell.com | support.dell.com 图 2-9 使用 KVM-Over-IP KVM 电缆 CAT 5 电缆 KVM GUI CAT 5 至 PS/2 HD/15 转接器 模拟 KVM 转换器 KVM 电缆 PowerEdge 1655MC 数字式 KVM-over-IP 转换器 CAT 5 KVM 控制 远程用户 PowerEdge 系统 PowerEdge 系统 KVM OSCAR OSCAR 使用 Main EID OSCAR OSCAR Main 1 按下 - Dell PowerEdge 1655MC | System
Configuration Guide - Page 51
3 OK Main Main 使用 Main KVM EID Print Screen Backspace 软切换 Print Screen OSCAR 1 按下 键 2-17 - Dell PowerEdge 1655MC | System
Configuration Guide - Page 52
www.dell.com | support.dell.com OSCAR 表 2-4 OSCAR 表 2-4 OSCAR 浏览键 按键 单击 键 OSCAR Print Screen Main Esc OSCAR - Dell PowerEdge 1655MC | System
Configuration Guide - Page 53
配置 OSCAR OSCAR 内部的 Setup KVM KVM Names OSCAR 要访问 Setup 1 按下 - Dell PowerEdge 1655MC | System
Configuration Guide - Page 54
www.dell.com | support.dell.com 1 在 Names Modify 修改 Name Modify 2 在 New Name 15 A-Z a-z 0-9 3 单击 OK Names Names OK 4 1 至步骤 3 5 在 Names OK OK 6 单击 X 或按下 - Dell PowerEdge 1655MC | System
Configuration Guide - Page 55
设置 OSCAR 要为 OSCAR 1 按下 键 12 5 在 Repeat Enter> 键 6 单击 OK 7 选择 Enable Screen Saver 8 在 Inactivity Time FREE Inactivity Time 9 Mode 能源 Energy Screen 屏幕 Energy - Dell PowerEdge 1655MC | System
Configuration Guide - Page 56
www.dell.com | support.dell.com 5 双击 Repeat Enter> 键 6 单击 OK 1 按下 - Dell PowerEdge 1655MC | System
Configuration Guide - Page 57
- Dell PowerEdge 1655MC | System
Configuration Guide - Page 58
www.dell.com | support.dell.com 2-24 - Dell PowerEdge 1655MC | System
Configuration Guide - Page 59
, 2-16 2-16 配置 , 2-19 2-17 2-19 浏览 , 2-18 PERC 4/im 配置 , 2-22 Remote Install 使用 , 2-23 B 背面板 , 2-2 部件 背面板 , 2-2 2-4 D 2-9 P 配置 PERC 4/im, 2-22 2-12 2-12 S 2-10 使用 KVM 2-14 Remote Install, 2-23 2-7 2-4 2-2 T 2-5 2-10 2-7 2-9 2-12 2-12 2-10 使用 , 2-7 2-10 X KVM 2-14 - Dell PowerEdge 1655MC | System
Configuration Guide - Page 60
2 索引 - Dell PowerEdge 1655MC | System
Configuration Guide - Page 61
Systèmes Dell™ PowerEdge™ 1655MC Guide de configuration du système www.dell.com | support.dell.com - Dell PowerEdge 1655MC | System
Configuration Guide - Page 62
Computer Corporation est strictement interdite. Marques déposées utilisées dans ce document : Dell, le logo DELL, PowerEdge et Dell OpenManage sont des marques de Dell Computer Corporation ; Microsoft et Windows sont des marques déposées de Microsoft Corporation ; ENERGY STAR est une marque dépos - Dell PowerEdge 1655MC | System
Configuration Guide - Page 63
3-22 3-23 3-24 3-24 Configuration de la mise en miroir des disques avec un système RAID PERC 4/im intégr 3-26 Utilisation du logiciel d'installation à distance Remote Install 3-28 Index Sommaire 3 - Dell PowerEdge 1655MC | System
Configuration Guide - Page 64
Figures Figure 3-1. Figure 3-2. Figure 3-3. Figure 3-4. Figure 3-5. Figure 3-6. Figure 3-7. Figure 3-8. Figure 3-9. Système avec support pour lecteur Éléments du panneau arrière Éléments du module de gestion du système . . Module de commutateur réseau Modules de commutateur réseau intégrés - Dell PowerEdge 1655MC | System
Configuration Guide - Page 65
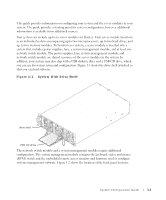
pour l'installation et la configuration du système. La Figure 3-1 représente le support pour lecteurs permettant de charger les logiciels. Figure 3-1. Système avec support pour lecteur support de lecteur emplacement des différents éléments du panneau arrière. Guide de configuration du système 3-1 - Dell PowerEdge 1655MC | System
Configuration Guide - Page 66
Guide d'installation en rack fourni avec votre solution de rack explique comment installer le système dans un rack. • Le document Setting Up Your System . • Le document Dell OpenManage Remote Install User's Guide (Guide de l'utilisateur pour l'installation à distance de Dell Open Manage) explique - Dell PowerEdge 1655MC | System
Configuration Guide - Page 67
Dell PowerEdge Integrated Switch User's Guide (Guide de l'utilisateur du commutateur intégré Dell PowerEdge) explique comment utiliser les modules de commutateur réseau et décrit leurs fonctions. • Le document Dell OpenManage Server Assistant User's Guide (Guide configuration et l'installation de ces - Dell PowerEdge 1655MC | System
Configuration Guide - Page 68
et la date et Dell OpenManage Server Assistant » dans le Guide de l'utilisateur. 9 Pour créer une image du module de serveur, utilisez le programme d'installation à distance, Dell OpenManage™ Remote Install, pour dupliquer la configuration du module de serveur. A l'aide du CD Dell OpenManage Systems - Dell PowerEdge 1655MC | System
Configuration Guide - Page 69
système connecteur d'état du système port souris port clavier port d'interface de rack analogique connecteur vidéo voyant d'état du module de commutateur réseau Guide de configuration du système 3-5 - Dell PowerEdge 1655MC | System
Configuration Guide - Page 70
www.dell.com | support.dell.com Tableau 3-1. Icônes . REMARQUE : Les exemples de cette section partent du principe que vous avez installé la mise à niveau HyperTerminal Private Edition 6.1 de Hilgraeve ou une version sup des propriétés du port COM s'affiche. 3-6 Guide de configuration du système - Dell PowerEdge 1655MC | System
Configuration Guide - Page 71
. 15 À l'invite de commande série d'ERA/MC, tapez racadm getniccfg. Le module de gestion du système transmet alors l'adresse DHCP ou l'adresse IP statique. Guide de configuration du système 3-7 - Dell PowerEdge 1655MC | System
Configuration Guide - Page 72
dell.com | support.dell reconfigurer la date et Dell Embedded Remote Access/MC User's Guide (Guide de l'utilisateur d'accès à distance intégré/MC Dell) et à l'aide en ligne. Utilisation du module de commutateur réseau Le module de commutateur réseau est activé pour DHCP côté client. Une fois install - Dell PowerEdge 1655MC | System
Configuration Guide - Page 73
de conversion DB9/RJ11 est fourni avec le commutateur réseau. Dell vous conseille d'utiliser le port série du module de gestion du • Tapez connect switch-1 pour vous connecter au module de commutateur réseau du haut. • Tapez connect switch-2 pour vous connecter Guide de configuration du système 3-9 - Dell PowerEdge 1655MC | System
Configuration Guide - Page 74
www.dell.com | support.dell.com 4 Pour vous procurer l'adresse IP du module de commutateur ré faut. Pour plus d'informations, reportez-vous au Dell PowerEdge Integrated Switch User's Guide (Guide de utilisateur du commutateur intégré Dell PowerEdge). Une fois le module de commutateur réseau configur - Dell PowerEdge 1655MC | System
Configuration Guide - Page 75
Intégration du système au réseau Le Dell™ PowerEdge™ 1655MC est à la base un réseau autonome. Le Tableau 3-2 et le Tableau 3-3 2 1/4 Module de serveur 5 LOM 1 1/5 LOM 2 1/5 Module de serveur 6 LOM 1 1/6 LOM 2 1/6 Module de gestion du système 1/11 Guide de configuration du système 3-11 - Dell PowerEdge 1655MC | System
Configuration Guide - Page 76
www.dell.com | support.dell.com Tableau 3-3. Ports externes ou de liaison montante sur le commutateur réseau Commutateur réseau 1 1/7 1/8 1/9 1/10 Commutateur réseau 2 Les deux partenaires de liaison fonctionnent alors à vitesse forcée et en mode duplex. 3-12 Guide de configuration du système - Dell PowerEdge 1655MC | System
Configuration Guide - Page 77
pour optimiser les performances et la disponibilité du réseau. Dans les exemples suivants, le PowerEdge 1655MC est doté de deux modules de commutateur réseau intégrés. Si un seul module de commutateur réseau est installé dans le système, tous les LOM1 des modules serveurs se partagent ce module de - Dell PowerEdge 1655MC | System
Configuration Guide - Page 78
www.dell.com | support.dell.com Dans la Figure 3-5, port série du module de gestion du système, procédez comme suit : 1 Tapez connect switch-x, où x désigne le numéro du commutateur. 2 A la suite de l'invite de commande ports de liaison montante est créé. 3-14 Guide de configuration du système - Dell PowerEdge 1655MC | System
Configuration Guide - Page 79
programme Broadcom Advanced Server, disponible sur le CD Dell OpenManage Server Assistant. SLB est la seule méthode de mise en équipe des LOM prise en charge sur le PowerEdge 1655MC. REMARQUE : ports de liaison montante du module de commutateur réseau. Guide de configuration du système 3-15 - Dell PowerEdge 1655MC | System
Configuration Guide - Page 80
www.dell.com | support.dell.com REMARQUE : Lorsque vous utilisez les pilotes Broadcom pour configurer une équipe SLB sur un canal statique ». Configurez le canal dynamique pour chaque commutateur externe. Reportezvous à « Configuration d'un canal dynamique ». 3-16 Guide de configuration du système - Dell PowerEdge 1655MC | System
Configuration Guide - Page 81
peut être géré via une connexion directe au commutateur KVM intégré. Figure 3-7. Gestion du système avec le commutateur KVM intégré PowerEdge 1655MC câble KVM interface graphique utilisateur KVM console KVM La Figure 3-8 est un exemple montrant comment le système peut être géré via un commutateur - Dell PowerEdge 1655MC | System
Configuration Guide - Page 82
www.dell.com | support.dell.com Figure 3-8. Gestion du système avec le commutateur KVM analogique commutateur analogique KVM PowerEdge 1655MC Systèmes PowerEdge La Figure 3-9 est un exemple montrant comment le système peut être géré avec un commutateur KVM via IP. REMARQUE : La connexion - Dell PowerEdge 1655MC | System
Configuration Guide - Page 83
5 interface graphique convertisseur CAT 5 vers PS/2 HD/15 commutateur analogique KVM câbles KVM PowerEdge 1655MC commutateur numérique KVM via IP CAT 5 établit une connexion directe au système fini, la boîte de dialogue Password (Mot de passe) s'affiche. Guide de configuration du système 3-19 - Dell PowerEdge 1655MC | System
Configuration Guide - Page 84
www.dell.com | support.dell.com 3 Tapez votre mot de passe, puis cliquez sur OK. La boîte de dialogue Main (Principal) s'affiche. Le statut des de commutation logicielle, appuyez sur . Tapez le numéro du module de serveur et appuyez sur . 3-20 Guide de configuration du système - Dell PowerEdge 1655MC | System
Configuration Guide - Page 85
ères contenus dans la zone de texte. Supprime la sélection en cours dans la liste de recherche ou les caractères d'une zone de texte. Guide de configuration du système 3-21 - Dell PowerEdge 1655MC | System
Configuration Guide - Page 86
www.dell.com | support.dell.com Tableau 3-4. Touches de navigation de l'inter face OSCAR (suite) Touche ou séquence de touches < un modèle de recherche personnalisé pour les modules serveur. Identifie les modules serveur par des noms uniques. 3-22 Guide de configuration du système - Dell PowerEdge 1655MC | System
Configuration Guide - Page 87
és tant que vous n'avez pas cliqué sur OK. 6 Cliquez sur X ou appuyez sur pour quitter la boîte de dialogue sans enregistrer vos modifications. Guide de configuration du système 3-23 - Dell PowerEdge 1655MC | System
Configuration Guide - Page 88
www.dell.com | support.dell.com Modification du comportement de l'affichage La boîte de dialogue Menu permet de modifier l'ordre de l'affichage des modules New (Nouveau). 4 Tapez un mot de passe dans la zone de texte New (Nouveau) et appuyez sur . 3-24 Guide de configuration du système - Dell PowerEdge 1655MC | System
Configuration Guide - Page 89
sur . 5 Double-cliquez dans la zone Repeat (Répéter), laissez-la vierge et appuyez sur . 6 Cliquez sur OK pour supprimer le mot de passe. Guide de configuration du système 3-25 - Dell PowerEdge 1655MC | System
Configuration Guide - Page 90
www.dell.com | support.dell.com Pour désactiver l'économiseur d'é d'installer un système d'exploitation sur le module serveur. Si un système d'exploitation a été préinstallé, vous pouvez appliquer les instructions l'utilitaire LSI Logic Configuration...) 3-26 Guide de configuration du système - Dell PowerEdge 1655MC | System
Configuration Guide - Page 91
: Deux disques doivent être installés pour que la mise en miroir intégrée soit activée. Les deux disques SCSI installés sont indiqués dans la liste au Dell PowerEdge RAID Controller 4/im Integrated Mirroring Guide (Guide de la mise en miroir intégrée du contrôleur Dell PowerEdge RAID 4/im). Guide de - Dell PowerEdge 1655MC | System
Configuration Guide - Page 92
. Installez le logiciel Remote Install à partir du CD Dell OpenManage Systems Management. Pour plus d'informations, reportez-vous au Dell OpenManage Remote Install User's Guide (Guide de l'utilisateur pour l'installation à distance de Dell Open Manage). 3-28 Guide de configuration du système - Dell PowerEdge 1655MC | System
Configuration Guide - Page 93
arrière, 3-2 G gestion à distance configuration du système client, 3-6 I icônes module de gestion du système, 3-6 L logiciel Remote Install utilisation, 3-28 M mappage de port module de commutateur réseau, 3-11 module de commutateur réseau, 3-9 configuration de canal dynamique, 3-15 configuration - Dell PowerEdge 1655MC | System
Configuration Guide - Page 94
P panneau arrière, 3-2 PERC 4/im configuration, 3-26 ports de liaison montante module de commutateur réseau, 3-12 ports externes module de commutateur réseau, 3-12 U utilisation accès à distance, 3-5 commutateur KVM, 3-17 logiciel Remote Install, 3-28 module de commutateur réseau, 3-8 2 Index - Dell PowerEdge 1655MC | System
Configuration Guide - Page 95
Dell™ PowerEdge™ 1655MC Systeme Anleitung für die Systemkonfiguration www.dell.com | support.dell.com - Dell PowerEdge 1655MC | System
Configuration Guide - Page 96
von Hardware oder den Verlust von Daten hin und beschreibt, wie dieses Problem vermieden werden kann. VORSICHT: VORSICHT weist darauf hin, dass die Gefahr Text verwendeten Warenzeichen: Dell, das DELL-Logo, PowerEdge und Dell OpenManage sind Warenzeichen der Dell Computer Corporation; Microsoft - Dell PowerEdge 1655MC | System
Configuration Guide - Page 97
Weitere hilfreiche Dokumente 4-2 Vorbereitung 4-3 Verwendung der Fernzugriffsfunktionen 4-4 Konfiguration des Client-Systems 4-5 Verwendung des Netzwerk-Switch-Moduls 4-8 Integration des Systems in das Netzwerk Konfiguration eines statischen Kanals Konfiguration eines dynamischen Kanals - Dell PowerEdge 1655MC | System
Configuration Guide - Page 98
auf der Rückseite Leistungsmerkmale des Systemverwaltungsmoduls Netzwerk-Switch-Modul An einen externen Switch angeschlossene integrierte Switch-Module Mit zwei externen Schaltern verbundenes integriertes Umschaltmodul Verwaltung des Systems mit dem integrierten KVM-Umschalter Verwaltung - Dell PowerEdge 1655MC | System
Configuration Guide - Page 99
Stromversorgung, Lüfter, ein Systemverwaltungsmodul und mindestens einen Netzwerk-Switch verfügt. Die Netzteile, Lüfter, das Systemverwaltungsmodul und der Netzwerk-Switch sind verteilte Ressourcen der Servermodule im System. Wenn Ihr System zusätzlich mit einem USB-Diskettenlaufwerk und einem USB - Dell PowerEdge 1655MC | System
Configuration Guide - Page 100
im System sowie die Installation oder den Austausch von Systemkomponenten. • Die Bedienungsanleitung enthält Informationen über Systemfunktionen, über die BIOS-Einstellungen und -Standardeinstellungen sowie technischen Daten. • Die Bedienungsanleitung Dell OpenManage Remote Install User's Guide - Dell PowerEdge 1655MC | System
Configuration Guide - Page 101
Dell PowerEdge Integrated Switch User's Guide erläutert die Funktionen und die Verwendung der Netzwerk-Switch-Module. • Die Bedienungsanleitung Dell OpenManage Server Assistant User's Guide und Installation dieser Optionen. • Manche Systeme enthalten auch Updates, in denen Änderungen am System, der - Dell PowerEdge 1655MC | System
Configuration Guide - Page 102
support.dell.com 5 Konfigurieren Sie ggf. die Festplatten für RAID 1 oder integrierte Spiegelung. Es wird empfohlen, RAID 1 vor der Installation des Betriebssystems zu konfigurieren. BITTE BEACHTEN: Das Systemverwaltungsmodul und die Netzwerk-Switch-Module sind DHCP-aktiviert. Falls ein DHCP-Server - Dell PowerEdge 1655MC | System
Configuration Guide - Page 103
für die Systemverwaltung Systemstatusanzeige/Systemstatus-Anschluss Videoanschluss Statusanzeige des Netzwerk-Switch-Moduls Analoger Rack-Schnittstellenanschluss Tastaturanschluss Mausanschluss Konfiguration des Client-Systems Alle Versionen des Microsoft® Windows®-Betriebssystems enthalten die - Dell PowerEdge 1655MC | System
Configuration Guide - Page 104
.dell.com | support.dell.com 1 Schließen Sie das Nullmodemkabel an den seriellen Anschluss des Systemverwaltungsmoduls und an das Client-System Einstellung übereinstimmt, die Sie für die Option Konsolenumleitung auf dem Server gewählt haben. 11 Klicken Sie auf Terminalkonfiguration. Die Anzahl der - Dell PowerEdge 1655MC | System
Configuration Guide - Page 105
Ihnen, den Standardbenutzernamen und das Standardpasswort zu ändern. Weitere Informationen hierzu finden Sie in der Bedienungsanleitung Dell Embedded Remote Access/MC User's Guide. Nachdem Sie die IP-Adresse am Systemverwaltungsmodul eingestellt haben, können Sie mit dem Modul die Servermodule - Dell PowerEdge 1655MC | System
Configuration Guide - Page 106
www.dell.com | support.dell.com Verwendung des Netzwerk-Switch-Moduls Das Netzwerk-Switch-Modul ist DHCP-Client-aktiviert. Nachdem es im System installiert und an das externe Netzwerk angeschlossen wurde, funktioniert das Netzwerk-SwitchModul ordnungsgemäß. Switch 1 (oben) greift auf das LAN auf - Dell PowerEdge 1655MC | System
Configuration Guide - Page 107
ein, um sich bei der seriellen Switch-Konsole abzumelden. 7 Geben Sie ~. Switch-Modul zu konfigurieren. HINWEIS: Wir empfehlen Ihnen, den Standardbenutzernamen und das Standardpasswort zu ändern. Weitere Informationen finden Sie in der Bedienungsanleitung Dell PowerEdge Integrated Switch User's Guide - Dell PowerEdge 1655MC | System
Configuration Guide - Page 108
weitergehend konfigurieren. Ausführliche Hinweise zur Konfiguration finden Sie im Online-Leitfaden Dell PowerEdge Integrated Switch User's Guide . Integration des Systems in das Netzwerk Der Dell™ PowerEdge™ 1655MC ist im Prinzip ein eigenständiges Netzwerk. Tabelle 4-2 und Tabelle 4-3 zeigen die - Dell PowerEdge 1655MC | System
Configuration Guide - Page 109
4-6 zeigen zwei Konfigurationen zur Netzwerkintegration eines PowerEdge 1655MC-Systems mit externen Netzwerk-Switches. Obwohl die Netzwerk-Switches ohne zusätzliche Konfiguration in das Netzwerk integriert werden können, empfiehlt Dell grundlegende Konfigurationen wie Link-Aggregation (Leitungsb - Dell PowerEdge 1655MC | System
Configuration Guide - Page 110
www.dell.com | support.dell.com Abbildung 4-5. An einen externen Switch angeschlossene integrierte Switch-Module Client IP-Adresse Kanal externer NetzwerkSwitch Kanal Switch-Modul 1 UplinkAnschlüsse (4) interne Anschlüsse (6) Switch-Modul 2 UplinkAnschlüsse (4) interne Anschlüsse (6) SLB- - Dell PowerEdge 1655MC | System
Configuration Guide - Page 111
und 10. Für die vier Uplink-Anschlüsse wird eine statische Verbindung (Trunk) erstellt. 4 Wiederholen Sie die Schritte 1 bis 3 für das zweite Netzwerk-Switch-Modul. 5 Speichern Sie die Konfiguration. Geben Sie dazu #copy running-config startup-config ein. 6 Geben Sie exit oder quit ein, um sich von - Dell PowerEdge 1655MC | System
Configuration Guide - Page 112
und Failover gewährleistet werden. SLB wird durch das Broadcom Advanced Server-Programm konfiguriert, das auf der Dell OpenManage Server Assistant-CD zu finden ist. SLB ist die einzige Methode der LOMZusammenführung, die der PowerEdge 1655MC unterstützt. HINWEIS: Wenn Sie zur Konfiguration eines SLB - Dell PowerEdge 1655MC | System
Configuration Guide - Page 113
Servermodul die Broadcom-Treiber verwenden, werden durch einen Fehler oder die Entfernung des Netzwerk-Switch-Modul keine Störungen des Netzwerk-Datenverkehrs verursacht. Das heiße Hinzufügen eines Netzwerk-Switch-Modul führt allerdings während des Bootens des Schalters zu vorübergehenden Störungen - Dell PowerEdge 1655MC | System
Configuration Guide - Page 114
www.dell.com | support.dell.com Verwendung des KVM-Umschalters (für Tastatur/Grafik/Bildschirm) Mit dem integrierten KVM- KVMUmschalter verwaltet werden kann. Abbildung 4-7. Verwaltung des Systems mit dem integrierten KVMUmschalter PowerEdge 1655MC KVM-Kabel KVM-GUI KVM-Konsole Abbildung 4-8 zeigt - Dell PowerEdge 1655MC | System
Configuration Guide - Page 115
KVMUmschalter analoger KVM-Umschalter PowerEdge 1655MC PowerEdge-Systeme Abbildung 4-9 zeigt ein Beispiel, wie das System mithilfe eines KVM-über-IP-Umschalters verwaltet werden kann. HINWEIS: Eine direkte Verbindung wird nur von KVM-über-IP-Umschaltern von Dell unterstützt. Anleitung für die - Dell PowerEdge 1655MC | System
Configuration Guide - Page 116
www.dell.com | support.dell.com Abbildung 4-9. Verwaltung des Systems mit einem KVM-über-IPUmschalter KVM-Kabel CAT-5-Kabel KVM-GUI CAT 5 auf PS/2 HD/15 Konverter analoger KVMUmschalter KVM-Kabel PowerEdge 1655MC digitaler KVM-über-IP-Umschalter CAT 5 stellt eine Direktverbindung zum System - Dell PowerEdge 1655MC | System
Configuration Guide - Page 117
OK. Das Dialogfeld Main (Hauptdialogfeld) wird angezeigt. Der Serverstatus Ihres Systems wird in der rechten Spalte des Dialogfelds Main (Hauptdialogfeld) angezeigt. auf den Namen, die EID oder die Portnummer des Servers. Zum Auswählen des vorherigen Servers drücken Sie die Taste und - Dell PowerEdge 1655MC | System
Configuration Guide - Page 118
www.dell.com | support.dell.com Um auf ein Servermodul weichzuschalten, drücken Sie die Taste . Geben Sie die Nummer des Servermoduls ein und drücken Sie die < - Dell PowerEdge 1655MC | System
Configuration Guide - Page 119
die Umschalttaste, um auf Großbuchstaben umzuschalten. OSCAR konfigurieren Sie können das KVM-System im OSCAR-Setup-Menü konfigurieren. Klicken Sie beim ersten Einrichten des KVM-Umschalters auf Names (Namen), um Server dem Namen nach zu identifizieren. Wählen Sie die weiteren Setup-Funktionen, um - Dell PowerEdge 1655MC | System
Configuration Guide - Page 120
www.dell.com | support.dell.com Zuweisen von Servernamen Verwenden Sie zur Identifizierung einzelner Servermodule OK geklickt haben. 4 Wiederholen Sie Schritt 1 bis Schritt 3 für jedes Servermodul in Ihrem System. 5 Klicken Sie im Dialogfeld Names (Namen) auf OK , um die Änderungen zu speichern - Dell PowerEdge 1655MC | System
Configuration Guide - Page 121
Ändern des Display-Verhaltens Verwenden Sie das Dialogfeld Menu (Menü), um die Anzeigenreihenfolge der Servermodule zu ändern und eine Verzögerungszeit für Anzeigen in OSCAR festzulegen. 1 Drücken Sie die Taste , um OSCAR zu starten. Das Dialogfeld Main (Hauptdialogfeld) wird angezeigt. - Dell PowerEdge 1655MC | System
Configuration Guide - Page 122
www.dell.com | support.dell.com 4 Geben Sie in das Textfeld New (Neu) ein Kennwort ein und bestätigen Sie es mit der . Kennwörter können bis zu 12 - Dell PowerEdge 1655MC | System
Configuration Guide - Page 123
nnte Ihr Monitor beschädigt werden. Festplattenspiegelung mit PERC 4/im Integrated RAID konfigurieren Verwenden Sie die folgenden Verfahren zu (RAID 1), ühren oder die Software zum Array-Management verwenden, die mit dem System geliefert wurde. Die folgende Meldung wird unter POST angezeigt: Drücken - Dell PowerEdge 1655MC | System
Configuration Guide - Page 124
www.dell.com | support.dell.com 3 Wählen Sie das Menü Mirroring Properties ( integrierten Spiegelung, Dell PowerEdge RAID Controller 4/im Integrated Mirroring Guide. Remote- können Remote-Installationssoftware verwenden, um Systeme zu erfassen, (vorbereitend) bereitzustellen und - Dell PowerEdge 1655MC | System
Configuration Guide - Page 125
Servermodule, die für die Bereitstellung vorbereitet sind. Installieren Sie die Remote-Installationssoftware von der CD Dell OpenManage Systems Management. Weitere Informationen hierzu finden Sie im Handbuch Dell OpenManage Remote Install User's Guide. Anleitung für die Systemkonfiguration 4-27 - Dell PowerEdge 1655MC | System
Configuration Guide - Page 126
www.dell.com | support.dell.com 4-28 Anleitung für die Systemkonfiguration - Dell PowerEdge 1655MC | System
Configuration Guide - Page 127
Navigieren, 4-20 Zuweisen von Namen, 4-22 P PERC 4/im Konfigurieren, 4-25 R Remote-Installation Verwenden, 4-26 Rückseite, 4-2 S statischen Kanal konfigurieren Netzwerk-Switch-Modul, 4-13 Symbole Systemverwaltungsmodul, 4-5 Systemverwaltungsmodul Gerätefunktionen, 4-5 KVM-Umschalter, 4-16 Symbole - Dell PowerEdge 1655MC | System
Configuration Guide - Page 128
V Verwenden Fernzugriff, 4-4 KVM-Umschalter, 4-16 Netzwerk-Switch-Modul, 4-8 Remote-Installation, 4-26 2 Stichwortverzeichnis - Dell PowerEdge 1655MC | System
Configuration Guide - Page 129
Dell™ PowerEdge™ 1655MC www.dell.com | support.dell.com - Dell PowerEdge 1655MC | System
Configuration Guide - Page 130
2002 Dell Computer Corporation Dell Computer Corporation Dell、DELL PowerEdge Dell OpenManage は、Dell Computer Corporation Microsoft および Windows は、Microsoft Corporation ENERGY STAR は、U.S.Environmental Protection Agency ENERGY STAR Dell Computer Corporation ENERGY STAR Dell Computer - Dell PowerEdge 1655MC | System
Configuration Guide - Page 131
目次 5-2 5-3 5-4 5-5 5-8 5-10 5-13 5-13 KVM OSCAR OSCAR OSCAR 5-15 5-17 5-18 5-18 5-19 5-20 5-20 5-21 5-22 PERC 4/im 内蔵 RAID 5-24 Remote Install 5-25 索引 目次 3 - Dell PowerEdge 1655MC | System
Configuration Guide - Page 132
図 図 5-1. 図 5-2. 図 5-3. 図 5-4. 図 5-5. 図 5-6. 図 5-7. 図 5-8. 図 5-9. 表 表 5-1. 表 5-2. 表 5-3. 表 5-4. 表 5-5. 5-1 5-2 5-5 5-8 1 5-12 2 5-15 KVM 5-16 KVM 5-16 KVM-Over-IP 5-17 5-5 5-10 5-11 OSCAR 5-19 5-20 4 目次 - Dell PowerEdge 1655MC | System
Configuration Guide - Page 133
6 2 2 2 1 USB USB CD 5-1 図 5-1 USB CD KVM 5-2 5-1 - Dell PowerEdge 1655MC | System
Configuration Guide - Page 134
www.dell.com | support.dell.com 図 5-2 1 2 2 4) • 『Installation and Troubleshooting Guide BIOS • 『Dell OpenManage Remote Install User's Guide • 『Dell PowerEdge Expandable RAID Controller 4/im Integrated Mirroring Guide 5-2 - Dell PowerEdge 1655MC | System
Configuration Guide - Page 135
• 『Dell Embedded Remote Access/MC User's Guide Dell PowerEdge Integrated Switch User's Guide • 『Dell OpenManage Server Assistant User's Guide CD readme 1 2 3 KVM 4 KVM KVM KVM 5 RAID 1 RAID 1 5-3 - Dell PowerEdge 1655MC | System
Configuration Guide - Page 136
www.dell.com | support.dell.com DHCP DHCP IP 6 と 7 IP 6 IP 7 IP 8 『Dell OpenManage Server Assistant CD Using the Dell OpenManage Server Assistant CD 9 Dell OpenManage™ Remote Install Dell OpenManage Systems Management CD Remote Install IP Ethernet GUI IP IP KVM 5-3 - Dell PowerEdge 1655MC | System
Configuration Guide - Page 137
図 5-3 Ethernet 表 5-1 アイコン Ethernet Microsoft® Windows Hilgraeve HyperTerminal HyperTerminal Private Edition 6.1 5-5 - Dell PowerEdge 1655MC | System
Configuration Guide - Page 138
www.dell.com | support.dell.com Hilgraeve HyperTerminal Private Edition 6.1 1 2 3 OK 4 COM OK COM COM 5 115200 8 1 6 OK 7 8 Ctrl 9 Backspace Ctrl+H 10 ANSI または VT 100/220 Console Redirection 11 5-6 - Dell PowerEdge 1655MC | System
Configuration Guide - Page 139
- s - Dell PowerEdge 1655MC | System
Configuration Guide - Page 140
www.dell.com | support.dell.com DHCP 1 LAN(LOM1 2 LOM2 VLAN CD 5-4 図 5-4 4) RJ11 4) 10/100/1000 BASE-T 4) RJ11 RJ11 DB9 - RJ11 メモ:RJ11 RJ11 10/100/1000 BASE-T 1 1 14 2 5-8 - Dell PowerEdge 1655MC | System
Configuration Guide - Page 141
connect switch-1 connect switch-2 3 Username-admin Password-admin DHCP 4 IP sh ip interface 5 IP #config (config)# config)#exit #copy running-config startup-config config config-if 6 quit または exit 7 Enter 8 Dell PowerEdge Integrated Switch User's Guide 5-9 - Dell PowerEdge 1655MC | System
Configuration Guide - Page 142
www.dell.com | support.dell.com GUI Telnet Dell PowerEdge Integrated Switch User's Guide Dell™ PowerEdge™ 1655MC 5-2 と 表 5-3 表 5-2 1 2 ポー ト 1 LOM 1 1/1 LOM 2 1/1 2 LOM 1 1/2 LOM 2 1/2 3 LOM 1 1/3 LOM 2 1/3 4 LOM 1 1/4 LOM 2 1/4 5 LOM - Dell PowerEdge 1655MC | System
Configuration Guide - Page 143
表 5-3 1 1/7 1/8 1/9 1/10 2 1/7 1/8 1/9 1/10 メモ:1/x は、CLI x 2 4 NIC 100 Mbps 1000 Mbps MDI NIC MID-X 図 5-5 と図 5-6 PowerEdge 1655MC 2 PowerEdge 1655MC に 2 1 LOM1 5-11 - Dell PowerEdge 1655MC | System
Configuration Guide - Page 144
www.dell.com | support.dell.com 図 5-5. 1 チャネル IP チャネル 1 6) ポート (4) 2 6) ポート (4) SLB チーム 1 LOM1 LOM2 IP 2 LOM1 LOM2 IP 図 5-5 4 1 2 ~ 4 Cisco EtherChannel IEEE 802.3ad Link Aggregation Control Protocol(LACP 1 3 GUI(Link Aggregation - Dell PowerEdge 1655MC | System
Configuration Guide - Page 145
1 connect switch-x x 2 #Config (config)#interface port-channel 1 (config-if)#exit (config)#interface ethernet 1/7 (config-if)#channel-group 1 (config)#exit config config-if 3 ポート 8、9、10 2 4 4 1 から 3 5 copy running-config startup- - Dell PowerEdge 1655MC | System
Configuration Guide - Page 146
www.dell.com | support.dell.com 3 1 と 2 4 copy running-config startup-config 5 quit または exit 6 Enter 2 5-5 SLB LOM SLB は Broadcom Advanced Server Program Dell OpenManage Server Assistant CD SLB は PowerEdge 1655MC LOM メモ:Broadcom SLB LOM SLB メモ:Broadcom SLB SLB 5-14 - Dell PowerEdge 1655MC | System
Configuration Guide - Page 147
図 5-6. 2 チャネル IP 1 1 6 4) 2 6 4) 1 LOM 1 IP 1 LOM 2 IP 2 2 LOM 1 IP 1 LOM 2 IP 2 IP 2 チャネル 2 5-6 KVM KVM KVM KVMover-IP 5-3 KVM-over-IP 5-7 KVM 5-15 - Dell PowerEdge 1655MC | System
Configuration Guide - Page 148
www.dell.com | support.dell.com 図 5-7 KVM PowerEdge 1655MC KVM KVM GUI KVM 5-8 KVM 5-8 KVM KVM PowerEdge 1655MC PowerEdge 図 5-9 は、KVM-over-IP Dell KVM-over-IP 5-16 - Dell PowerEdge 1655MC | System
Configuration Guide - Page 149
図 5-9. KVM-Over-IP KVM CAT 5 KVM GUI CAT 5 - PS/2 HD/15 KVM KVM PowerEdge 1655MC KVM-over-IP KVM CAT 5 PowerEdge PowerEdge KVM は、On-Screen Configuration and Activity Reporting(OSCAR OSCAR Main Electronic Identification Number(EID OSCAR OSCAR 1 < - Dell PowerEdge 1655MC | System
Configuration Guide - Page 150
www.dell.com | support.dell.com 2 Password 3 OK KVM EID 1 Print Screen Backspace 1 Print Screen OSCAR 1 - Dell PowerEdge 1655MC | System
Configuration Guide - Page 151
OSCAR 5-4 OSCAR 表 5-4. OSCAR Print Screen> 機能 OSCAR Print Screen> を 2 Esc OSCAR 1 OK 1 OSCAR Enter 1 Names Slot < - Dell PowerEdge 1655MC | System
Configuration Guide - Page 152
www.dell.com | support.dell.com OSCAR の設定 OSCAR KVM KVM スイッ OSCAR 1 - Dell PowerEdge 1655MC | System
Configuration Guide - Page 153
1 Modify Name Modify 2 New Name 15 A-Z、a-z、0-9 3 OK OK 4 1 3 5 OK メモ:OK 6 X Esc OSCAR 1 - Dell PowerEdge 1655MC | System
Configuration Guide - Page 154
www.dell.com | support.dell.com OSCAR 1 - Dell PowerEdge 1655MC | System
Configuration Guide - Page 155
ENERGY STAR Screen ENERGY STARR Energy 1 - Dell PowerEdge 1655MC | System
Configuration Guide - Page 156
www.dell.com | support.dell.com ENERGY STAR Energy PERC 4/im 内蔵 RAID RAID 1 POST Press Crtl - M to start LSI Logic Configuration Utility... 1 - Dell PowerEdge 1655MC | System
Configuration Guide - Page 157
Enter POST Dell PowerEdge RAID Controller 4/im Integrated Mirroring Guide Remote Install Remote Install Preboot Execution Environment(PXE Remote Install Remote Install Capture Predeploy Deploy Configure IP Remote Install Dell OpenManage Systems Management CD - Dell PowerEdge 1655MC | System
Configuration Guide - Page 158
www.dell.com | support.dell.com 5-26 - Dell PowerEdge 1655MC | System
Configuration Guide - Page 159
使用 , 5-15 O OSCAR, 5-17 5-18 設定 , 5-20 操作 , 5-19 5-20 5-17 P PERC 4/im 設定 , 5-24 R Remote Install 使用 , 5-25 あ 5-5 5-11 き 5-5 こ 5-2 し KVM 5-15 5-5 機能 , 5-5 使用 KVM 5-15 Remote Install, 5-25 5-8 5-4 せ 5-13 設定 PERC 4/im, 5-24 と 5-13 ね 5-8 5-11 5-11 使用 , 5-8 5-13 5-13 5-10 - Dell PowerEdge 1655MC | System
Configuration Guide - Page 160
ほ 5-10 ま 5-2 り 5-4 使用 , 5-4 5-5 ん ルの , 5-1 2 索引 - Dell PowerEdge 1655MC | System
Configuration Guide - Page 161
Dell™ PowerEdge™ 1655MC 시스템 www.dell.com | support.dell.com - Dell PowerEdge 1655MC | System
Configuration Guide - Page 162
2002 Dell Computer Corporation Dell Computer Corporation Dell, DELL 로고, PowerEdge, Dell OpenManage는 Dell Computer Corporation Microsoft 및 Windows는 Microsoft Corporation ENERGY STAR는 U.S Environmental Protection Agency Dell Computer Corporation은 ENEFGY STAR ENERGY STAR Dell Computer - Dell PowerEdge 1655MC | System
Configuration Guide - Page 163
차례 6-2 6-3 6-4 6-5 6-7 6-9 6-12 6-13 KVM OSCAR OSCAR OSCAR 6-14 6-16 6-17 6-17 6-18 6-19 6-19 6-20 6-21 PERC 4/im 내장형 RAID 6-22 6-23 색인 차례 3 - Dell PowerEdge 1655MC | System
Configuration Guide - Page 164
그림 그림 6-1. 그림 6-2. 그림 6-3. 그림 6-4. 그림 6-5. 그림 6-6. 그림 6-7. 그림 6-8. 그림 6-9. 표 표 6-1. 표 6-2. 표 6-3. 표 6-4. 표 6-5. 6-1 6-2 6-5 6-8 6-11 6-14 온보드 KVM 6-15 KVM 6-15 KVM-Over-IP 6-16 6-5 6-9 6-10 OSCAR 6-18 6-19 4 차례 - Dell PowerEdge 1655MC | System
Configuration Guide - Page 165
6 2 1 USB USB CD 6-1 그림 6-1 USB CD KVM 6-2 6-1 - Dell PowerEdge 1655MC | System
Configuration Guide - Page 166
www.dell.com | support.dell.com 그림 6-2 1 2 2) 팬(4) BIOS • ≪Dell OpenManage • ≪Dell PowerEdge RAID 4/im 6-2 - Dell PowerEdge 1655MC | System
Configuration Guide - Page 167
• ≪Dell MC Dell PowerEdge • ≪Dell OpenManage Server Assistant CD readme 시작하기 1 2 3 KVM 4 KVM KVM KVM 5 RAID 1 RAID 1 6-3 - Dell PowerEdge 1655MC | System
Configuration Guide - Page 168
www.dell.com | support.dell.com DHCP DHCP IP IP 6단계와 7 6 IP 7 IP 8 Dell OpenManage Server Assistant CD Dell OpenManage Server Assistant CD 9 Dell OpenManage Dell OpenManage Systems Management CD IP GUI(Graphical User Interface IP IP KVM 6-3 6-4 - Dell PowerEdge 1655MC | System
Configuration Guide - Page 169
그림 6-3 표 6-1 아이콘 Microsoft® Windows Hilgraeve's HyperTerminal HyperTerminal Private Edition 6.1 Hilgraeve 6.1 1 6-5 - Dell PowerEdge 1655MC | System
Configuration Guide - Page 170
www.dell.com | support.dell.com 2 3 4 COM COM COM 5 115200 8 1 6 7 8 Ctrl 9 Backspace Ctrl+H 10 ANSI 또는 VT 100/220 11 12 24~26 80 13 14 Enter Username = root Password = calvin 6-6 - Dell PowerEdge 1655MC | System
Configuration Guide - Page 171
18 racadm getncicfg Enter IP 19 racreset Enter RAC AC 20 racadm setractime - [-o - Dell PowerEdge 1655MC | System
Configuration Guide - Page 172
www.dell.com | support.dell.com 그림 6-4 4) 4) RJ11 10/100/1000 BASE-T 4) RJ11 RJ11 DB9/RJ11 주: RJ11 RJ11 10/100/1000 BASE-T 1 1단계~14 2 connect switch-1 connect switch-2 3 Username-admin Password-admin DHCP 4 IP sh ip interface 6-8 - Dell PowerEdge 1655MC | System
Configuration Guide - Page 173
gateway address> (config)#exit #copy running-config startup-config config config-if 6 quit 또는 exit 7 Enter 8 Dell PowerEdge GUI, Telnet Dell PowerEdge Dell™ PowerEdge™ 1655MC 6-2와 표 6-3 표 6-2 1 LOM 1 LOM 2 1 포트 1/1 2 LOM 1 1/2 2 포트 1/1 6-9 - Dell PowerEdge 1655MC | System
Configuration Guide - Page 174
www.dell.com | support.dell.com 표 6-2 LOM 2 3 LOM 1 LOM 2 4 LOM 1 LOM 2 5 LOM 1 LOM 2 6 LOM 1 LOM 2 1 포트 2 포트 1/2 1/3 1/3 1/4 1/4 1/5 1/5 1/6 1/6 1/11 표 6-3 1 1/7 1/8 1/9 1/10 2 1/7 1/8 1/9 1/10 주: 1/x 는 CLI x 4 NIC 100Mbps 1000Mbps 6-10 - Dell PowerEdge 1655MC | System
Configuration Guide - Page 175
NIC)의 MDI MID-X 그림 6-5와 그림 6-6은 PowerEdge 1655MC PowerEdge 1655MC LOM1 그림 6-5 ip 주소 채널 채널 1 4) 포트(6) 2 4) 6) SLB 팀 1 LOM1 ip 주소 LOM2 2 LOM1 ip 주소 LOM2 6-11 - Dell PowerEdge 1655MC | System
Configuration Guide - Page 176
www.dell.com | support.dell.com 그림 6-5에서 4 2~4 Cisco EtherChannel IEEE 802.3ad LACP(Link Aggregation Control Protocol 3 GUI(Link Aggregation EtherChannel LACP 1 connect switch-x x 2 #Config (config)#interface port-channel 1 (config-if)#exit (config)#interface ethernet 1/7 - Dell PowerEdge 1655MC | System
Configuration Guide - Page 177
8, 9, 10 2 4 LACP 3 1단계~2 4 copy running-config startup-config 5 quit 또는 exit 6 Enter 6-5 SLB(Smart Load Balancing LOM SLB는 Dell OpenManage Server Assistant CD에 있는 Broadcom Advanced Server SLB는 PowerEdge 1655MC LOM 주: SLB Broadcom LOM SLB Broadcom SLB SLB 6-13 - Dell PowerEdge 1655MC | System
Configuration Guide - Page 178
www.dell.com | support.dell.com 그림 6-6 채널 ip 주소 1 1 4) 포트(6) 2 4) 6) 1 LOM 1 ip 주소 1 LOM 2 ip 주소 2 2 LOM 1 ip 주소 1 LOM 2 ip 주소 2 ip 주소 2 채널 2 6-6 KVM 온보드 KVM KVM KVM-over-IP 6-3 KVM-over-IP 6-7 KVM 6-14 - Dell PowerEdge 1655MC | System
Configuration Guide - Page 179
그림 6-7. 온보드 KVM PowerEdge 1655MC KVM 케이블 KVM GUI KVM 6-8 KVM 6-8 KVM KVM 스위치 PowerEdge 1655MC PowerEdge 시스템 그림 6-9는 KVM-over-IP Dell KVM-over-IP 6-15 - Dell PowerEdge 1655MC | System
Configuration Guide - Page 180
www.dell.com | support.dell.com 그림 6-9. KVM-Over-IP KVM 케이블 CAT 5 케이블 KVM GUI CAT 5와 PS/2 HD/15 컨버터 KVM 스위치 KVM 케이블 PowerEdge 1655MC 디지탈 KVM-over-IP 스위치 CAT 5 KVM PowerEdge 시스템 PowerEdge 시스템 KVM OSCAR(On-Screen Configuration and Activity Reporting OSCAR Main EID( - Dell PowerEdge 1655MC | System
Configuration Guide - Page 181
3 OK Main Main Main KVM EID Print Screen Backspace Print Screen OSCAR 1 을 눌러 OSCAR Main 2 Setup-Menu Menu 3 을 눌러 Main Delay Time 4 OK Print Screen Enter 6-17 - Dell PowerEdge 1655MC | System
Configuration Guide - Page 182
www.dell.com | support.dell.com OSCAR 표 6-4 OSCAR 표 6-4. OSCAR 탐색 키 키누름 기능 OSCAR Print Screen Main Esc OSCAR OK Main OSCAR Enter Enter < - Dell PowerEdge 1655MC | System
Configuration Guide - Page 183
OSCAR 구성 OSCAR Setup KVM KVM Names OSCAR Setup 1 을 눌러 OSCAR Main 2 Setup Setup 표 6-5 OSCAR 표 6-5 EID Names Names Names 1 - Dell PowerEdge 1655MC | System
Configuration Guide - Page 184
www.dell.com | support.dell.com 1 Names Modify Name Modify 2 New Name 15 A-Z, a-z, 0-9 3 Names OK Names OK 4 1단계~3 5 Names OK 주: OK 6 X Esc Menu OSCAR 1 을 눌러 OSCAR Main 2 Setup-Menu Menu 3 - Dell PowerEdge 1655MC | System
Configuration Guide - Page 185
OSCAR OSCAR 1 을 눌러 OSCAR Main 2 Setup-Security Menu 3 New 4 New Enter 암호는 12 5 Repeat Enter 6 OK 7 Enable Screen Saver 8 Inactivity Time에 입력 FREE Inactivity Time 9 ENERGY STAR Mode에서 Energy ENERGY STAR Screen ENERGY STAR Energy Energy 1 - Dell PowerEdge 1655MC | System
Configuration Guide - Page 186
www.dell.com | support.dell.com 4 New Enter 5 Repeat Enter 6 OK 1 을 눌러 OSCAR Main 2 Setup-Security Menu 3 4 Enable Screen Saver 5 Inactivity Time에 입력 FREE 6 ENERGY STAR Mode에서 Energy ENERGY STAR - Dell PowerEdge 1655MC | System
Configuration Guide - Page 187
Pair 필드가 Secondary 9 Adapter Properties Menu Esc 10 Save changes and exit this menu Enter 11 Main Menu Esc 12 Exit the Configuration Utility Enter POST Dell PowerEdge RAID 4/im PXE(Preboot Execution Environment 6-23 - Dell PowerEdge 1655MC | System
Configuration Guide - Page 188
www.dell.com | support.dell.com IP Dell OpenManage Systems Management CD Dell OpenManage 6-24 - Dell PowerEdge 1655MC | System
Configuration Guide - Page 189
색인 K KVM 6-14 사용 , 6-14 O OSCAR, 6-16 구성 , 6-19 6-16 6-17 6-19 탐색 , 6-18 P PERC 4/im 구성 , 6-22 가 구성 PERC 4/im, 6-22 6-2 6-5 6-8 6-13 사용 , 6-7 6-10 6-10 6-12 6-9 다 6-13 사 사용 KVM 6-14 6-7 6-23 6-4 6-2 KVM 6-14 기능 , 6-5 6-5 아 6-5 6-10 6-10 6-5 6-23 6-4 사용 , 6-4 - Dell PowerEdge 1655MC | System
Configuration Guide - Page 190
2 색인 - Dell PowerEdge 1655MC | System
Configuration Guide - Page 191
Sistemas 1655MC Dell™ PowerEdge™ Guía de configuración del sistema www.dell.com | support.dell.com - Dell PowerEdge 1655MC | System
Configuration Guide - Page 192
ón en cualquier medio sin la autorización por escrito de Dell Computer Corporation. Marcas comerciales utilizadas en este texto: Dell, el logotipo de DELL, PowerEdge y Dell OpenManage son marcas comerciales de Dell Computer Corporation; Microsoft y Windows son marcas registradas de Microsoft - Dell PowerEdge 1655MC | System
Configuration Guide - Page 193
Contenido Otros documentos necesarios 7-2 Pasos preliminares 7-4 Utilización de las características de acceso remoto 7-5 Configuración del sistema cliente 7-6 Utilización del módulo de conmutación de red 7-8 Integración del sistema en red Configuración de un canal estático Configuración - Dell PowerEdge 1655MC | System
Configuration Guide - Page 194
Figuras Figura 7-1. Figura 7-2. Figura 7-3. Figura 7-4. Figura 7-5. Figura 7-6. Figura 7-7. Figura 7-8. Figura 7-9. Sistema con plataforma de unidades . . . . . . Características del panel posterior Características del módulo de administración del sistema Módulo de conmutación de red Módulos - Dell PowerEdge 1655MC | System
Configuration Guide - Page 195
Esta guía proporciona información sobre la forma de configurar el sistema y los módulos del servidor del sistema. Esta guía proporciona un punto inicial para configuración del sistema; no obstante, existe información adicional disponible de fuentes adicionales. El sistema puede incluir hasta seis mó - Dell PowerEdge 1655MC | System
Configuration Guide - Page 196
www.dell.com | support.dell.com Figura 7-2. Características del panel posterior módulo de conmutación de red del BIOS y especificaciones técnicas. • La Dell OpenManage Remote Install User's Guide (Guía del usuario para instalación remota de Dell OpenManage) describe la duplicación de la configuraci - Dell PowerEdge 1655MC | System
Configuration Guide - Page 197
Dell PowerEdge Integrated Switch User's Guide (Guía del usuario de conmutación integrada de Dell PowerEdge) en línea describe las características y la forma de utilizar los módulos de conmutación de red. • La Dell OpenManage Server Assistant User's Guide (Guía del usuario de Dell OpenManage Server - Dell PowerEdge 1655MC | System
Configuration Guide - Page 198
www.dell.com | support.dell.com Pasos preliminares 1 Desembale el Server Assistant" en la Guía del usuario. 9 Para crear una imagen del módulo del servidor, utilice Instalación remota de Dell OpenManage™ para duplicar la configuración del módulo del servidor. Utilice el CD de Dell OpenManage Systems - Dell PowerEdge 1655MC | System
Configuration Guide - Page 199
Utilización de las características de acceso remoto Puede configurar inicialmente el módulo de administración del sistema y el módulo de conmutación de red utilizando el puerto serie del módulo de administración del sistema, un sistema cliente y un cable de módem nulo serie. La configuración inicial - Dell PowerEdge 1655MC | System
Configuration Guide - Page 200
www.dell.com | support.dell.com Tabla 7-1. Iconos del módulo de administración del sistema Icono Característica del módulo de administración del sistema Puerto serie de administración Puerto de administración - Dell PowerEdge 1655MC | System
Configuration Guide - Page 201
5 Configure el puerto con los siguientes ajustes: • Defina Bits por segundo como 115200. • Defina Bits de datos como 8. • Defina Paridad como Ninguno. • Defina Bits de parada como 1. • Defina Control de flujo como Hardware. 6 Haga clic en Aceptar.. 7 En HyperTerminal, haga clic en Archivo, haga clic - Dell PowerEdge 1655MC | System
Configuration Guide - Page 202
www.dell.com | support.dell.com 17 Pulse . 18 Escriba racadm getncicfg y pulse . usuario predeterminado y la contraseña. Para obtener información adicional, consulte la Dell Embedded Remote Access/MC User's Guide (Guía del usuario de acceso remoto incorporado / MC) Tras establecer la - Dell PowerEdge 1655MC | System
Configuration Guide - Page 203
de red. Con el conmutador de red se proporciona un cable DB9-a-RJ11. Dell recomienda el uso del puerto serie del módulo de administración del sistema para de red. • Escriba connect switch-1 para conectar al módulo de conmutación de red superior. • Escriba connect switch-2 para conectar al módulo de - Dell PowerEdge 1655MC | System
Configuration Guide - Page 204
www.dell.com | support.dell.com 5 Para definir una dirección IP estática para el módulo de contraseña. Para obtener información adicional, consulte la Dell PowerEdge Integrated Switch User's Guide (Guía del usuario del conmutador integrado Dell PowerEdge). Una vez configurado el módulo de conmutaci - Dell PowerEdge 1655MC | System
Configuration Guide - Page 205
Integración del sistema en red El Dell™ PowerEdge™ 1655MC es esencialmente una red autocontenida. La Tabla 7-2 y la Tabla 7-3 muestran la asignación de los puertos internos y externos. Tabla 7-2. Asignación del puerto de red interno Puerto - Dell PowerEdge 1655MC | System
Configuration Guide - Page 206
www.dell.com | support.dell.com Tabla 7-3. Puertos de enlace ascendente o externo en el conmutador de red Dell recomienda configuraciones básicas como la adición de enlaces o la canalización para maximizar el rendimiento y disponibilidad de la red. En los ejemplos siguientes, el PowerEdge 1655MC - Dell PowerEdge 1655MC | System
Configuration Guide - Page 207
Figura 7-5. Módulos de conmutación integrados conectados a un solo conmutador externo cliente dirección ip canal conmutador de red externo canal módulo de conmutación 1 puertos puertos de enlace internos ascenden- (6) te (4) módulo de conmutación 2 puertos de enlace ascendente (4) puertos - Dell PowerEdge 1655MC | System
Configuration Guide - Page 208
www.dell.com | support.dell.com Es posible configurar un canal utilizando la GUI basada en desde el puerto serie del módulo de administración de red, realice los pasos siguientes: 1 Escriba connect switch-x, donde x es el número de conmutador. 2 En el indicador #, escriba: #Config (config)# - Dell PowerEdge 1655MC | System
Configuration Guide - Page 209
Program (Programa de servidor avanzado Broadcom), que se encuentra en el CD de Dell OpenManage Server Assistant. SLB es el único método de coordinación de LOM admitido en el PowerEdge 1655MC. NOTA: Cuando utilice los controladores Broadcom para configurar un equipo SLB, el software solamente realiza - Dell PowerEdge 1655MC | System
Configuration Guide - Page 210
www.dell.com | support.dell.com Figura 7-6. Módulos de conmutación integrados conectados a dos conmutadores externos canal conmutador de red externo cliente dirección ip 1 conmutador de red externo módulo de conmutación 1 - Dell PowerEdge 1655MC | System
Configuration Guide - Page 211
sistema con un conmutador KVM analógico. Figura 7-8. Administración del sistema con un conmutador KVM analógico conmutador KVM analógico PowerEdge 1655MC Sistemas PowerEdge La Figura 7-9 muestra un ejemplo de cómo se puede administrar el sistema utilizando un conmutador KVM-sobre-IP. Guía de - Dell PowerEdge 1655MC | System
Configuration Guide - Page 212
.com | support.dell.com NOTA: La conexión directa solamente se admite en conmutadores KVM-sobre-IP de Dell. Figura 7-9. Administración del sistema con un conmutador KVM-sobreIP cable KVM cable CAT 5 GUI KVM conversor de CAT 5 a PS/2 HD/15 conmutador KVM analógico cables KVM PowerEdge 1655MC - Dell PowerEdge 1655MC | System
Configuration Guide - Page 213
1 Pulse para iniciar OSCAR. Aparece el cuadro de diálogo Main (Principal). 2 Si se ha asignado una contraseña, aparece el cuadro de diálogo Password (Contraseña). 3 Escriba su contraseña y haga clic en OK. Aparece el cuadro de diálogo Main (Principal). El estado de los servidores del - Dell PowerEdge 1655MC | System
Configuration Guide - Page 214
www.dell.com | support.dell.com Conceptos básicos de desplazamiento en OSCAR La Tabla 7-4 describe la forma de utilizar el teclado y el ratón para desplazarse en OSCAR. Tabla 7-4. Teclas de - Dell PowerEdge 1655MC | System
Configuration Guide - Page 215
Configuración de OSCAR Puede configurar el sistema KVM desde el menú Setup (Configuración) dentro de OSCAR. Haga clic en Names (Nombres) al configurar el conmutador KVM para identificar los servidores mediante nombres únicos. Seleccione otras características de configuración para gestionar las - Dell PowerEdge 1655MC | System
Configuration Guide - Page 216
www.dell.com | support.dell.com Para acceder al cuadro de diálogo Names (Nombres): 1 Pulse . Aparece el cuadro de diálogo Main (Principal). 2 Haga clic en Setup- - Dell PowerEdge 1655MC | System
Configuration Guide - Page 217
3 Seleccione Name (Nombre) para ver servidores alfabéticamente por nombre, seleccione EID para ver numéricamente los módulos de servidor por número de EID, o bien seleccione Slot (Ranura) para ver numéricamente servidores por número de ranura. 4 Haga clic en Aceptar. Para fijar un tiempo de demora - Dell PowerEdge 1655MC | System
Configuration Guide - Page 218
www.dell.com | support.dell.com NOTA: Cuando se activa el salvapantallas, aparece el indicador FREE (Libre). El número de minutos en el campo Inactivity Time (Tiempo de inactividad) debe - Dell PowerEdge 1655MC | System
Configuration Guide - Page 219
6 Para Mode (Modo), seleccione Energy (Energía) si el monitor es compatible con ENERGY STAR®. Seleccione Screen (Pantalla) si el monitor no es compatible con ENERGY STAR®. PRECAUCIÓN: No utilice el ajuste Energy (Energía) si el monitor no es compatible con ENERGY STAR®. Pueden producirse daños en el - Dell PowerEdge 1655MC | System
Configuration Guide - Page 220
www.dell.com | support.dell.com 9 Pulse para salir de Adapter Properties Menu (Menú de propiedades duplicación integrada, consulte la Dell PowerEdge RAID Controller 4/im Integrated Mirroring Guide (Guía de duplicación integrada de la controladora RAID 4/im Dell PowerEdge) Uso del software de - Dell PowerEdge 1655MC | System
Configuration Guide - Page 221
ón IP a los módulos de servidor que estén esperando para su implantación. Instale el software Instalación remota desde el CD Dell OpenManage Systems Management. Para obtener información adicional, consulte la Dell OpenManage Remote Install User's Guide (Guía del usuario para instalación remota de - Dell PowerEdge 1655MC | System
Configuration Guide - Page 222
www.dell.com | support.dell.com 7-28 Guía de configuración del sistema - Dell PowerEdge 1655MC | System
Configuration Guide - Page 223
Índice A acceso remoto características, 7-5 uso, 7-5 administración remota configurar sistema cliente, 7-6 asignación de puerto módulo de conmutación de red, 7-11 C características módulo de administración del sistema, 7-5 panel posterior, 7-2 configuración PERC 4/im, 7-25 configurar canal dinámico
-
 1
1 -
 2
2 -
 3
3 -
 4
4 -
 5
5 -
 6
6 -
 7
7 -
8
-
9
-
10
-
11
-
12
-
13
-
14
-
15
-
16
-
17
-
18
-
19
-
20
-
21
-
22
-
23
-
24
-
25
-
26
-
27
-
28
-
29
-
30
-
31
-
32
-
33
-
34
-
35
-
36
-
37
-
38
-
39
-
40
-
41
-
42
-
43
-
44
-
45
-
46
-
47
-
48
-
49
-
50
-
51
-
52
-
53
-
54
-
55
-
56
-
57
-
58
-
59
-
60
-
61
-
62
-
63
-
64
-
65
-
66
-
67
-
68
-
69
-
70
-
71
-
72
-
73
-
74
-
75
-
76
-
77
-
78
-
79
-
80
-
81
-
82
-
83
-
84
-
85
-
86
-
87
-
88
-
89
-
90
-
91
-
92
-
93
-
94
-
95
-
96
-
97
-
98
-
99
-
100
-
101
-
102
-
103
-
104
-
105
-
106
-
107
-
108
-
109
-
110
-
111
-
112
-
113
-
114
-
115
-
116
-
117
-
118
-
119
-
120
-
121
-
122
-
123
-
124
-
125
-
126
-
127
-
128
-
129
-
130
-
131
-
132
-
133
-
134
-
135
-
136
-
137
-
138
-
139
-
140
-
141
-
142
-
143
-
144
-
145
-
146
-
147
-
148
-
149
-
150
-
151
-
152
-
153
-
154
-
155
-
156
-
157
-
158
-
159
-
160
-
161
-
162
-
163
-
164
-
165
-
166
-
167
-
168
-
169
-
170
-
171
-
172
-
173
-
174
-
175
-
176
-
177
-
178
-
179
-
180
-
181
-
182
-
183
-
184
-
185
-
186
-
187
-
188
-
189
-
190
-
191
-
192
-
193
-
194
-
195
-
196
-
197
-
198
-
199
-
200
-
201
-
202
-
203
-
204
-
205
-
206
-
207
-
208
-
209
-
210
-
211
-
212
-
213
-
214
-
215
-
216
-
217
-
218
-
219
-
220
-
221
-
222
-
223
 |
 |

www.dell.com | support.dell.com
Dell™ PowerEdge™ 1655MC Systems
System Configuration Guide