Dell PowerEdge 1655MC System Configuration Guide - Page 11
Using the Network Switch Module
 |
View all Dell PowerEdge 1655MC manuals
Add to My Manuals
Save this manual to your list of manuals |
Page 11 highlights
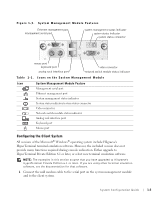
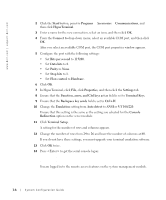
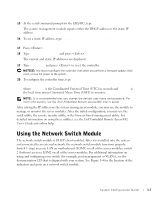
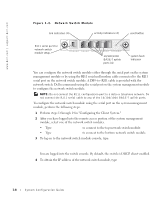
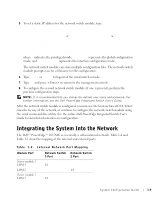
15 At the serial command prompt for the ERA/MC, type racadm getniccfg. The system management module reports either the DHCP address or the static IP address. 16 To set a static IP address, type racadm setniccfg - s . 17 Press . 18 Type racadm getncicfg and press . The current and static IP addresses are displayed. 19 Type racreset and press to reset the controller. NOTICE: You must reconfigure the controller time when you perform a firmware update, RAC reset, or lose AC power to the system. 20 To configure the controller time, type racadm setractime - [-o ] where utctime is the Coordinated Universal Time (UTC) in seconds and offset is the local time minus Greenwich Mean Time (GMT) in minutes. NOTE: It is recommended that you change the default user name and password. For more information, see the Dell Embedded Remote Access/MC User's Guide. After setting the IP address on the system management module, you may use the module to manage or monitor the server modules. After the initial configuration, you may use the serial utility, the remote racadm utility, or the browser-based management utility. For detailed information on using these utilities, see the Dell Embedded Remote Access/MC User's Guide and online help. Using the Network Switch Module The network switch module is DHCP client-enabled. After it is installed into the system and connected to an external network, the network switch module functions properly. Switch 1 (top) accesses LAN on motherboard (LOM1) on all of the server modules; switch 2 (bottom) accesses LOM2 on all of the server modules. For additional information on using and configuring your switch (for example, port management or VLANs), see the documentation CD that is shipped with your system. See Figure 1-4 for the location of the indicators and ports on a network switch module. System Configuration Guide 1-7
-
 1
1 -
2
-
3
-
4
-
5
-
 6
6 -
 7
7 -
 8
8 -
 9
9 -
 10
10 -
 11
11 -
 12
12 -
 13
13 -
 14
14 -
 15
15 -
 16
16 -
17
-
18
-
19
-
20
-
21
-
22
-
23
-
24
-
25
-
26
-
27
-
28
-
29
-
30
-
31
-
32
-
33
-
34
-
35
-
36
-
37
-
38
-
39
-
40
-
41
-
42
-
43
-
44
-
45
-
46
-
47
-
48
-
49
-
50
-
51
-
52
-
53
-
54
-
55
-
56
-
57
-
58
-
59
-
60
-
61
-
62
-
63
-
64
-
65
-
66
-
67
-
68
-
69
-
70
-
71
-
72
-
73
-
74
-
75
-
76
-
77
-
78
-
79
-
80
-
81
-
82
-
83
-
84
-
85
-
86
-
87
-
88
-
89
-
90
-
91
-
92
-
93
-
94
-
95
-
96
-
97
-
98
-
99
-
100
-
101
-
102
-
103
-
104
-
105
-
106
-
107
-
108
-
109
-
110
-
111
-
112
-
113
-
114
-
115
-
116
-
117
-
118
-
119
-
120
-
121
-
122
-
123
-
124
-
125
-
126
-
127
-
128
-
129
-
130
-
131
-
132
-
133
-
134
-
135
-
136
-
137
-
138
-
139
-
140
-
141
-
142
-
143
-
144
-
145
-
146
-
147
-
148
-
149
-
150
-
151
-
152
-
153
-
154
-
155
-
156
-
157
-
158
-
159
-
160
-
161
-
162
-
163
-
164
-
165
-
166
-
167
-
168
-
169
-
170
-
171
-
172
-
173
-
174
-
175
-
176
-
177
-
178
-
179
-
180
-
181
-
182
-
183
-
184
-
185
-
186
-
187
-
188
-
189
-
190
-
191
-
192
-
193
-
194
-
195
-
196
-
197
-
198
-
199
-
200
-
201
-
202
-
203
-
204
-
205
-
206
-
207
-
208
-
209
-
210
-
211
-
212
-
213
-
214
-
215
-
216
-
217
-
218
-
219
-
220
-
221
-
222
-
223
 |
 |