Dell Precision Tower 7810 Dell Precision Tower 7810 Owners Manual - Page 21
Installing the HDD Thermal Sensor, Removing the Input/Output (I/O) Panel, computer cover
 |
View all Dell Precision Tower 7810 manuals
Add to My Manuals
Save this manual to your list of manuals |
Page 21 highlights
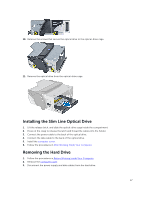
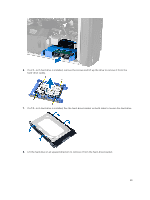
5. Release the latch that secures the HDD thermal sensor. Here, the HDD thermal sensor is attached to the hard drive. Installing the HDD Thermal Sensor NOTE: The HDD thermal sensor is an optional component and your computer may not ship with it. 1. Connect the HDD thermal sensor to the SAS HDD component that you wish to monitor the temperature, and secure it with the latch. 2. Attach the HDD thermal sensor cable to the system board. 3. Install the computer cover. 4. Follow the procedures in After Working Inside Your Computer. Removing the Input/Output (I/O) Panel 1. Follow the procedures in Before Working Inside Your Computer. 2. Remove: a. computer cover b. front bezel 3. Remove the screws that secure the I/O panel cage to the chassis. 21
-
 1
1 -
2
-
3
-
4
-
5
-
6
-
7
-
8
-
9
-
10
-
11
-
12
-
13
-
14
-
15
-
 16
16 -
 17
17 -
 18
18 -
 19
19 -
 20
20 -
 21
21 -
 22
22 -
 23
23 -
 24
24 -
 25
25 -
 26
26 -
27
-
28
-
29
-
30
-
31
-
32
-
33
-
34
-
35
-
36
-
37
-
38
-
39
-
40
-
41
-
42
-
43
-
44
-
45
-
46
-
47
-
48
-
49
-
50
-
51
-
52
-
53
-
54
-
55
-
56
-
57
-
58
-
59
-
60
-
61
-
62
-
63
-
64
-
65
-
66
-
67
-
68
 |
 |

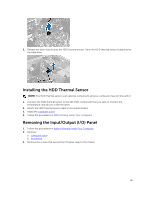
5.
Release the latch that secures the HDD thermal sensor. Here, the HDD thermal sensor is attached to
the hard drive.
Installing the HDD Thermal Sensor
NOTE:
The HDD thermal sensor is an optional component and your computer may not ship with it.
1.
Connect the HDD thermal sensor to the SAS HDD component that you wish to monitor the
temperature, and secure it with the latch.
2.
Attach the HDD thermal sensor cable to the system board.
3.
Install the
computer cover
.
4.
Follow the procedures in
After Working Inside Your Computer
.
Removing the Input/Output (I/O) Panel
1.
Follow the procedures in
Before Working Inside Your Computer
.
2.
Remove:
a.
computer cover
b.
front bezel
3.
Remove the screws that secure the I/O panel cage to the chassis.
21