Dell Precision Tower 7810 Dell Precision Tower 7810 Owners Manual - Page 25
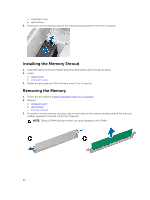
Installing the Memory, Removing the Coin-Cell Battery, Removing the Heatsink Assembly, memory shroud
 |
View all Dell Precision Tower 7810 manuals
Add to My Manuals
Save this manual to your list of manuals |
Page 25 highlights
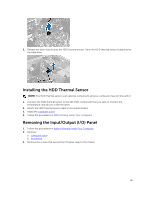
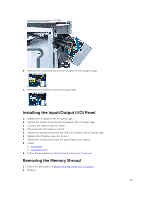
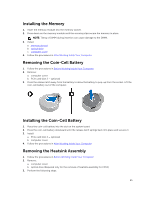
Installing the Memory 1. Insert the memory module into the memory socket. 2. Press down on the memory module until the securing clips secure the memory in place. NOTE: Tilting of DIMM during insertion can cause damage to the DIMM. 3. Install: a. memory shroud b. optical drive c. computer cover 4. Follow the procedures in After Working Inside Your Computer. Removing the Coin-Cell Battery 1. Follow the procedures in Before Working Inside Your Computer. 2. Remove: a. computer cover b. PCIe card (slot 2 - optional) 3. Press the release latch away from the battery to allow the battery to pop-up from the socket. Lift the coin-cell battery out of the computer. Installing the Coin-Cell Battery 1. Place the coin-cell battery into the slot on the system board. 2. Press the coin-cell battery downward until the release latch springs back into place and secures it. 3. Install: a. PCIe card (slot 2 - optional) b. computer cover 4. Follow the procedures in After Working Inside Your Computer. Removing the Heatsink Assembly 1. Follow the procedures in Before Working Inside Your Computer. 2. Remove: a. computer cover b. optical drive (Required only for the removal of heatsink assembly for CPU1) 3. Perform the following steps: 25
-
 1
1 -
2
-
3
-
4
-
5
-
6
-
7
-
8
-
9
-
10
-
11
-
12
-
13
-
14
-
15
-
16
-
17
-
18
-
19
-
 20
20 -
 21
21 -
 22
22 -
 23
23 -
 24
24 -
 25
25 -
 26
26 -
 27
27 -
 28
28 -
 29
29 -
 30
30 -
31
-
32
-
33
-
34
-
35
-
36
-
37
-
38
-
39
-
40
-
41
-
42
-
43
-
44
-
45
-
46
-
47
-
48
-
49
-
50
-
51
-
52
-
53
-
54
-
55
-
56
-
57
-
58
-
59
-
60
-
61
-
62
-
63
-
64
-
65
-
66
-
67
-
68
 |
 |
