Dell S500WI User Guide - Page 116
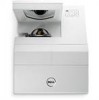
Changing the Lamp - projector bulb
 |
UPC - 884116063018
View all Dell S500WI manuals
Add to My Manuals
Save this manual to your list of manuals |
Page 116 highlights
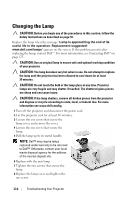
Changing the Lamp CAUTION: Before you begin any of the procedures in this section, follow the Safety Instructions as described on page 10. Replace the lamp when the message "Lamp is approaching the end of its useful life in the operation. Replacement suggested! www.dell.com/lamps" appears on the screen. If this problem persists after replacing the lamp, contact Dell™. For more information, see Contacting Dell™on page 125. CAUTION: Use an original lamp to ensure safe and optimal working condition of your projector. CAUTION: The lamp becomes very hot when in use. Do not attempt to replace the lamp until the projector has been allowed to cool down for at least 30 minutes. CAUTION: Do not touch the bulb or the lamp glass at any time. Projector lamps are very fragile and may shatter if touched. The shattered glass pieces are sharp and can cause injury. CAUTION: If the lamp shatters, remove all broken pieces from the projector and dispose or recycle according to state, local, or federal law. For more information see www.dell.com/hg. 1 Turn off the projector and disconnect the power cord. 2 Let the projector cool for at least 30 minutes. 3 Loosen the one screw that secure the lamp cover, and remove the cover. 4 Loosen the one screw that secure the lamp. 5 Pull the lamp up by its metal handle. NOTE: Dell™ may require lamps replaced under warranty to be returned to Dell™. Otherwise, contact your local waste disposal agency for the address of the nearest deposit site. 6 Replace with the new lamp. 7 Tighten the two screws that secure the lamp. 8 Replace the lamp cover and tighten the one screw. 116 Troubleshooting Your Projector
-
 1
1 -
2
-
3
-
4
-
5
-
6
-
7
-
8
-
9
-
10
-
11
-
12
-
13
-
14
-
15
-
16
-
17
-
18
-
19
-
20
-
21
-
22
-
23
-
24
-
25
-
26
-
27
-
28
-
29
-
30
-
31
-
32
-
33
-
34
-
35
-
36
-
37
-
38
-
39
-
40
-
41
-
42
-
43
-
44
-
45
-
46
-
47
-
48
-
49
-
50
-
51
-
52
-
53
-
54
-
55
-
56
-
57
-
58
-
59
-
60
-
61
-
62
-
63
-
64
-
65
-
66
-
67
-
68
-
69
-
70
-
71
-
72
-
73
-
74
-
75
-
76
-
77
-
78
-
79
-
80
-
81
-
82
-
83
-
84
-
85
-
86
-
87
-
88
-
89
-
90
-
91
-
92
-
93
-
94
-
95
-
96
-
97
-
98
-
99
-
100
-
101
-
102
-
103
-
104
-
105
-
106
-
107
-
108
-
109
-
110
-
 111
111 -
 112
112 -
 113
113 -
 114
114 -
 115
115 -
 116
116 -
 117
117 -
 118
118 -
 119
119 -
 120
120 -
 121
121 -
122
-
123
-
124
-
125
-
126
-
127
-
128
-
129
-
130
-
131
-
132
 |
 |
