Dell Studio XPS 13 Setup Guide - Page 14
Setting Up 5.1 Audio Connections, IDT Audio Control Panel - screen
 |
UPC - 883685979287
View all Dell Studio XPS 13 manuals
Add to My Manuals
Save this manual to your list of manuals |
Page 14 highlights
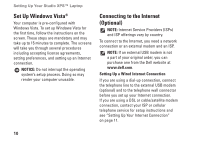
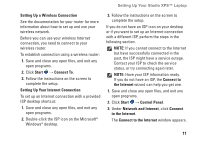
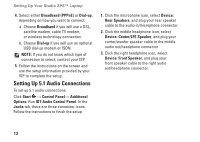
Setting Up Your Studio XPS™ Laptop 4. Select either Broadband (PPPoE) or Dial-up, depending on how you want to connect: a. Choose Broadband if you will use a DSL, satellite modem, cable TV modem, or wireless technology connection. b. Choose Dial-up if you will use an optional USB dial-up modem or ISDN. NOTE: If you do not know which type of connection to select, contact your ISP. 5. Follow the instructions on the screen and use the setup information provided by your ISP to complete the setup. Setting Up 5.1 Audio Connections To set up 5.1 audio connections: Click Start → Control Panel→ Additional Options. Run IDT Audio Control Panel. In the Jacks tab, there are three connector icons. Follow the instructions to finish the setup. 1. Click the microphone icon, select Device: Rear Speakers, and plug your rear speaker cable to the audio in/microphone connector. 2. Click the middle headphone icon, select Device: Center/LFE Speaker, and plug your center/woofer speaker cable to the middle audio out/headphone connector. 3. Click the right headphone icon, select Device: Front Speaker, and plug your front speaker cable to the right audio out/headphone connector. 12
-
 1
1 -
2
-
3
-
4
-
5
-
6
-
7
-
8
-
 9
9 -
 10
10 -
 11
11 -
 12
12 -
 13
13 -
 14
14 -
 15
15 -
 16
16 -
 17
17 -
 18
18 -
 19
19 -
20
-
21
-
22
-
23
-
24
-
25
-
26
-
27
-
28
-
29
-
30
-
31
-
32
-
33
-
34
-
35
-
36
-
37
-
38
-
39
-
40
-
41
-
42
-
43
-
44
-
45
-
46
-
47
-
48
-
49
-
50
-
51
-
52
-
53
-
54
-
55
-
56
-
57
-
58
-
59
-
60
-
61
-
62
-
63
-
64
-
65
-
66
-
67
-
68
-
69
-
70
-
71
-
72
-
73
-
74
 |
 |