Dell U3419W UltraSharp Monitor Users Guide - Page 35
Removing the Monitor Stand, Wall Mounting (Optional), stand is bought
 |
View all Dell U3419W manuals
Add to My Manuals
Save this manual to your list of manuals |
Page 35 highlights
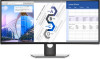
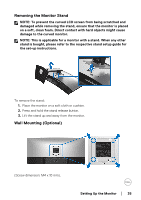
Removing the Monitor Stand NOTE: To prevent the curved LCD screen from being scratched and damaged while removing the stand, ensure that the monitor is placed on a soft, clean foam. Direct contact with hard objects might cause damage to the curved monitor. NOTE: This is applicable for a monitor with a stand. When any other stand is bought, please refer to the respective stand setup guide for the set-up instructions. To remove the stand: 1. Place the monitor on a soft cloth or cushion. 2. Press and hold the stand release button. 3. Lift the stand up and away from the monitor. Wall Mounting (Optional) (Screw dimension: M4 x 10 mm). Setting Up the Monitor │ 35
-
 1
1 -
2
-
3
-
4
-
5
-
6
-
7
-
8
-
9
-
10
-
11
-
12
-
13
-
14
-
15
-
16
-
17
-
18
-
19
-
20
-
21
-
22
-
23
-
24
-
25
-
26
-
27
-
28
-
29
-
 30
30 -
 31
31 -
 32
32 -
 33
33 -
 34
34 -
 35
35 -
 36
36 -
 37
37 -
 38
38 -
 39
39 -
 40
40 -
41
-
42
-
43
-
44
-
45
-
46
-
47
-
48
-
49
-
50
-
51
-
52
-
53
-
54
-
55
-
56
-
57
-
58
-
59
-
60
-
61
-
62
-
63
-
64
-
65
-
66
-
67
-
68
-
69
-
70
-
71
-
72
-
73
 |
 |

Setting Up the Monitor
±±
│
± ± 35
Removing the Monitor Stand
NOTE: To prevent the curved LCD screen from being scratched and
damaged while removing the stand, ensure that the monitor is placed
on a soft, clean foam. Direct contact with hard objects might cause
damage to the curved monitor.
NOTE: This is applicable for a monitor with a stand. When any other
stand is bought, please refer to the respective stand setup guide for
the set-up instructions.
To remove the stand:
1.
Place the monitor on a soft cloth or cushion.
2.
Press and hold the stand release button.
3.
Lift the stand up and away from the monitor.
Wall Mounting (Optional)
(Screw dimension: M4 x 10 mm).