Dell V505 All In One Inkjet Printer User's Guide - Page 103
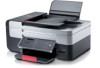
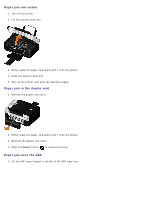
Scanning Problems, Make sure the document or photo is loaded correctly on the scanner glass.
 |
View all Dell V505 All In One Inkjet Printer manuals
Add to My Manuals
Save this manual to your list of manuals |
Page 103 highlights
c. Click Dell V505. In Windows XP or Windows 2000: Click Start® Programs or All Programs® Dell Printers® Dell V505. 2. Select Dell Imaging Toolbox. The Dell Imaging Toolbox dialog box opens. 3. From the Home screen, click My Photo Album. 4. Click File® Open to select the image that you want to edit. 5. With an image open, click the Advanced tab. 6. Click Image Patterns. The Image Patterns dialog box opens. 7. Select Reduce stray marks (background noise) on color documents. 8. Move the slider from left to right to adjust the quantity of background noise on your scanned document. 9. Click OK. Make sure the document or photo is loaded correctly on the scanner glass. For more information, see Loading Original Documents on the Scanner Glass. Check paper sizes. Make sure the paper size being used matches the size you selected on the operator panel or the Dell Imaging Toolbox. Scanning Problems Check for blinking lights and error messages on the printer. For more information, see Error Messages. Check the USB cable. Ensure the USB cable is firmly connected to your printer and your computer. Shut down the computer, reconnect the USB cable as shown on the Setting Up Your Printer poster, and then restart the computer. Determine if the printer software is installed. In Windows Vista: 1. Click ® Programs.
-
 1
1 -
2
-
3
-
4
-
5
-
6
-
7
-
8
-
9
-
10
-
11
-
12
-
13
-
14
-
15
-
16
-
17
-
18
-
19
-
20
-
21
-
22
-
23
-
24
-
25
-
26
-
27
-
28
-
29
-
30
-
31
-
32
-
33
-
34
-
35
-
36
-
37
-
38
-
39
-
40
-
41
-
42
-
43
-
44
-
45
-
46
-
47
-
48
-
49
-
50
-
51
-
52
-
53
-
54
-
55
-
56
-
57
-
58
-
59
-
60
-
61
-
62
-
63
-
64
-
65
-
66
-
67
-
68
-
69
-
70
-
71
-
72
-
73
-
74
-
75
-
76
-
77
-
78
-
79
-
80
-
81
-
82
-
83
-
84
-
85
-
86
-
87
-
88
-
89
-
90
-
91
-
92
-
93
-
94
-
95
-
96
-
97
-
 98
98 -
 99
99 -
 100
100 -
 101
101 -
 102
102 -
 103
103 -
 104
104 -
 105
105 -
 106
106 -
 107
107 -
 108
108 -
109
-
110
-
111
-
112
-
113
-
114
-
115
-
116
-
117
-
118
-
119
-
120
-
121
-
122
-
123
-
124
-
125
-
126
-
127
-
128
-
129
-
130
-
131
-
132
-
133
-
134
-
135
-
136
-
137
-
138
-
139
-
140
-
141
-
142
-
143
-
144
-
145
-
146
-
147
-
148
-
149
-
150
-
151
-
152
-
153
-
154
-
155
-
156
-
157
-
158
-
159
-
160
-
161
-
162
-
163
-
164
-
165
-
166
-
167
-
168
-
169
-
170
-
171
-
172
-
173
 |
 |