Dell XPS 13 9340 Owners Manual - Page 65
Installing the power button with fingerprint reader
 |
View all Dell XPS 13 9340 manuals
Add to My Manuals
Save this manual to your list of manuals |
Page 65 highlights
Figure 46. Installing the power button with fingerprint reader Steps NOTE: When installing the power button with fingerprint reader, open the display assembly to a 90-degree angle and then place the computer on the edge of a flat surface. Ensure to maintain the angle throughout the installation process to minimize the risk of damaging the thin display panel when applying torque to install and remove screws from the computer. Removing and installing Field Replaceable Units (FRUs) 65
-
 1
1 -
2
-
3
-
4
-
5
-
6
-
7
-
8
-
9
-
10
-
11
-
12
-
13
-
14
-
15
-
16
-
17
-
18
-
19
-
20
-
21
-
22
-
23
-
24
-
25
-
26
-
27
-
28
-
29
-
30
-
31
-
32
-
33
-
34
-
35
-
36
-
37
-
38
-
39
-
40
-
41
-
42
-
43
-
44
-
45
-
46
-
47
-
48
-
49
-
50
-
51
-
52
-
53
-
54
-
55
-
56
-
57
-
58
-
59
-
 60
60 -
 61
61 -
 62
62 -
 63
63 -
 64
64 -
 65
65 -
 66
66 -
 67
67 -
 68
68 -
 69
69 -
 70
70 -
71
-
72
-
73
-
74
-
75
-
76
-
77
-
78
-
79
-
80
-
81
-
82
-
83
-
84
-
85
-
86
-
87
-
88
-
89
-
90
-
91
-
92
-
93
-
94
-
95
-
96
-
97
-
98
-
99
-
100
-
101
-
102
 |
 |

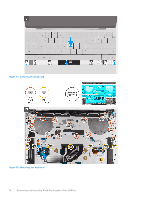
Figure 46. Installing the power button with fingerprint reader
Steps
NOTE:
When installing the power button with fingerprint reader, open the display assembly to a 90-degree angle and then
place the computer on the edge of a flat surface. Ensure to maintain the angle throughout the installation process to
minimize the risk of damaging the thin display panel when applying torque to install and remove screws from the computer.
Removing and installing Field Replaceable Units (FRUs)
65