Denon 2106 Operating Instructions - Page 44
Advanced Setup, Part 1 - avr remote control
 |
UPC - 081757506571
View all Denon 2106 manuals
Add to My Manuals
Save this manual to your list of manuals |
Page 44 highlights
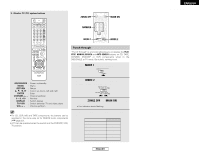
ENGLISH Advanced Setup - Part 1 Use System Setup to customize a variety of settings to suit your listening environment. For the contents of a system menu and the initial setting of this unit ( page 54, 55). Navigating through the System Setup Menu You can change the settings using the buttons on the remote control unit. MODE 1 Advanced Setup - Part 1 On screen display and front display The AVR-2106 is equipped with an intuitive and easy-to-understand on screen display, and is equipped with an alphanumeric front panel display that can also be used to check and adjust settings. We recommend that you use the on screen display when you make system adjustments. Some representative front display and on screen display examples are shown below. [ Front display ] Top menu Screen title No. [ On screen display ] Top menu SETUP ENTER CURSOR [ On screen display ] 2 1 Set the MODE 1 switch to "AUDIO". [ Display ] *Input Setup *Auto Setup/EQ *Speaker Setup Sub-menu title To select a menu, press the CURSOR D or H button. 2 Press the SETUP button to display the "System Setup" menu. 3 Press the CURSOR D or H button to select the menu, then press the ENTER button. 3 Press the ENTER button to enter the selected menu. 4 4 To change a setting, first select it pressing the CURSOR D or H button, and then change the setting pressing the CURSOR F or G button. *Digital In *COAX1 CD Main menu *Digital In Screen title No. Sub-menu title Main menu *AutoSet
-
 1
1 -
2
-
3
-
4
-
5
-
6
-
7
-
8
-
9
-
10
-
11
-
12
-
13
-
14
-
15
-
16
-
17
-
18
-
19
-
20
-
21
-
22
-
23
-
24
-
25
-
26
-
27
-
28
-
29
-
30
-
31
-
32
-
33
-
34
-
35
-
36
-
37
-
38
-
 39
39 -
 40
40 -
 41
41 -
 42
42 -
 43
43 -
 44
44 -
 45
45 -
 46
46 -
 47
47 -
 48
48 -
 49
49 -
50
-
51
-
52
-
53
-
54
-
55
-
56
-
57
-
58
-
59
-
60
-
61
-
62
-
63
-
64
-
65
-
66
-
67
-
68
-
69
-
70
-
71
-
72
 |
 |
