Denon S-302 Owners Manual - English - Page 24
Network Setup
 |
UPC - 081757507882
View all Denon S-302 manuals
Add to My Manuals
Save this manual to your list of manuals |
Page 24 highlights
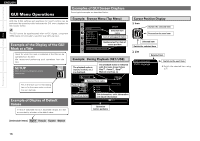
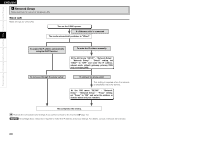
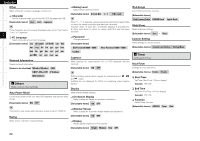
Getting Started Connections Setup Playback Remote Control Information Troubleshooting ENGLISH f Network Setup Make settings for wired or wireless LAN. Wired LAN Make settings for wired LAN. Turn on the S-302's power. If a Ethernet cable is connected The mode automatically switches to "Wired". To acquire the IP address automatically using the DHCP function To enter the IP address manually At the GUI menu "SETUP" - "Network Setup" - "Network Setup" - "Detail" setting, set "DHCP" to "OFF" and enter the IP address, subnet mask, default gateway, primary DNS and secondary DNS. To not pass through the proxy server To connect via proxy server This setting is required when the network is established via proxy servers. At the GUI menu "SETUP" - "Network Setup" - "Network Setup" - "Proxy" setting, set "Proxy" to "ON" and enter the address or domain name and port numbers. This completes the setting. Recheck the connections and settings if you cannot connect to the Internet (vpage 15). NOTE Knowledge about networks is required to make the IP address and proxy settings. For details, consult a network administrator. 20
-
 1
1 -
2
-
3
-
4
-
5
-
6
-
7
-
8
-
9
-
10
-
11
-
12
-
13
-
14
-
15
-
16
-
17
-
18
-
 19
19 -
 20
20 -
 21
21 -
 22
22 -
 23
23 -
 24
24 -
 25
25 -
 26
26 -
 27
27 -
 28
28 -
 29
29 -
30
-
31
-
32
-
33
-
34
-
35
-
36
-
37
-
38
-
39
-
40
-
41
-
42
-
43
-
44
-
45
-
46
-
47
-
48
-
49
-
50
-
51
-
52
-
53
-
54
-
55
-
56
-
57
-
58
 |
 |