Epson ActionNote 650 User Manual - Page 70
Fn F12, Ctrl Alt F12, Installing Optional Devices
 |
View all Epson ActionNote 650 manuals
Add to My Manuals
Save this manual to your list of manuals |
Page 70 highlights
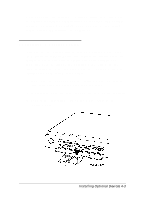
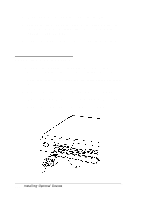
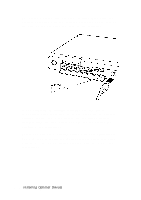
4. Connect the monitor cable to the VGA port. 5. If the connector has retaining screws, tighten them. 6. Connect the monitor power cable to a grounded electrical outlet. 7. Turn on the monitor first, then the computer. The display mode your computer uses depends on the setting you selected for the Display Mode option in the System Configuration utility. If you selected CRT, you see a display only on the external monitor. If you selected L C D, you must press Fn F12 to change the display to the external monitor. If you selected BOTH (available with active matrix or monochrome LCDS), you see a display on the external monitor and LCD simultaneously, and may want to press Fn F12 to change the display to the external monitor only. (If you are using an external keyboard, press Ctrl Alt F12 to change the display mode.) Be sure to run the SCU to change the setting of the Display Mode option so your monitor displays the way you want it to whenever you turn on or reset your computer. See Chapter 1 for instructions. 4-2 Installing Optional Devices
-
 1
1 -
2
-
3
-
4
-
5
-
6
-
7
-
8
-
9
-
10
-
11
-
12
-
13
-
14
-
15
-
16
-
17
-
18
-
19
-
20
-
21
-
22
-
23
-
24
-
25
-
26
-
27
-
28
-
29
-
30
-
31
-
32
-
33
-
34
-
35
-
36
-
37
-
38
-
39
-
40
-
41
-
42
-
43
-
44
-
45
-
46
-
47
-
48
-
49
-
50
-
51
-
52
-
53
-
54
-
55
-
56
-
57
-
58
-
59
-
60
-
61
-
62
-
63
-
64
-
 65
65 -
 66
66 -
 67
67 -
 68
68 -
 69
69 -
 70
70 -
 71
71 -
 72
72 -
 73
73 -
 74
74 -
 75
75 -
76
-
77
-
78
-
79
-
80
-
81
-
82
-
83
-
84
-
85
-
86
-
87
-
88
-
89
-
90
-
91
-
92
-
93
-
94
-
95
-
96
-
97
-
98
-
99
-
100
-
101
-
102
-
103
-
104
-
105
-
106
-
107
-
108
-
109
-
110
-
111
-
112
-
113
-
114
 |
 |
