Epson ActionNote 650 User Manual - Page 81
Removing and Replacing the Hard Disk Drive, new memory size. See Using Suspend To Disk Mode
 |
View all Epson ActionNote 650 manuals
Add to My Manuals
Save this manual to your list of manuals |
Page 81 highlights
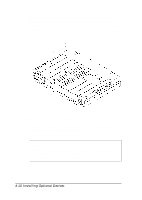
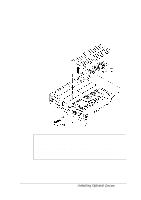
14. Turn the computer over and open the LCD screen. 15. Run the System Configuration utility, as described in Chapter 1, to make sure your computer recognizes the new memory configuration. (As soon as you turn on the computer, it will prompt you to run the SCU because of the memory size mismatch.) If you later remove or change the memory module, be sure to run the SCU again. 16. If you are using Suspend to Disk as your suspend mode, you should recreate the Suspend to Disk data file on your computer's hard disk drive so its size corresponds to your new memory size. See "Using Suspend To Disk Mode" in Chapter 3 for instructions. Removing and Replacing the Hard Disk Drive If you need to remove the hard disk drive, follow these steps: 1. Turn off the computer and any peripheral devices. 2. Disconnect any external device cables connected to the computer. 3. Close the LCD screen, if necessary. 4. Turn the computer over so the bottom faces up. 5. Follow the steps on pages 4-10 through 4-11 to remove the memory module cover and the CPU heat spreader. Installing Optional Devices 4-13
-
 1
1 -
2
-
3
-
4
-
5
-
6
-
7
-
8
-
9
-
10
-
11
-
12
-
13
-
14
-
15
-
16
-
17
-
18
-
19
-
20
-
21
-
22
-
23
-
24
-
25
-
26
-
27
-
28
-
29
-
30
-
31
-
32
-
33
-
34
-
35
-
36
-
37
-
38
-
39
-
40
-
41
-
42
-
43
-
44
-
45
-
46
-
47
-
48
-
49
-
50
-
51
-
52
-
53
-
54
-
55
-
56
-
57
-
58
-
59
-
60
-
61
-
62
-
63
-
64
-
65
-
66
-
67
-
68
-
69
-
70
-
71
-
72
-
73
-
74
-
75
-
 76
76 -
 77
77 -
 78
78 -
 79
79 -
 80
80 -
 81
81 -
 82
82 -
 83
83 -
 84
84 -
 85
85 -
 86
86 -
87
-
88
-
89
-
90
-
91
-
92
-
93
-
94
-
95
-
96
-
97
-
98
-
99
-
100
-
101
-
102
-
103
-
104
-
105
-
106
-
107
-
108
-
109
-
110
-
111
-
112
-
113
-
114
 |
 |
