Epson ActionNote 650 User Manual - Page 84
When you are sure the holes and pins are properly aligned, left side of the connector.
 |
View all Epson ActionNote 650 manuals
Add to My Manuals
Save this manual to your list of manuals |
Page 84 highlights
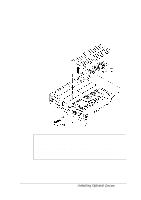
10. To reinstall the drive (or install a new one), position it as shown below; then place the rear of the drive beneath the lip of the computer's side panel. Leave the side of the drive containing the drive connector slightly above the compartment so you can connect the cable in the next step. 11. Align the holes in the cable connector with the group of 44 pins on the right side of the drive connector. Make sure the connector does not cover the group of four pins on the left side of the connector. 12. When you are sure the holes and pins are properly aligned, carefully push the cable connector straight onto the pins, pressing firmly and evenly along the width of the connector until it is fully seated. 4-16 Installing Optional Devices
-
 1
1 -
2
-
3
-
4
-
5
-
6
-
7
-
8
-
9
-
10
-
11
-
12
-
13
-
14
-
15
-
16
-
17
-
18
-
19
-
20
-
21
-
22
-
23
-
24
-
25
-
26
-
27
-
28
-
29
-
30
-
31
-
32
-
33
-
34
-
35
-
36
-
37
-
38
-
39
-
40
-
41
-
42
-
43
-
44
-
45
-
46
-
47
-
48
-
49
-
50
-
51
-
52
-
53
-
54
-
55
-
56
-
57
-
58
-
59
-
60
-
61
-
62
-
63
-
64
-
65
-
66
-
67
-
68
-
69
-
70
-
71
-
72
-
73
-
74
-
75
-
76
-
77
-
78
-
 79
79 -
 80
80 -
 81
81 -
 82
82 -
 83
83 -
 84
84 -
 85
85 -
 86
86 -
 87
87 -
 88
88 -
 89
89 -
90
-
91
-
92
-
93
-
94
-
95
-
96
-
97
-
98
-
99
-
100
-
101
-
102
-
103
-
104
-
105
-
106
-
107
-
108
-
109
-
110
-
111
-
112
-
113
-
114
 |
 |

10. To reinstall the drive (or install a new one), position it as
shown below; then place the rear of the drive beneath the
lip of the computer’s side panel. Leave the side of the drive
containing the drive connector slightly above the
compartment so you can connect the cable in the next step.
11. Align the holes in the cable connector with the group of
44 pins on the right side of the drive connector. Make sure
the connector does not cover the group of four pins on the
left side of the connector.
12. When you are sure the holes and pins are properly aligned,
carefully push the cable connector straight onto the pins,
pressing firmly and evenly along the width of the
connector until it is fully seated.
4-16
Installing Optional Devices