Epson BrightLink 480i User Manual - Page 116
If you make a mistake, press the, button on the remote control to go back to the previous circle.
 |
View all Epson BrightLink 480i manuals
Add to My Manuals
Save this manual to your list of manuals |
Page 116 highlights
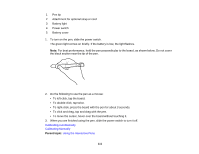
The circle disappears, and you see another circle lower than the first one. Note: For the most accurate calibration, make sure you touch the center of the circle. 7. Touch the center of the next circle, then repeat. When you get to the bottom of the column, the next circle appears at the top of a new column. Note: Make sure you are not blocking the signal between the pen and the interactive receiver (next to the projection window on the projector). If you make a mistake, press the Esc button on the remote control to go back to the previous circle. To restart the calibration process, press and hold the Esc button. 8. Continue until all of the circles disappear. 116
-
 1
1 -
2
-
3
-
4
-
5
-
6
-
7
-
8
-
9
-
10
-
11
-
12
-
13
-
14
-
15
-
16
-
17
-
18
-
19
-
20
-
21
-
22
-
23
-
24
-
25
-
26
-
27
-
28
-
29
-
30
-
31
-
32
-
33
-
34
-
35
-
36
-
37
-
38
-
39
-
40
-
41
-
42
-
43
-
44
-
45
-
46
-
47
-
48
-
49
-
50
-
51
-
52
-
53
-
54
-
55
-
56
-
57
-
58
-
59
-
60
-
61
-
62
-
63
-
64
-
65
-
66
-
67
-
68
-
69
-
70
-
71
-
72
-
73
-
74
-
75
-
76
-
77
-
78
-
79
-
80
-
81
-
82
-
83
-
84
-
85
-
86
-
87
-
88
-
89
-
90
-
91
-
92
-
93
-
94
-
95
-
96
-
97
-
98
-
99
-
100
-
101
-
102
-
103
-
104
-
105
-
106
-
107
-
108
-
109
-
110
-
 111
111 -
 112
112 -
 113
113 -
 114
114 -
 115
115 -
 116
116 -
 117
117 -
 118
118 -
 119
119 -
 120
120 -
 121
121 -
122
-
123
-
124
-
125
-
126
-
127
-
128
-
129
-
130
-
131
-
132
-
133
-
134
-
135
-
136
-
137
-
138
-
139
-
140
-
141
-
142
-
143
-
144
-
145
-
146
-
147
-
148
-
149
-
150
-
151
-
152
-
153
-
154
-
155
-
156
-
157
-
158
-
159
-
160
-
161
-
162
-
163
-
164
-
165
-
166
-
167
-
168
-
169
-
170
-
171
-
172
-
173
-
174
-
175
-
176
-
177
-
178
-
179
-
180
-
181
-
182
-
183
-
184
-
185
-
186
-
187
-
188
-
189
-
190
-
191
-
192
-
193
-
194
-
195
-
196
-
197
-
198
-
199
-
200
-
201
-
202
-
203
-
204
-
205
-
206
-
207
-
208
-
209
-
210
-
211
-
212
-
213
-
214
-
215
-
216
-
217
-
218
-
219
-
220
-
221
-
222
-
223
-
224
-
225
-
226
-
227
-
228
-
229
-
230
-
231
-
232
-
233
-
234
-
235
-
236
-
237
-
238
-
239
-
240
-
241
-
242
-
243
-
244
-
245
-
246
-
247
-
248
-
249
-
250
-
251
-
252
-
253
-
254
-
255
-
256
-
257
-
258
-
259
 |
 |

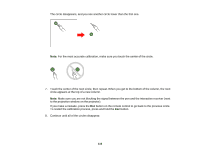
The circle disappears, and you see another circle lower than the first one.
Note:
For the most accurate calibration, make sure you touch the center of the circle.
7.
Touch the center of the next circle, then repeat. When you get to the bottom of the column, the next
circle appears at the top of a new column.
Note:
Make sure you are not blocking the signal between the pen and the interactive receiver (next
to the projection window on the projector).
If you make a mistake, press the
Esc
button on the remote control to go back to the previous circle.
To restart the calibration process, press and hold the
Esc
button.
8.
Continue until all of the circles disappear.
116