Epson BrightLink 480i User Manual - Page 76
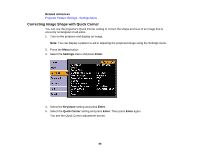
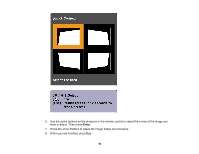
Adjusting the Image Height, Turn on the projector and display an image.
 |
View all Epson BrightLink 480i manuals
Add to My Manuals
Save this manual to your list of manuals |
Page 76 highlights
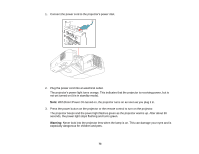
Adjusting the Image Height If you are projecting from a table or other flat surface, and the image is too high or low, you can adjust the image height using the projector's adjustable feet. Make sure the feet have been installed. Caution: Tilting the projector will distort the image shape and may cause difficulty focusing the image. For interactive use, make sure the projector is not tilted an an angle of more than ± 3º vertically or horizontally. 1. Turn on the projector and display an image. 2. To raise the image, extend the rear feet by rotating them. 3. To lower the image, extend the front foot by rotating it. 76
-
 1
1 -
2
-
3
-
4
-
5
-
6
-
7
-
8
-
9
-
10
-
11
-
12
-
13
-
14
-
15
-
16
-
17
-
18
-
19
-
20
-
21
-
22
-
23
-
24
-
25
-
26
-
27
-
28
-
29
-
30
-
31
-
32
-
33
-
34
-
35
-
36
-
37
-
38
-
39
-
40
-
41
-
42
-
43
-
44
-
45
-
46
-
47
-
48
-
49
-
50
-
51
-
52
-
53
-
54
-
55
-
56
-
57
-
58
-
59
-
60
-
61
-
62
-
63
-
64
-
65
-
66
-
67
-
68
-
69
-
70
-
 71
71 -
 72
72 -
 73
73 -
 74
74 -
 75
75 -
 76
76 -
 77
77 -
 78
78 -
 79
79 -
 80
80 -
 81
81 -
82
-
83
-
84
-
85
-
86
-
87
-
88
-
89
-
90
-
91
-
92
-
93
-
94
-
95
-
96
-
97
-
98
-
99
-
100
-
101
-
102
-
103
-
104
-
105
-
106
-
107
-
108
-
109
-
110
-
111
-
112
-
113
-
114
-
115
-
116
-
117
-
118
-
119
-
120
-
121
-
122
-
123
-
124
-
125
-
126
-
127
-
128
-
129
-
130
-
131
-
132
-
133
-
134
-
135
-
136
-
137
-
138
-
139
-
140
-
141
-
142
-
143
-
144
-
145
-
146
-
147
-
148
-
149
-
150
-
151
-
152
-
153
-
154
-
155
-
156
-
157
-
158
-
159
-
160
-
161
-
162
-
163
-
164
-
165
-
166
-
167
-
168
-
169
-
170
-
171
-
172
-
173
-
174
-
175
-
176
-
177
-
178
-
179
-
180
-
181
-
182
-
183
-
184
-
185
-
186
-
187
-
188
-
189
-
190
-
191
-
192
-
193
-
194
-
195
-
196
-
197
-
198
-
199
-
200
-
201
-
202
-
203
-
204
-
205
-
206
-
207
-
208
-
209
-
210
-
211
-
212
-
213
-
214
-
215
-
216
-
217
-
218
-
219
-
220
-
221
-
222
-
223
-
224
-
225
-
226
-
227
-
228
-
229
-
230
-
231
-
232
-
233
-
234
-
235
-
236
-
237
-
238
-
239
-
240
-
241
-
242
-
243
-
244
-
245
-
246
-
247
-
248
-
249
-
250
-
251
-
252
-
253
-
254
-
255
-
256
-
257
-
258
-
259
 |
 |

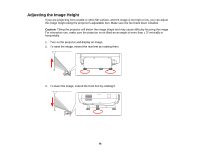
Adjusting the Image Height
If you are projecting from a table or other flat surface, and the image is too high or low, you can adjust
the image height using the projector's adjustable feet. Make sure the feet have been installed.
Caution:
Tilting the projector will distort the image shape and may cause difficulty focusing the image.
For interactive use, make sure the projector is not tilted an an angle of more than ± 3º vertically or
horizontally.
1.
Turn on the projector and display an image.
2.
To raise the image, extend the rear feet by rotating them.
3.
To lower the image, extend the front foot by rotating it.
76