Epson ET-2750 Users Guide - Page 102
Scanning, Starting a Scan, Starting a Scan Using the Product Control Panel
 |
View all Epson ET-2750 manuals
Add to My Manuals
Save this manual to your list of manuals |
Page 102 highlights
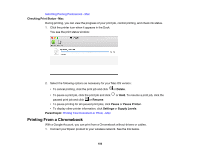
Scanning You can scan your originals and save them as digital files. Starting a Scan Scanning in Epson Scan 2 Starting a Scan After placing your originals on your product for scanning, start scanning using one of these methods. Starting a Scan Using the Product Control Panel Starting a Scan Using the Epson Scan 2 Icon Starting a Scan from a Scanning Program Starting a Scan from a Smart Device Parent topic: Scanning Related tasks Placing Originals on the Scanner Glass Starting a Scan Using the Product Control Panel You can scan an image to your computer using your product's control panel buttons. Your product automatically selects default scan settings, but you can view or change them as necessary. When scanning to a memory card, you can change the scan settings using the product's LCD screen. If you are scanning to a computer, you can change the default scan settings using the Event Manager utility on the computer. 1. Make sure you installed the product software and connected the product to your computer or network. Note: Restart your computer after installing the product software to enable scanning from the control panel. Also make sure the Event Manager program is not being blocked by your firewall or security software. 2. Press the home button, if necessary. 3. Press the left or right arrow button to select Scan and press the OK button. 102
-
 1
1 -
2
-
3
-
4
-
5
-
6
-
7
-
8
-
9
-
10
-
11
-
12
-
13
-
14
-
15
-
16
-
17
-
18
-
19
-
20
-
21
-
22
-
23
-
24
-
25
-
26
-
27
-
28
-
29
-
30
-
31
-
32
-
33
-
34
-
35
-
36
-
37
-
38
-
39
-
40
-
41
-
42
-
43
-
44
-
45
-
46
-
47
-
48
-
49
-
50
-
51
-
52
-
53
-
54
-
55
-
56
-
57
-
58
-
59
-
60
-
61
-
62
-
63
-
64
-
65
-
66
-
67
-
68
-
69
-
70
-
71
-
72
-
73
-
74
-
75
-
76
-
77
-
78
-
79
-
80
-
81
-
82
-
83
-
84
-
85
-
86
-
87
-
88
-
89
-
90
-
91
-
92
-
93
-
94
-
95
-
96
-
 97
97 -
 98
98 -
 99
99 -
 100
100 -
 101
101 -
 102
102 -
 103
103 -
 104
104 -
 105
105 -
 106
106 -
 107
107 -
108
-
109
-
110
-
111
-
112
-
113
-
114
-
115
-
116
-
117
-
118
-
119
-
120
-
121
-
122
-
123
-
124
-
125
-
126
-
127
-
128
-
129
-
130
-
131
-
132
-
133
-
134
-
135
-
136
-
137
-
138
-
139
-
140
-
141
-
142
-
143
-
144
-
145
-
146
-
147
-
148
-
149
-
150
-
151
-
152
-
153
-
154
-
155
-
156
-
157
-
158
-
159
-
160
-
161
-
162
-
163
-
164
-
165
-
166
-
167
-
168
-
169
-
170
-
171
-
172
-
173
-
174
-
175
-
176
-
177
-
178
-
179
-
180
-
181
-
182
-
183
-
184
-
185
-
186
-
187
-
188
-
189
-
190
-
191
-
192
-
193
-
194
-
195
-
196
-
197
-
198
-
199
-
200
-
201
-
202
-
203
-
204
-
205
-
206
-
207
-
208
-
209
-
210
-
211
-
212
-
213
-
214
-
215
-
216
-
217
-
218
-
219
-
220
-
221
-
222
-
223
-
224
-
225
-
226
 |
 |